What this document is
This is the verification walkthrough for our Week 2 capstone build. Every fact below was confirmed by running a command or opening a screen on 2026-05-05. It's organized in five phases — Host first, then each VM in dependency order — so you can re-run it from a cold start and arrive at the same conclusions.
Read it as "how I would prove this build works to someone who doesn't trust me yet". That's the spirit.
pfsense).Topology — what we actually built
The instructor's new Week 1–5 guide says NAT lives on the Proxmox host (via iptables). Our actual build delegates routing/NAT/DHCP/DNS to pfSense2 (VM 103), which has NICs on all three bridges. The host's iptables rules exist but are vestigial — pfSense2 NATs every internal packet before the host ever sees it.
🗺️ Open topology presentation → — 13-slide walkthrough for class
172.16.0.0/24
vmbr2 — LAN 192.168.0.0/24
Phase 1 — Proxmox host inspection
Verified ✓Goal: snapshot bridges, VM inventory, NAT rules, and ip_forward state from the host without depending on any VM being reachable.
Step 1.1 — Open the Proxmox host shell
Web UI shell (preferred — clipboard works)
In Safari, open https://10.10.10.10:8006 → log in as root → in the left tree click the node tctmachine → top tab >_ Shell. A web terminal opens with prompt root@tctmachine:~#.
Alternative: from your Mac Terminal, ssh root@10.10.10.10. Same result, but the web shell pastes more reliably from macOS.
Step 1.2 — Run the host inspection block
Paste this single block, hit Enter
# prints host info, all bridges, /etc/network/interfaces, qm list, then every VM config
echo "=== HOST ==="
hostname
pveversion
ip -br addr
echo
echo "=== BRIDGES (/etc/network/interfaces) ==="
cat /etc/network/interfaces
echo
echo "=== VM LIST ==="
qm list
echo
for id in 100 101 102 103 104; do
  echo
  echo "=========================================="
  echo "  VM $id"
  echo "=========================================="
  qm config $id 2>&1
done
Step 1.3 — Run the NAT / iptables follow-up block
Resolves "where do the NAT rules actually live"
echo "=== NAT / iptables — where do the rules live? ==="
ls -la /etc/network/interfaces.d/ 2>/dev/null
echo "--- interfaces.d contents ---"
cat /etc/network/interfaces.d/* 2>/dev/null || echo "(empty or missing)"
echo
echo "--- /etc/iptables/rules.v4 ---"
cat /etc/iptables/rules.v4 2>/dev/null || echo "(no persistent file)"
echo
echo "--- live nat table ---"
iptables -t nat -L -n -v
echo
echo "--- ip_forward sysctl ---"
sysctl net.ipv4.ip_forward
grep -H ip_forward /etc/sysctl.conf /etc/sysctl.d/*.conf 2>/dev/null
Verified state — host
| Field | Value |
|---|---|
| Hostname | tctmachine |
| Proxmox version | pve-manager 8.2.2 · kernel 6.8.4-2-pve |
| Physical NIC in use | eno1 (UP) — eno2/3/4 down, unused |
| vmbr0 | 10.10.10.10/16 · gw 10.10.10.1 · bridges eno1 |
| vmbr1 | 172.16.0.10/24 · bridge_ports none (VM-only) |
| vmbr2 | 192.168.0.10/24 · bridge_ports none (VM-only) |
| IP forwarding | net.ipv4.ip_forward = 1 (set in /etc/sysctl.conf + /etc/sysctl.d/99-sysctl.conf; duplicated, harmless) |
| iptables-persistent rules | Present — see findings below |
| VMs in inventory | 100 (template), 101 (running), 102 (running), 103 (running), 104 (stopped) |
Findings — host
✓ Bridges configured per spec
vmbr0/1/2 all UP, on correct subnets, with correct host-side IPs. Matches the new Week 1–5 ODT guide.
⚠ NAT MASQUERADE rule has a stray /32
/etc/iptables/rules.v4 contains -A POSTROUTING -s 10.10.110.10/32 -o vmbr0 -j MASQUERADE. 10.10.110.10 is pfSense2's WAN IP — the rule is redundant (pfSense2 already NATs internally) and matched only 1 packet ever. Functionally inert. Can be deleted or left.
⚠ Internal-subnet MASQUERADE missing
The host has no MASQUERADE rule for 172.16.0.0/24 or 192.168.0.0/24. Doesn't matter — pfSense2 routes/NATs all internal traffic. But if you later switch to host-iptables NAT (the canonical guide topology), you'll need to add them.
ℹ Forward-chain ACL rules ARE persisted
rules.v4 has -A FORWARD -s 172.16.0.0/24 -d 192.168.0.0/24 -j ACCEPT and a port-22 forward — leftover from earlier topology work. Harmless. Document or remove during Week 3 cleanup.
Screenshots
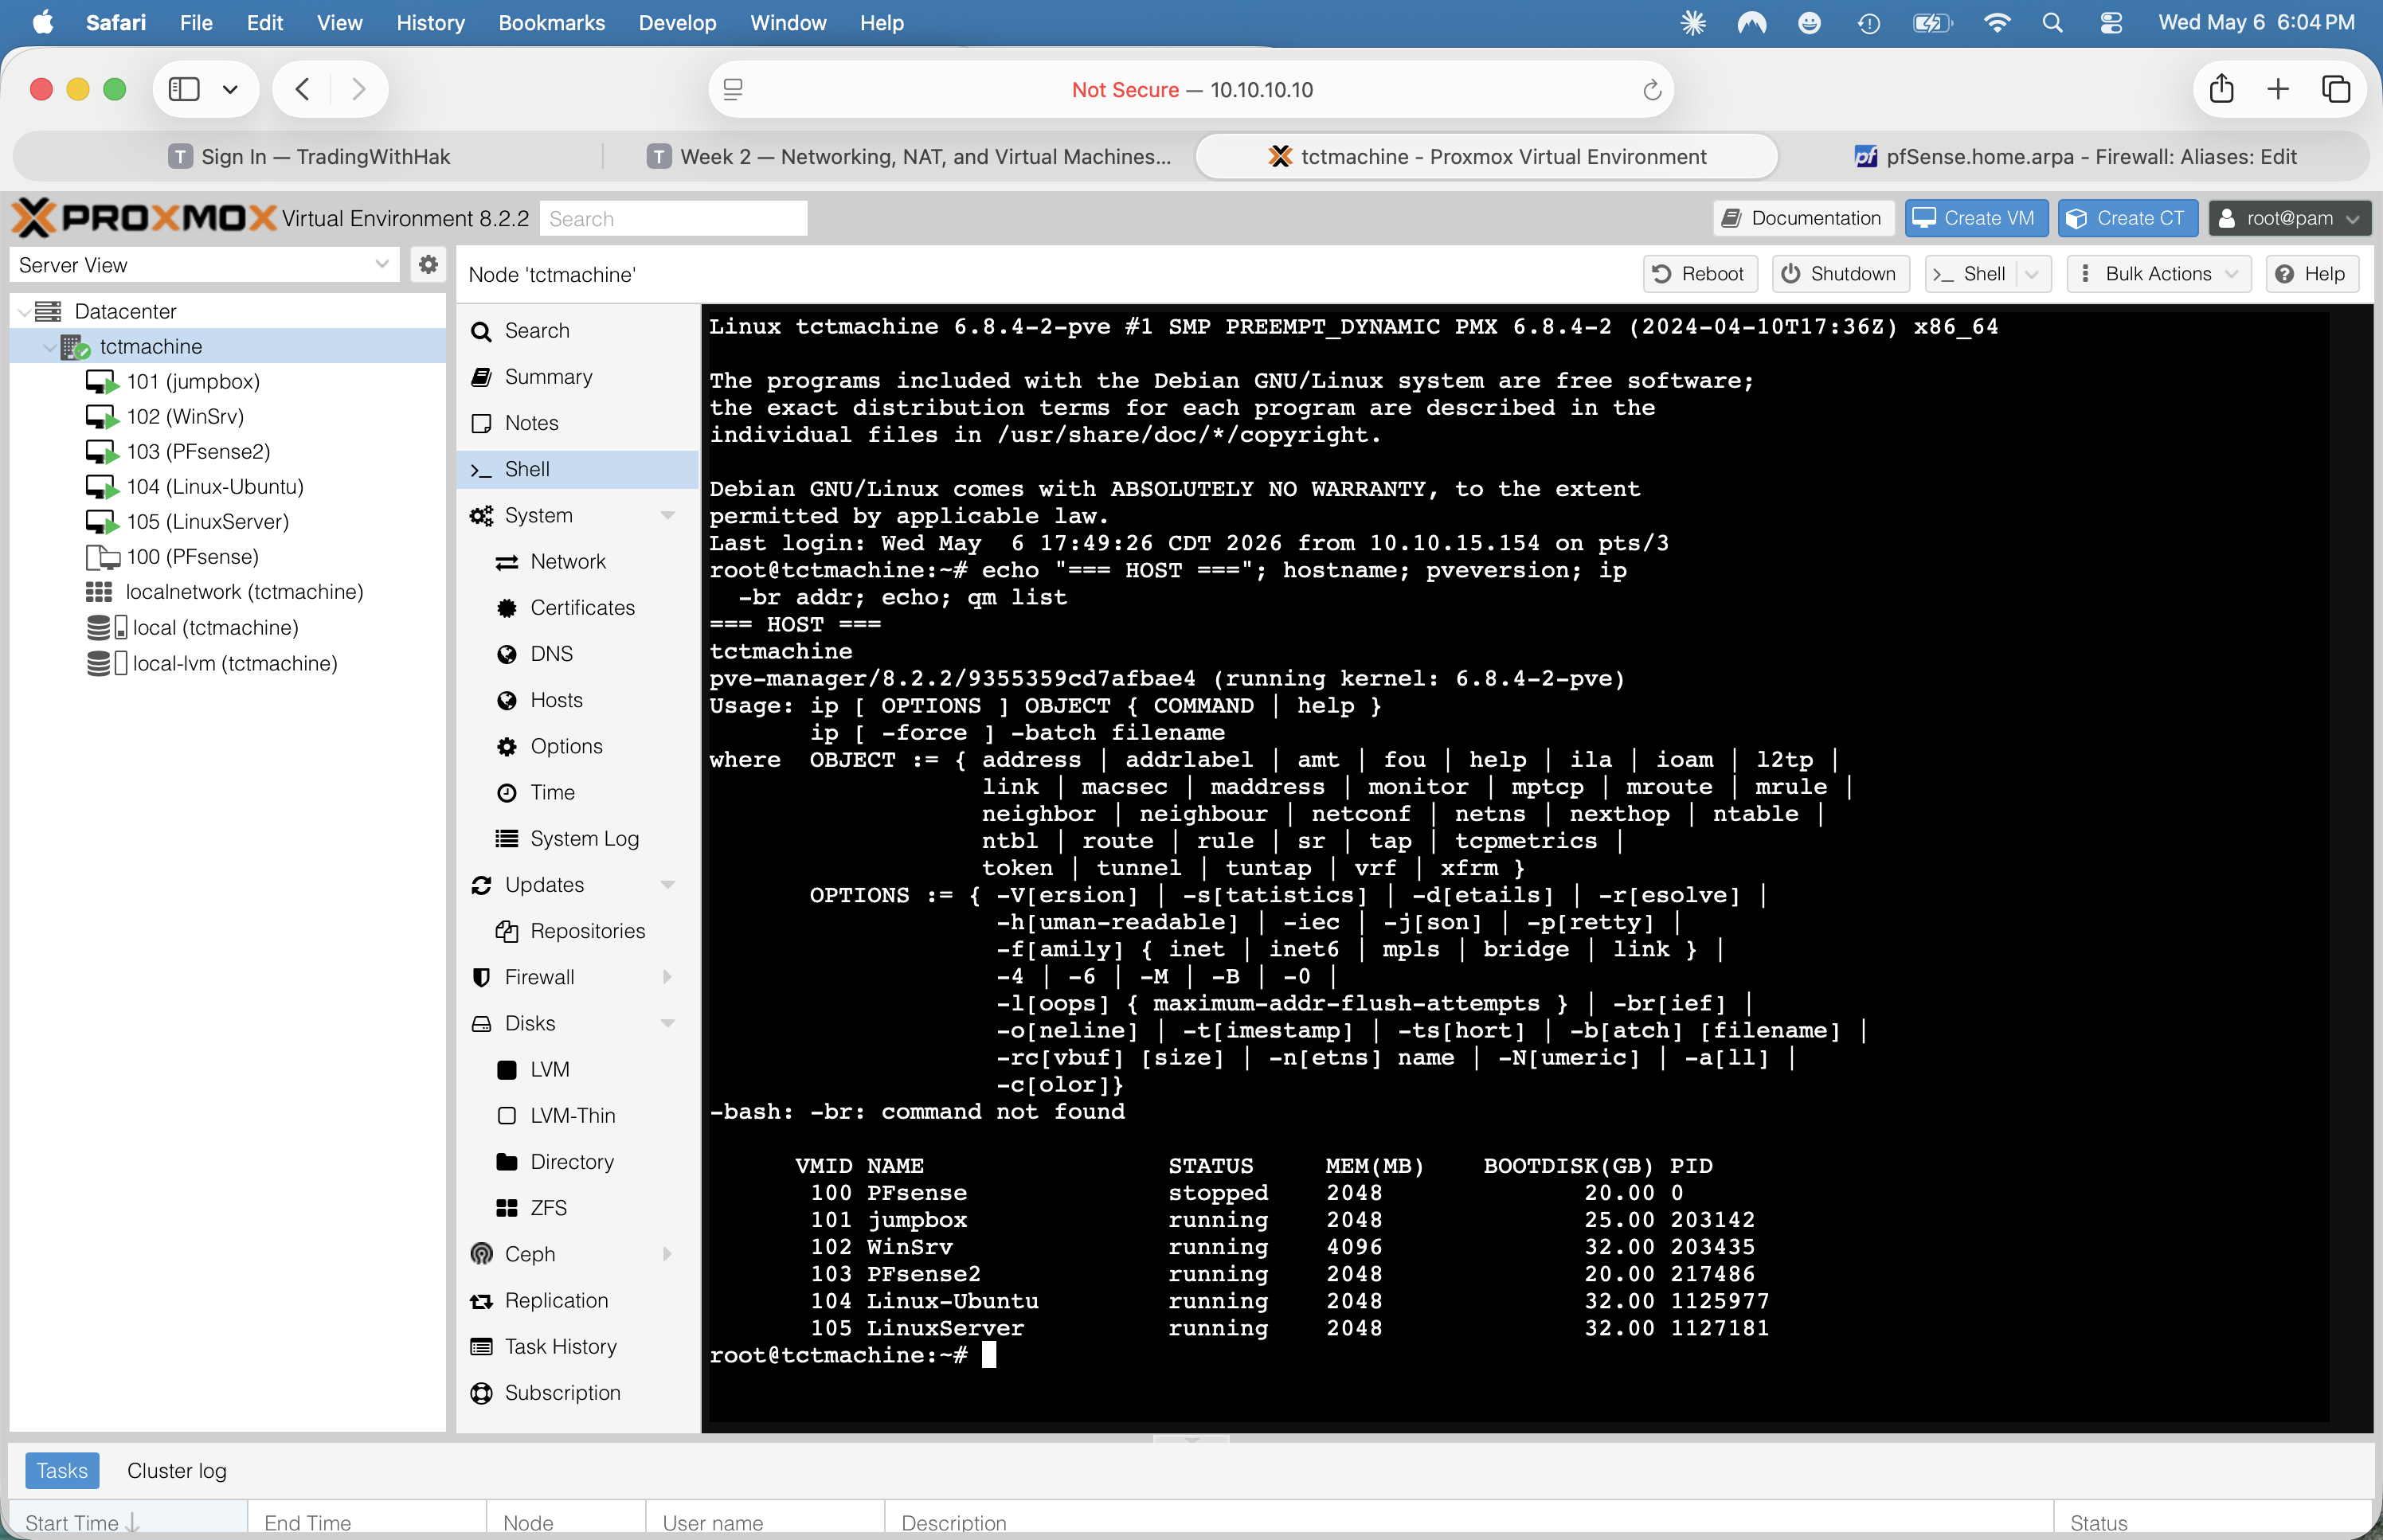
pveversion + full qm list table — all 6 VMs accounted for (note: VM 104 + VM 105 both running). Captured 2026-05-06.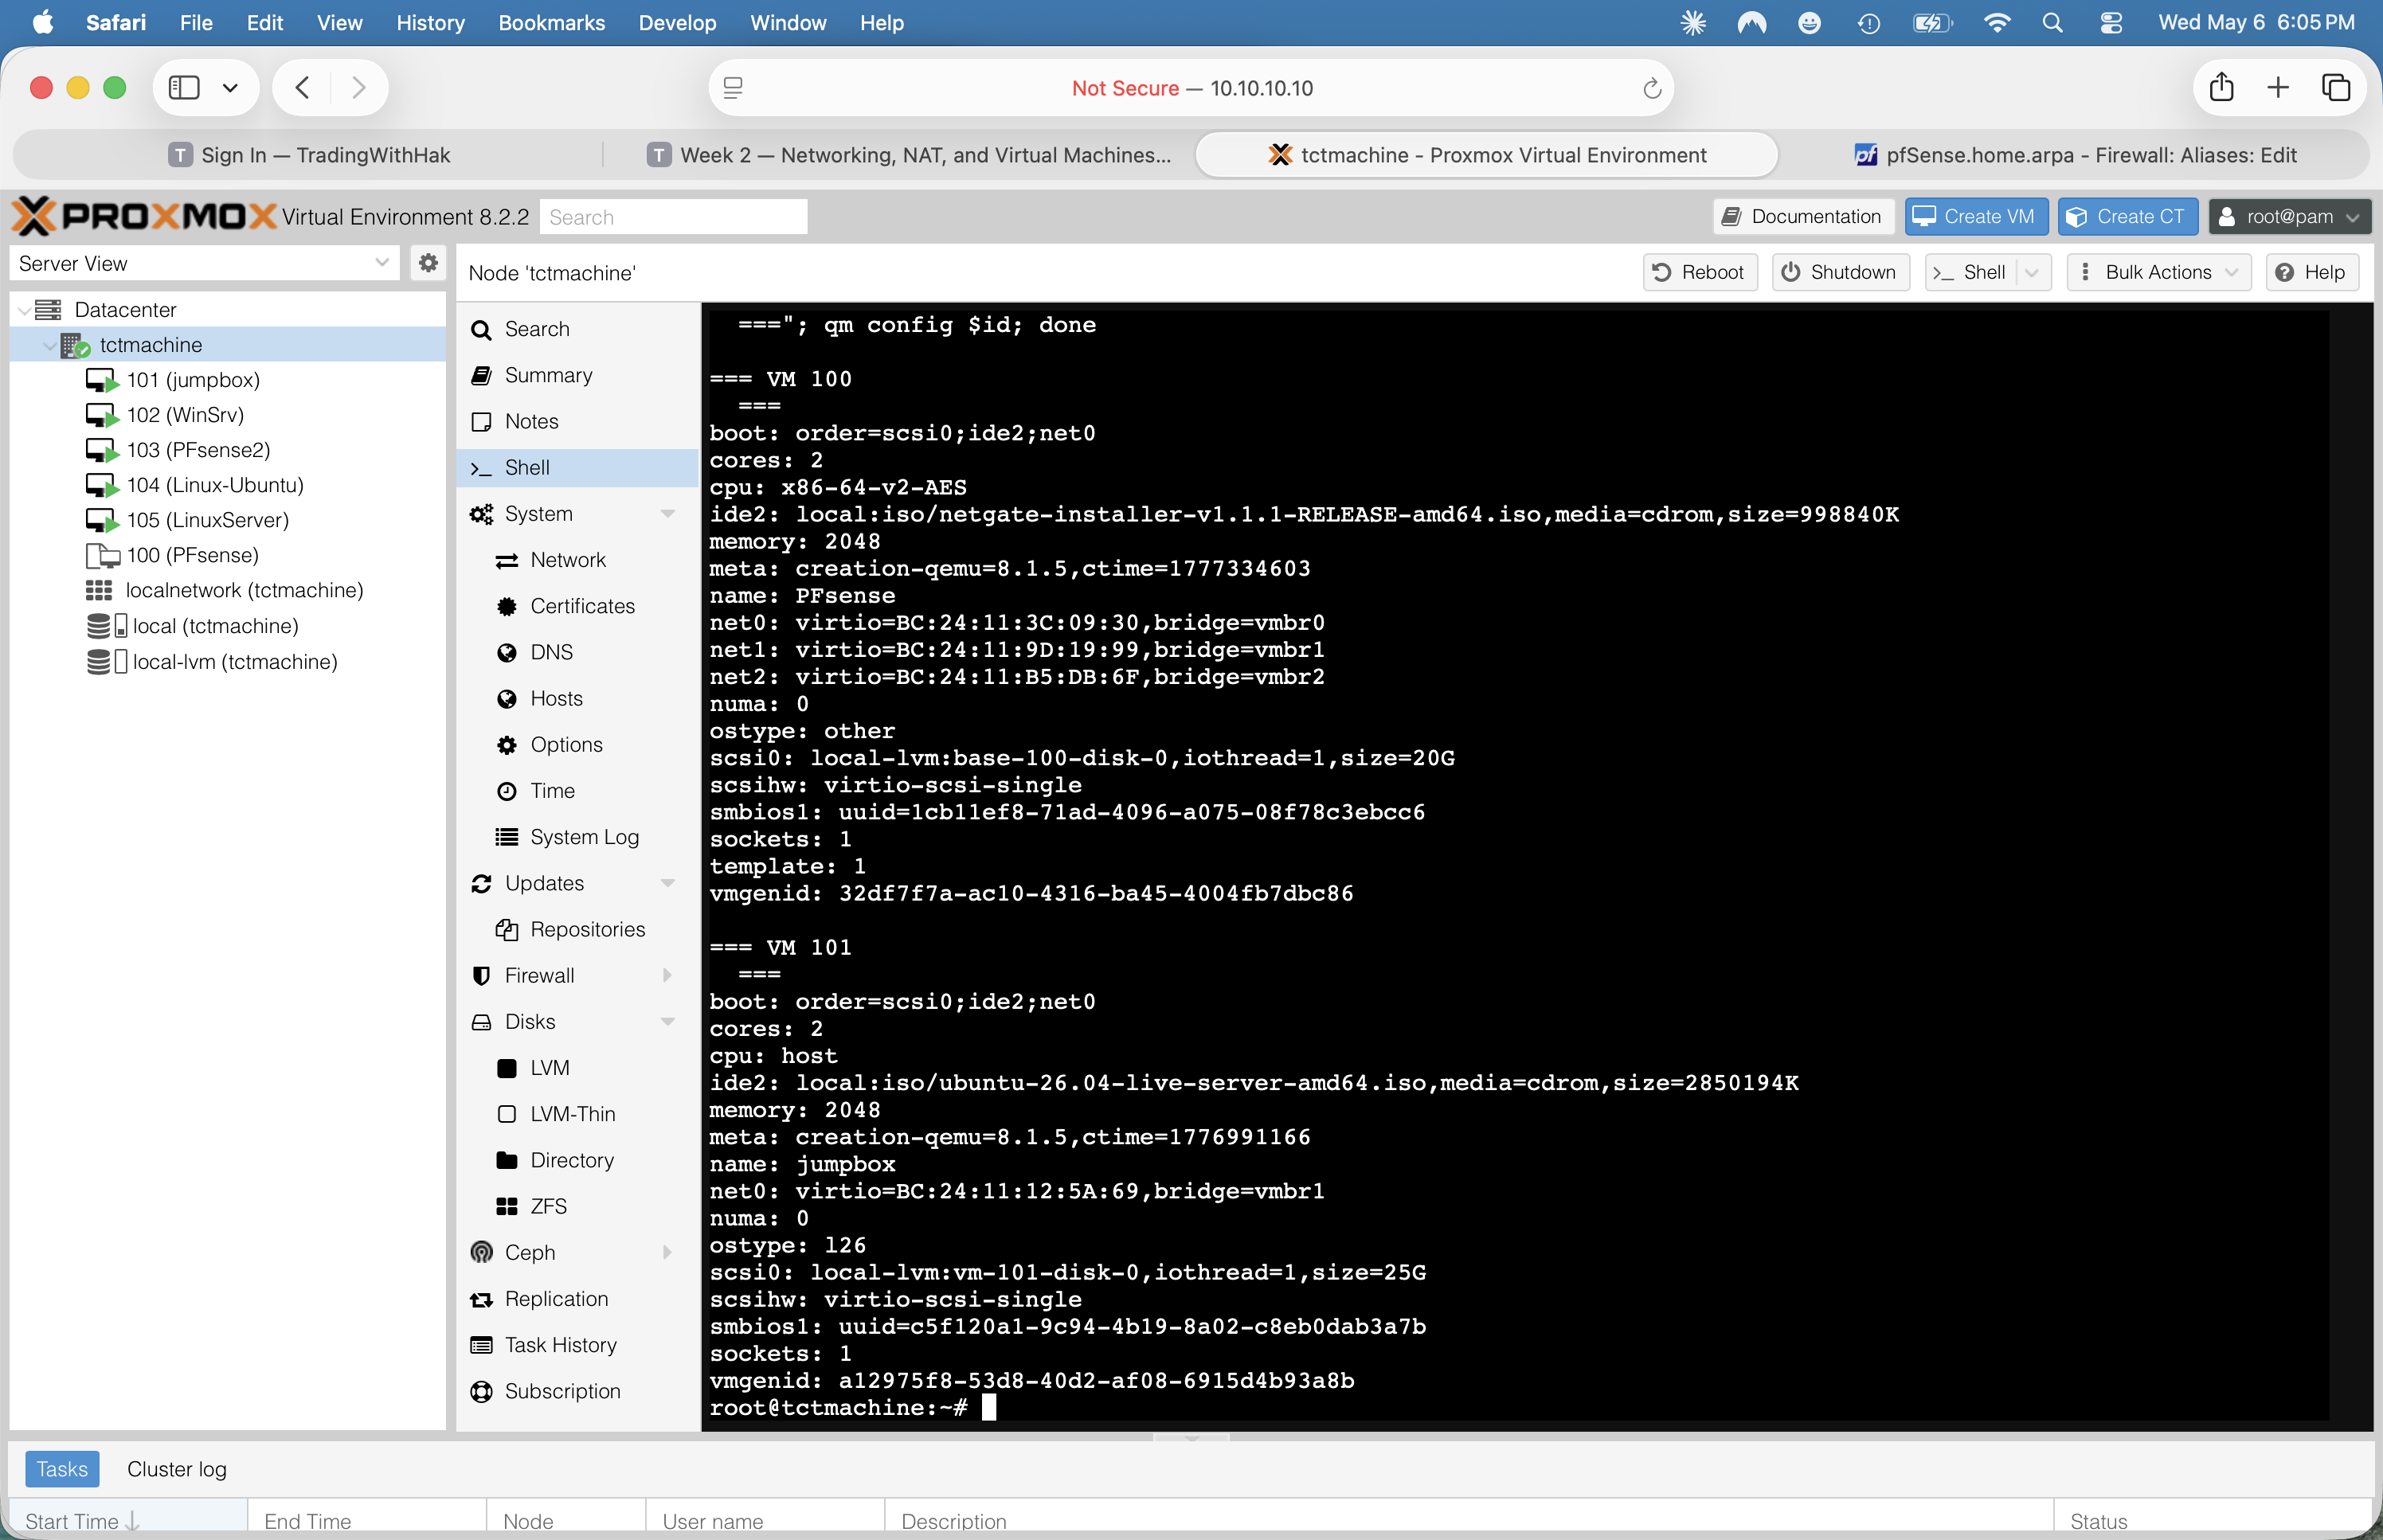
template: 1 on the PFsense base disk and single-NIC on vmbr1 for jumpbox.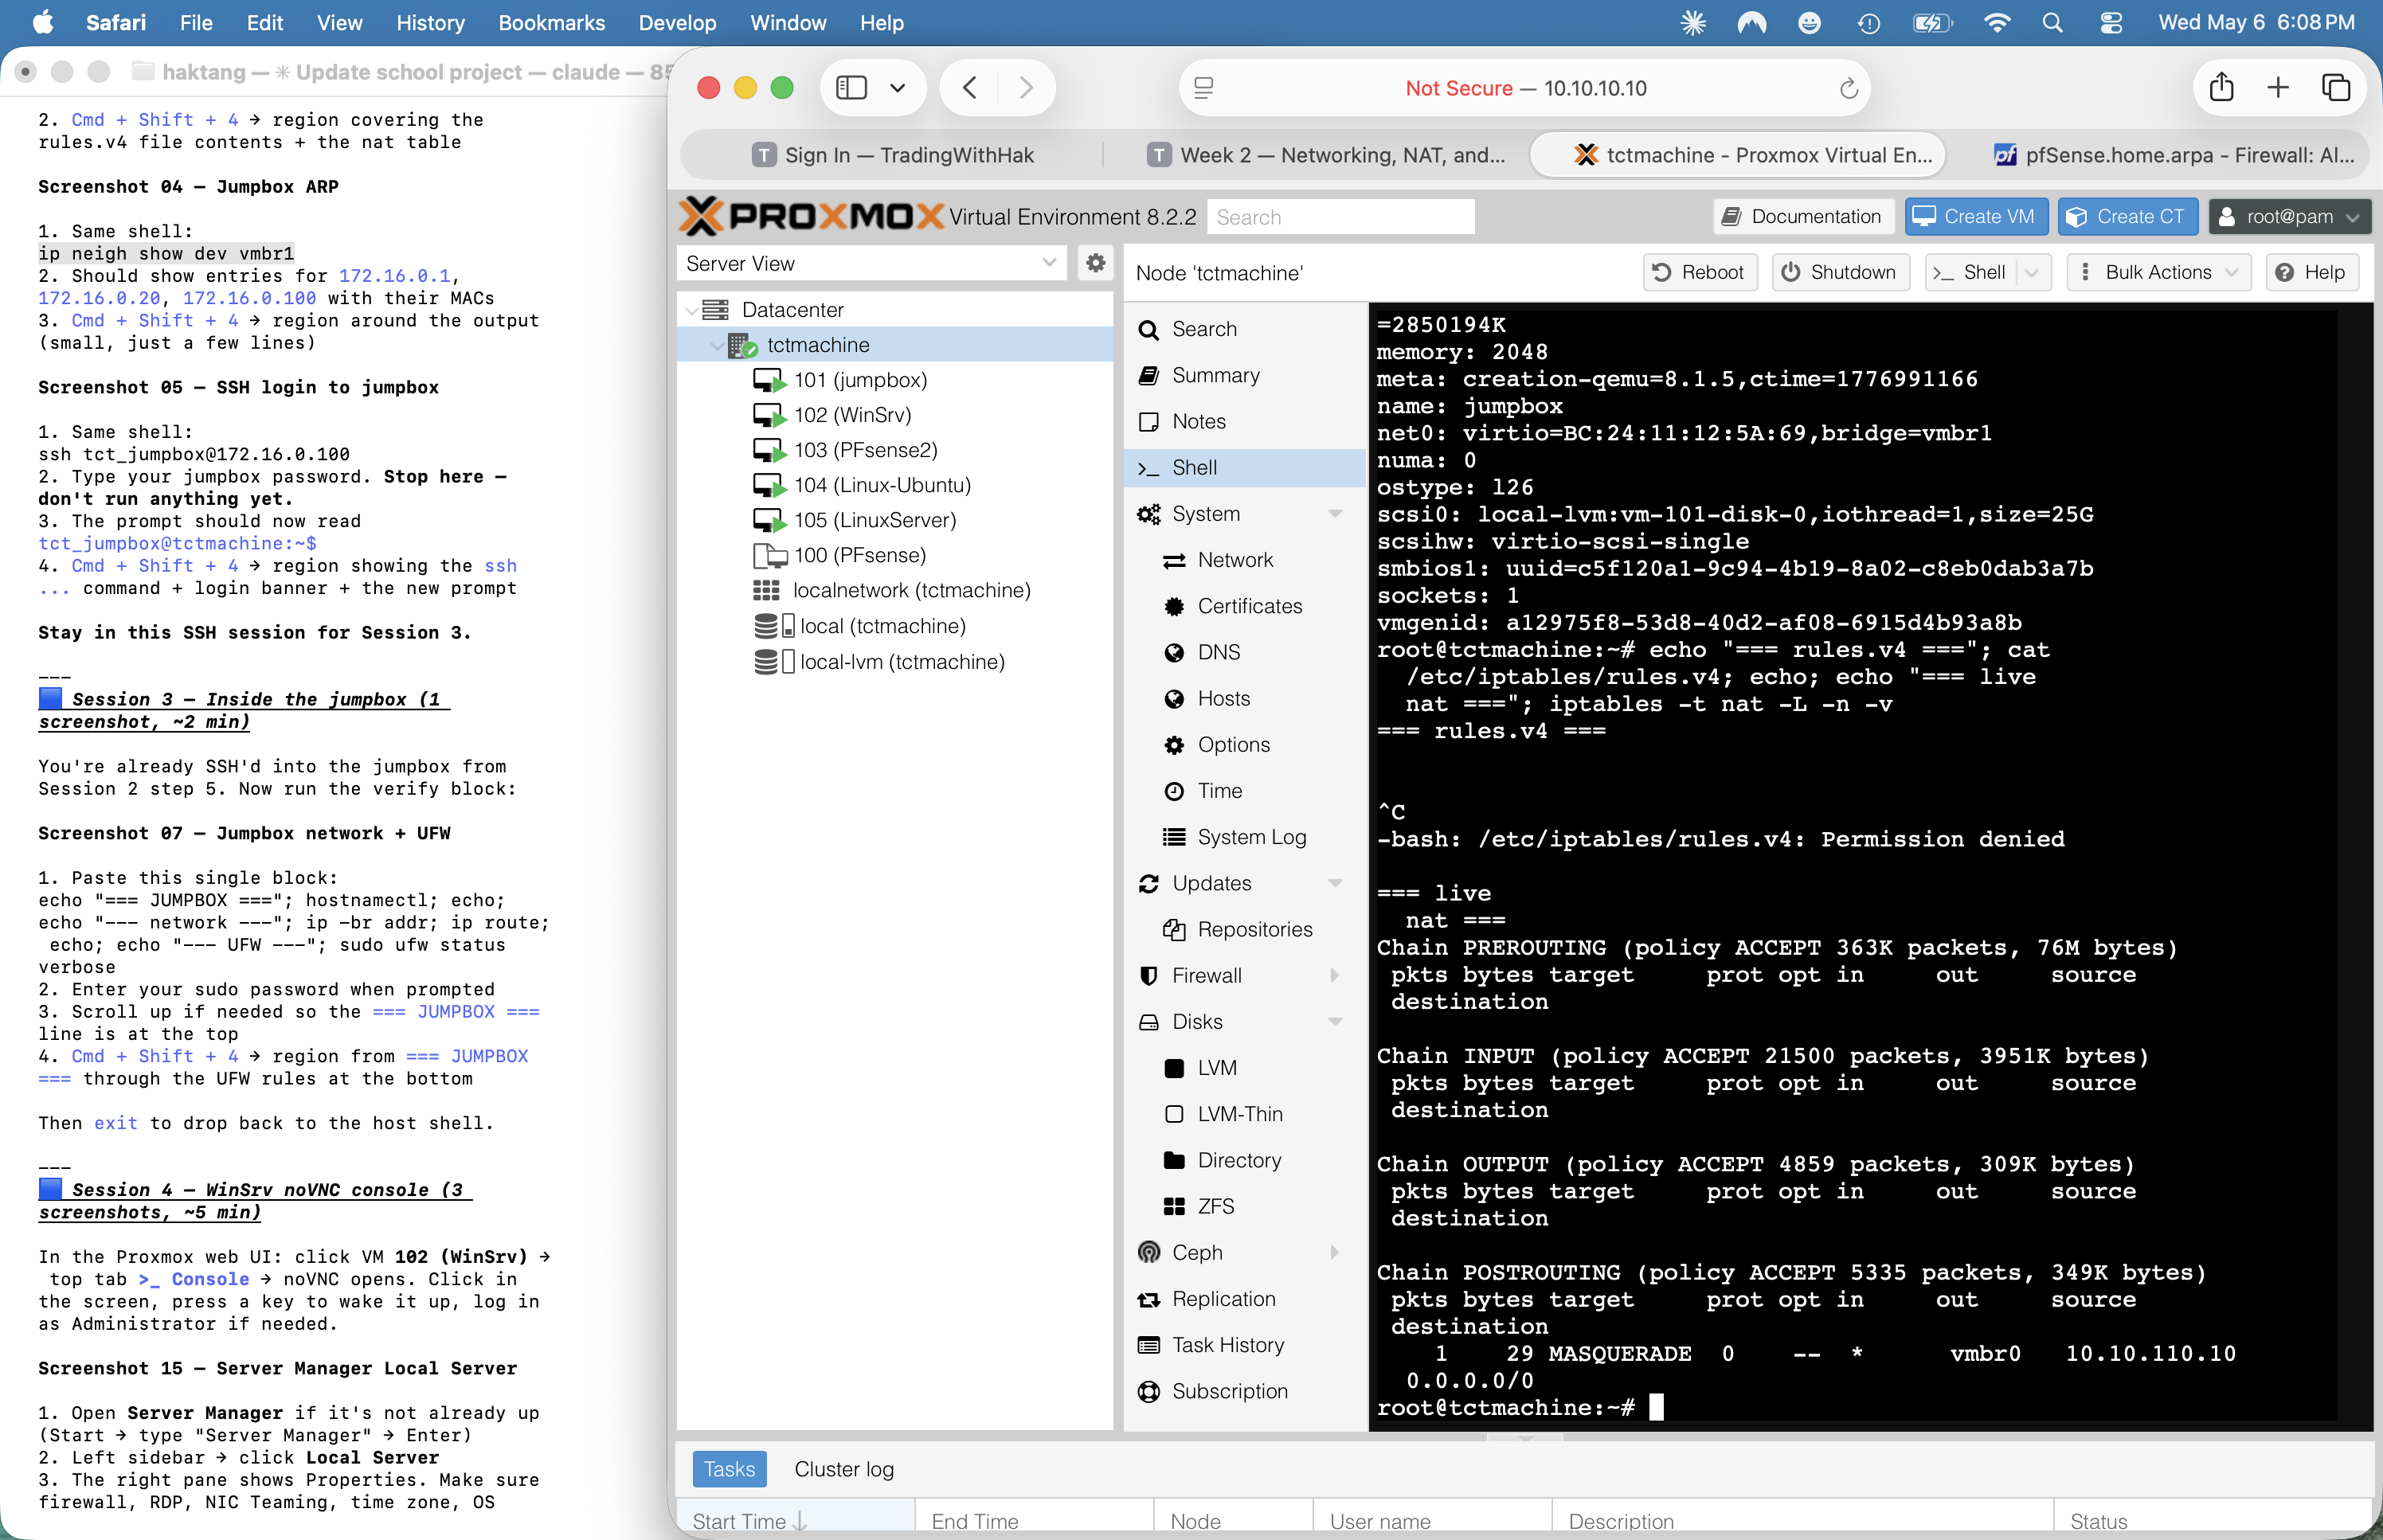
iptables -t nat -L -n -v · only one MASQUERADE rule, source 10.10.110.10/32 (pfSense WAN IP) — vestigial double-NAT, only matched 1 packet ever. Note: cat /etc/iptables/rules.v4 needs sudo — that error is expected on the screenshot.Phase 2 — Jumpbox (VM 101)
Verified ✓Goal: confirm the jumpbox runs Ubuntu, has a healthy DHCP lease, can reach the internet, has SSH up, and has UFW restricting SSH to the lab subnets.
Step 2.1 — Find the jumpbox IP from the host
ARP cache lookup
The Proxmox web console doesn't accept clipboard paste, so we SSH in from the host shell instead. First find the jumpbox IP from the host's ARP table on vmbr1:
ip neigh show dev vmbr1
Look for the line whose MAC matches the jumpbox's net0 from VM 101's config (BC:24:11:12:5A:69). That's your IP. In our build it landed on 172.16.0.100 via DHCP from pfSense2.
ping -c1 172.16.0.100 first to refresh.Step 2.2 — SSH from host into jumpbox
Use the host shell as the SSH origin
ssh tct_jumpbox@172.16.0.100
Type yes on the first connection to accept the host key. Enter the password you set at install. Now you're inside the jumpbox and in a paste-friendly terminal (because the host's web shell carried the paste support through the SSH session).
10.1o.10.10 (letter O instead of zero) gives "Could not resolve hostname". Always copy/paste IPs.Step 2.3 — Run the jumpbox inspection block
Network, OS, SSH config, UFW, gateway test
echo "=== JUMPBOX (VM 101) ==="
hostnamectl
echo
echo "--- network ---"
ip -br addr
ip route
resolvectl status | grep -E "DNS Servers|Current DNS|Link "
echo
echo "--- OS / packages ---"
lsb_release -a 2>/dev/null
uname -r
echo
echo "--- SSH config status ---"
sudo grep -E '^(Port|PermitRootLogin|PasswordAuthentication|AllowUsers|MaxAuthTries|PubkeyAuthentication)' /etc/ssh/sshd_config
sudo grep -rE '^(Port|PermitRootLogin|PasswordAuthentication)' /etc/ssh/sshd_config.d/ 2>/dev/null
sudo systemctl is-active ssh
sudo systemctl is-enabled ssh
echo
echo "--- UFW ---"
sudo ufw status verbose
echo
echo "--- who is the gateway really? ---"
ip route get 8.8.8.8
') around the regex in the grep -E calls. Double quotes get the parens eaten by bash and the grep fails with "Unmatched (".Verified state — jumpbox
| Field | Value | Status |
|---|---|---|
| OS | Ubuntu 26.04 LTS "resolute" · kernel 7.0.0-14-generic | verified |
| Hostname | tctmachine (matches Proxmox host name — confusing) | to fix |
| NIC | ens18 on vmbr1 · MAC BC:24:11:12:5A:69 | verified |
| IPv4 | 172.16.0.100/24 via DHCP from pfSense2 | DHCP not static |
| Gateway | 172.16.0.1 = pfSense2 DMZ interface | routes through pfSense2 |
| DNS | 172.16.0.1 = pfSense2 Unbound resolver | verified |
| SSH service | active + enabled (default port 22, default config) | not hardened yet |
| UFW status | active · default deny in / allow out · port 22 ALLOW from 10.10.10.0/24, 192.168.0.0/24, 172.16.0.0/24 | matches Part 7 step 4 |
| Internet reachability | ping google.com + ping 1.1.1.1 both 0% loss, ~9–10 ms RTT | verified |
Findings — jumpbox
✓ Outbound connectivity proven
DNS resolves, ICMP works, latency normal. Confirms pfSense2 is doing NAT correctly and pushing healthy DNS via DHCP.
⚠ Hostname collision with host
Both Proxmox host and jumpbox identify as tctmachine. Confusing in logs and SSH banners. Fix: sudo hostnamectl set-hostname jumpbox, then update /etc/hosts and reboot.
⚠ DHCP not static
Lab guide spec is 172.16.0.2 static. We're at 172.16.0.100 dynamic. Two ways to fix: (a) static IP via netplan, (b) DHCP reservation in pfSense2 (Services → DHCP → DMZ → Static Mappings).
⚠ SSH not hardened
Default port 22, root login + password auth still permitted. Lab guide Part 7 step 3 prescribes: change port (e.g. 2222), PermitRootLogin no, PasswordAuthentication no (after key-based login is set up), AllowUsers tct_jumpbox, MaxAuthTries 3.
Screenshots
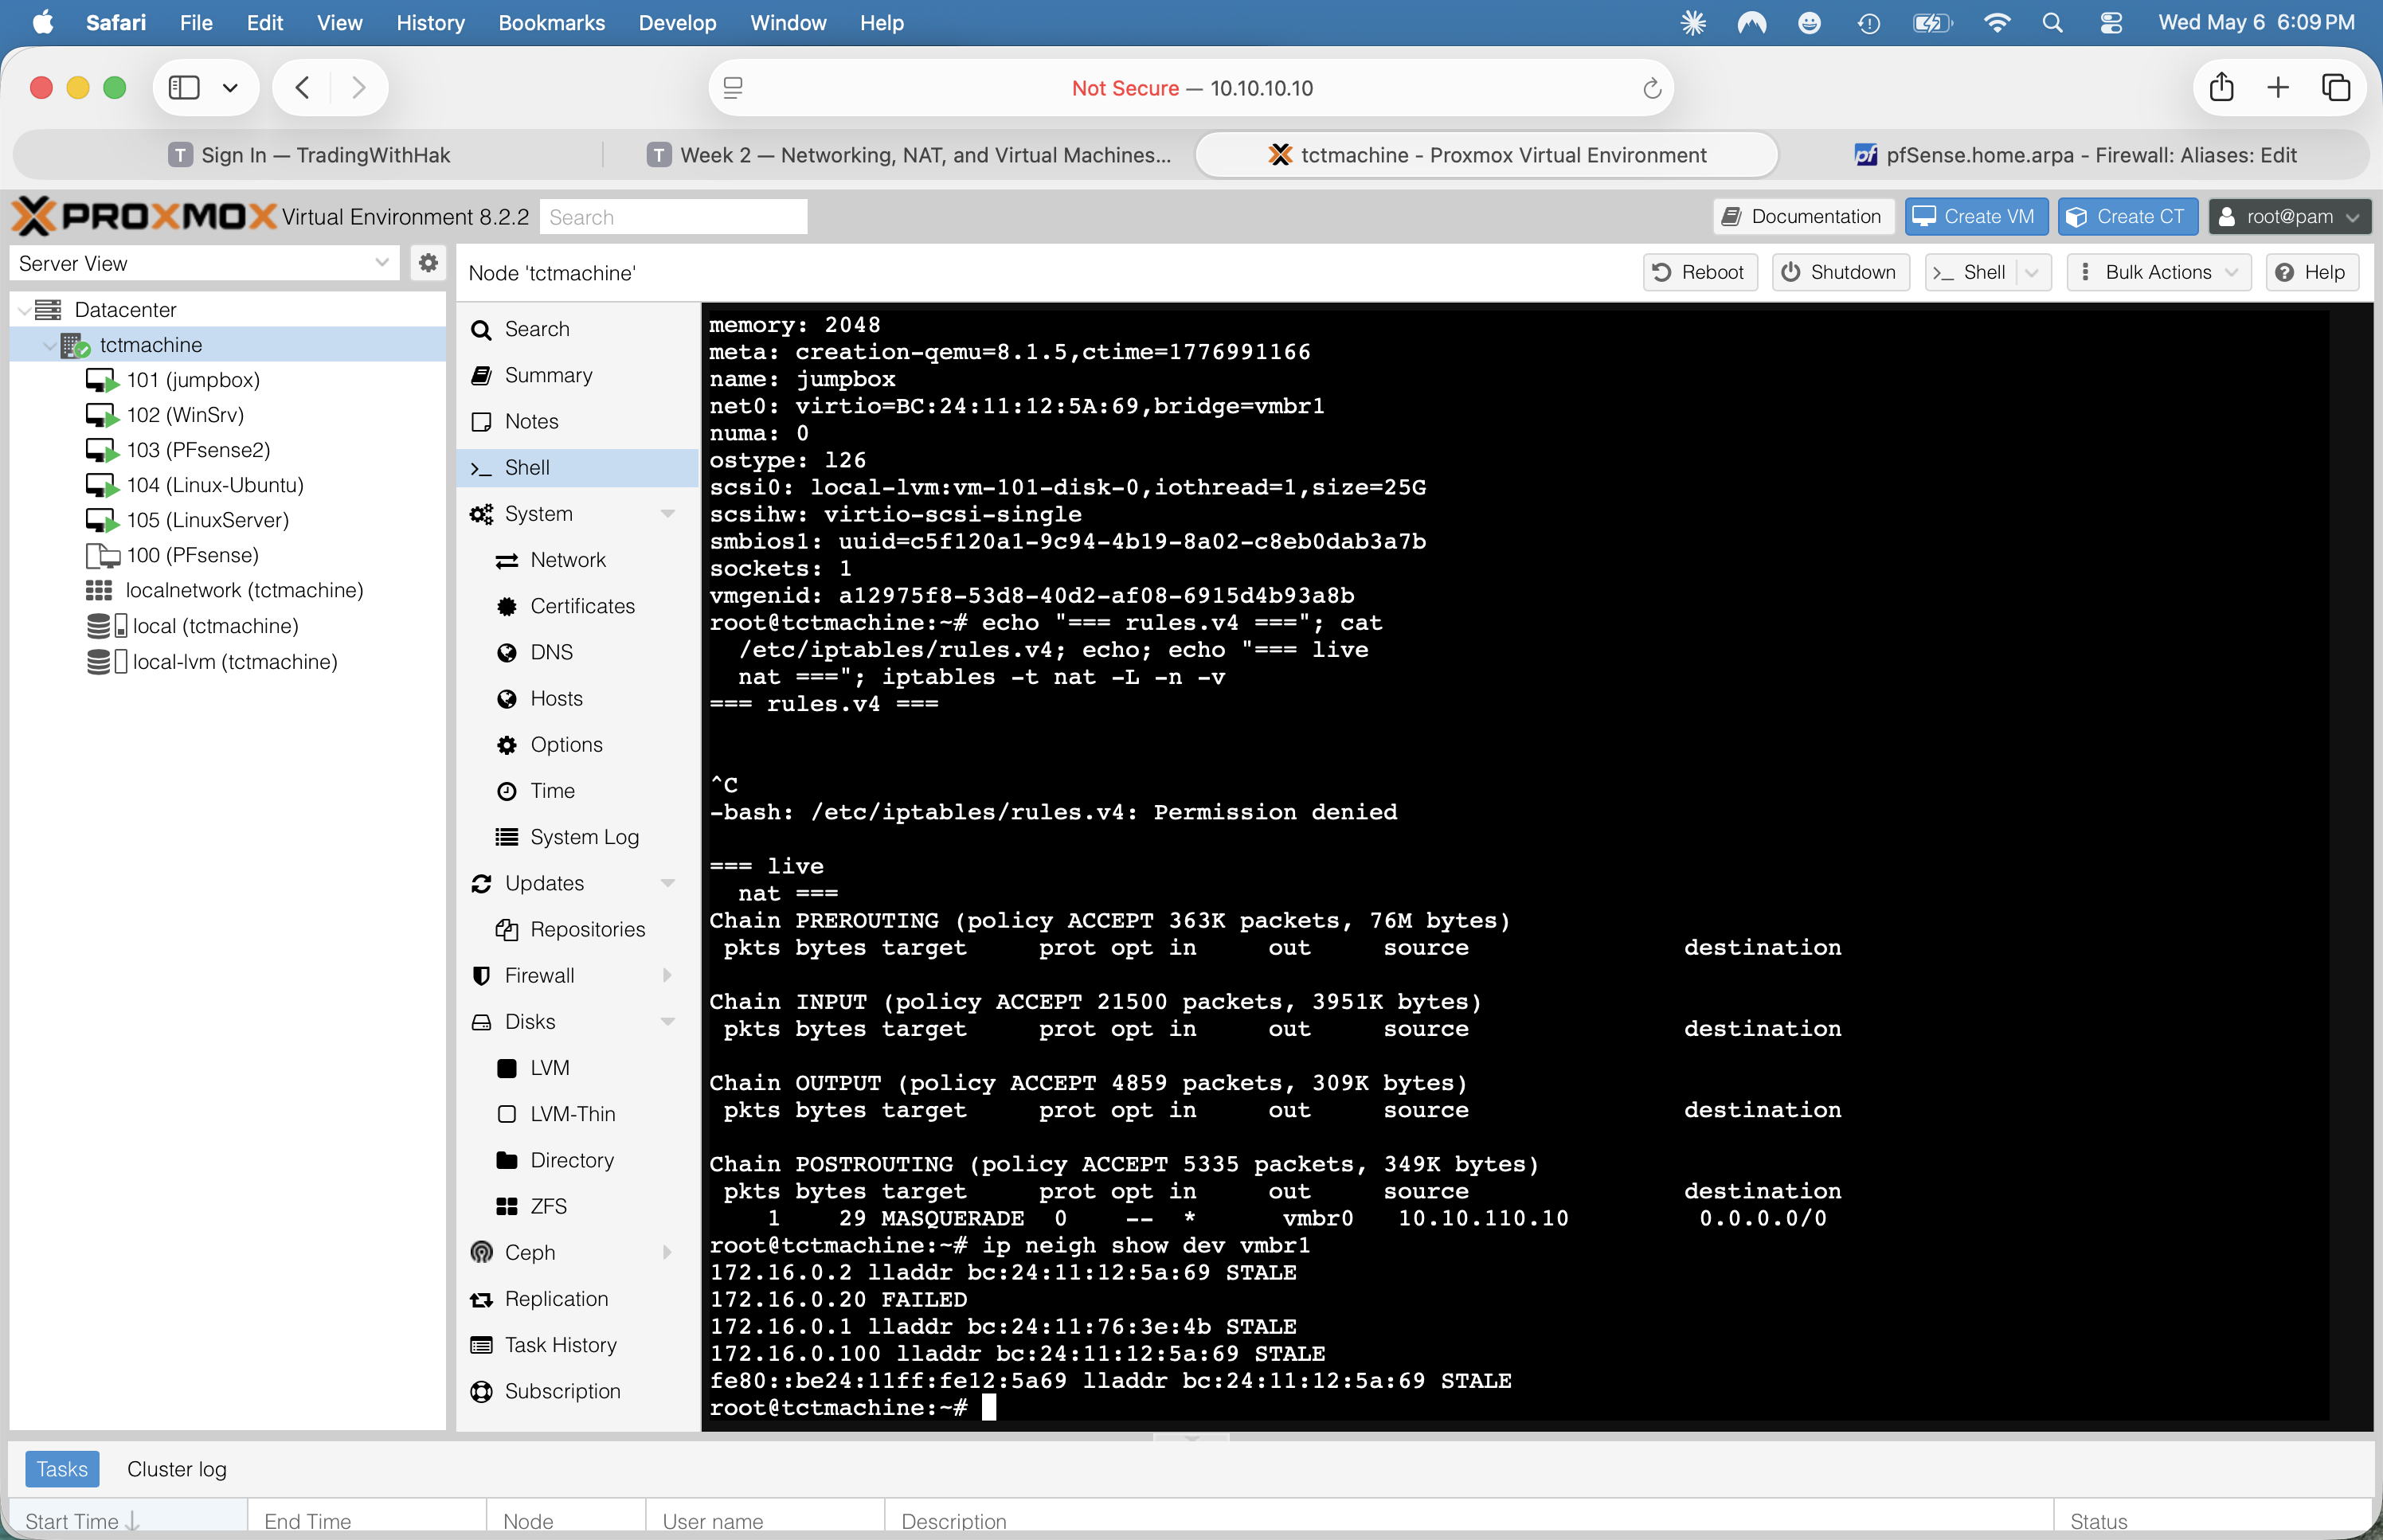
vmbr1 · pfSense2 at .1 (gateway) + .20, jumpbox at .100. Confirms MAC bc:24:11:12:5a:69 = jumpbox.tct_jumpbox@tctmachine:~$ prompt right after login from the host shell.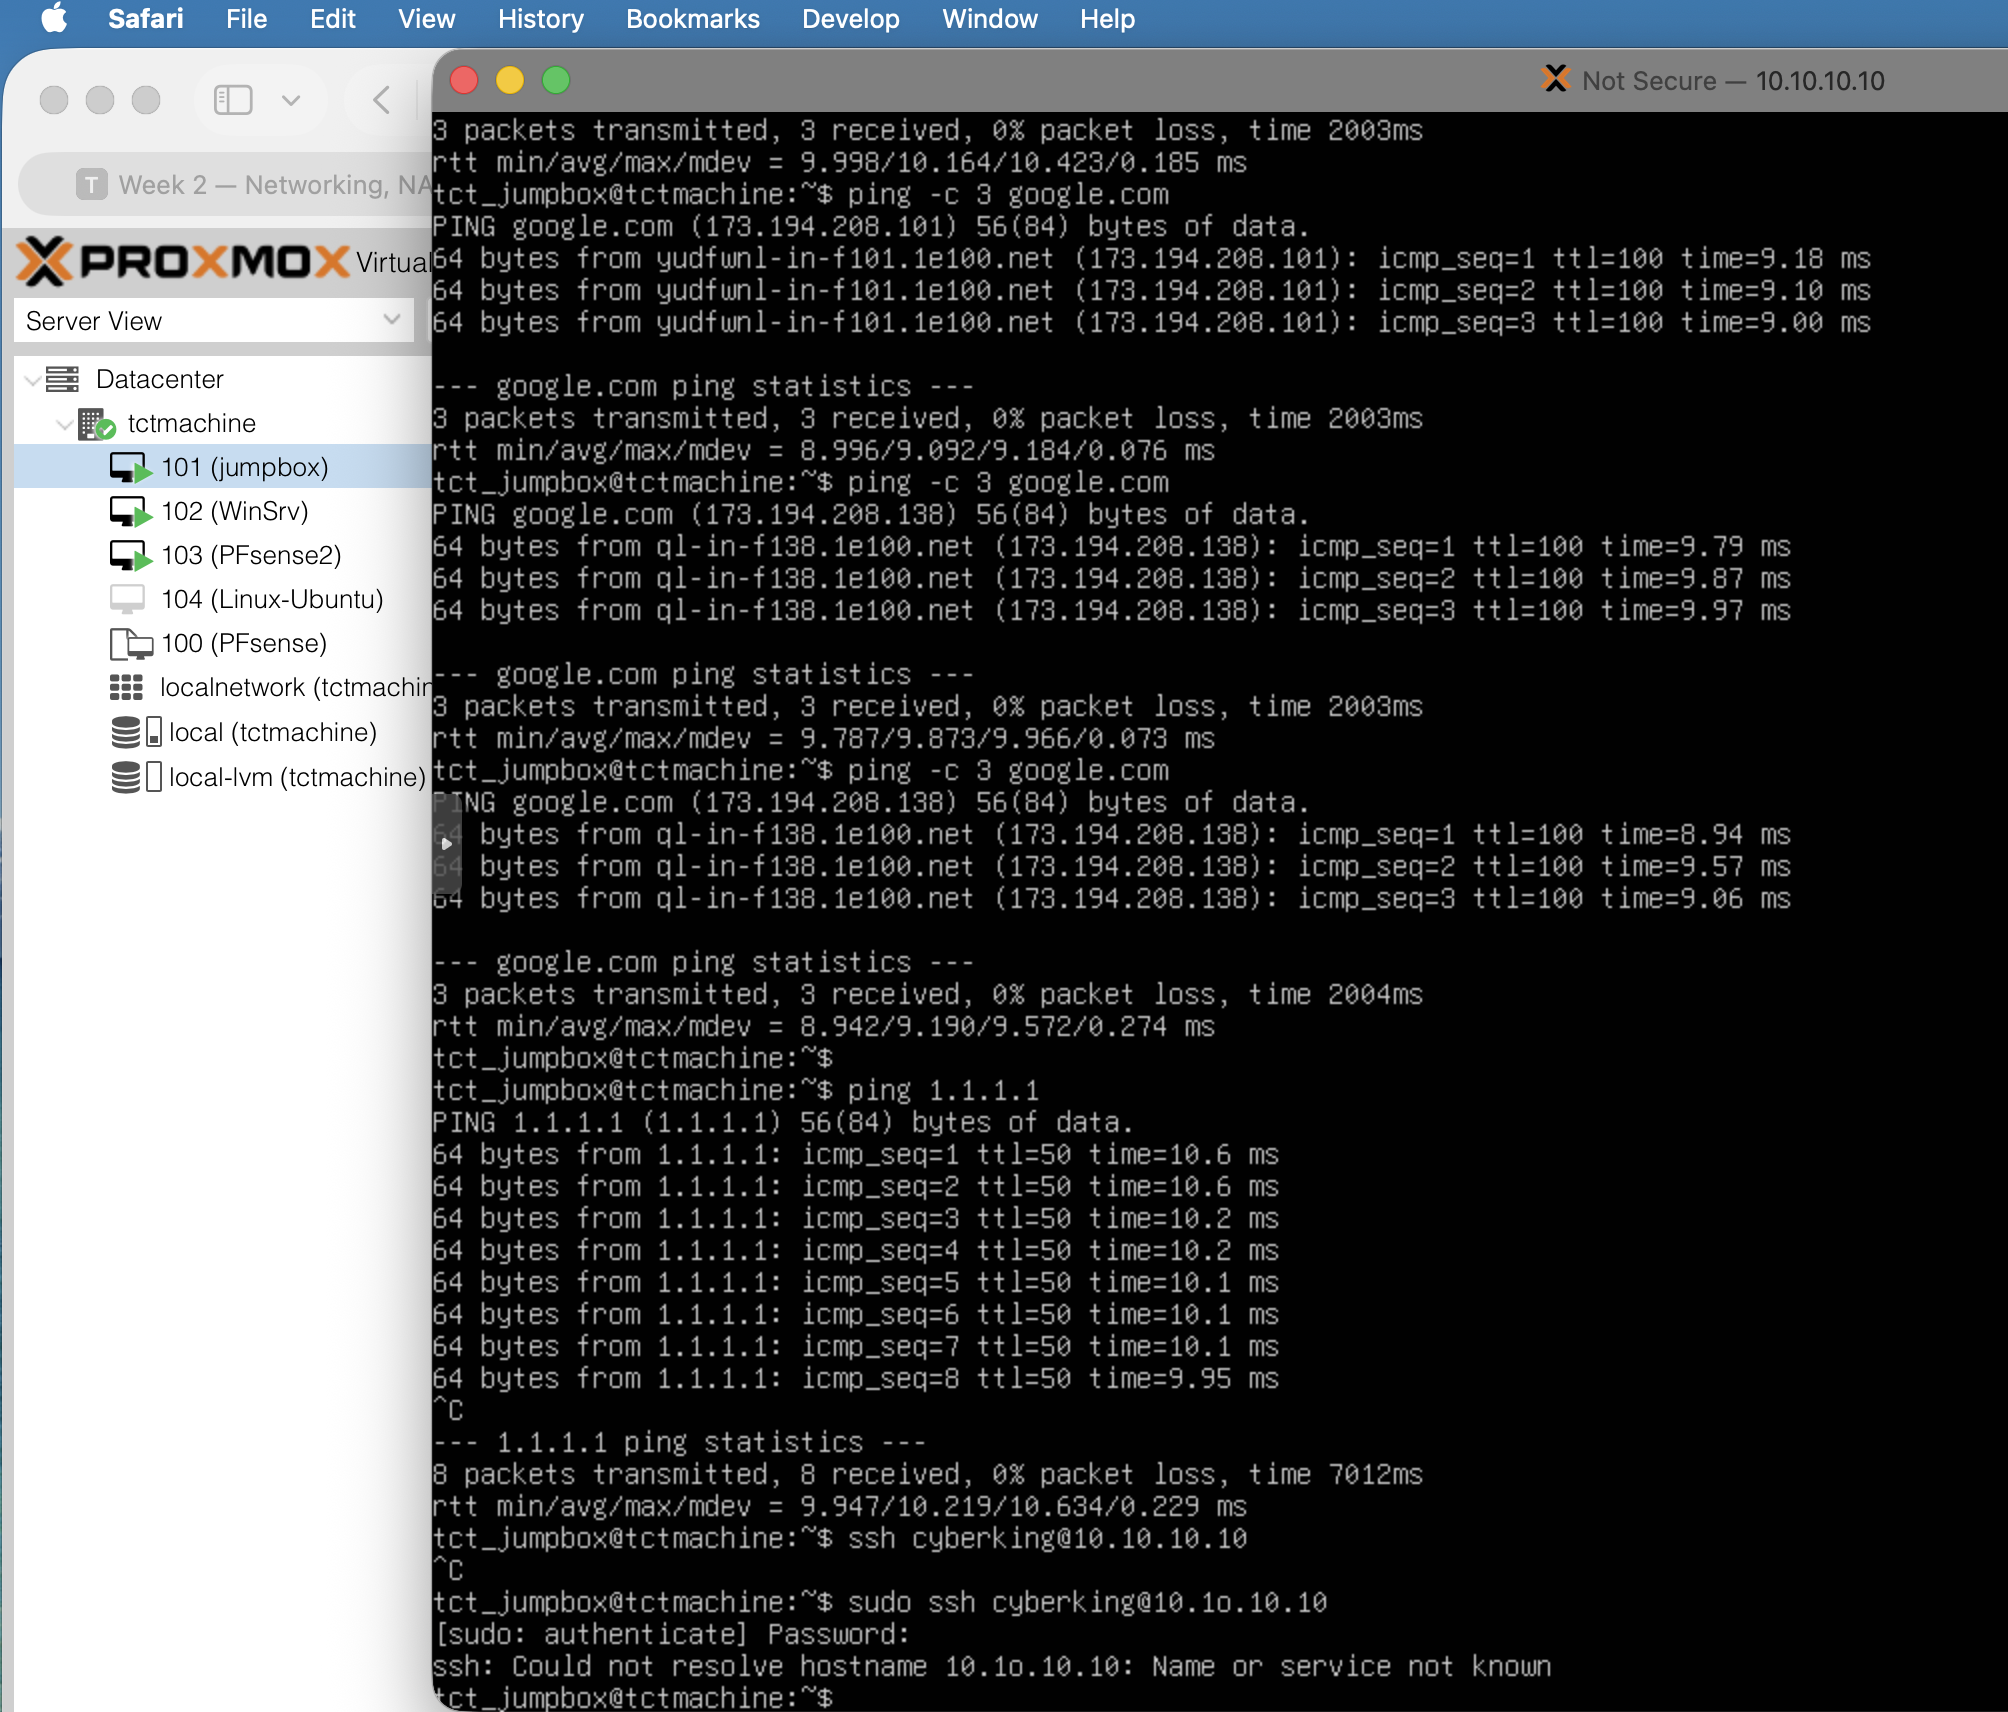
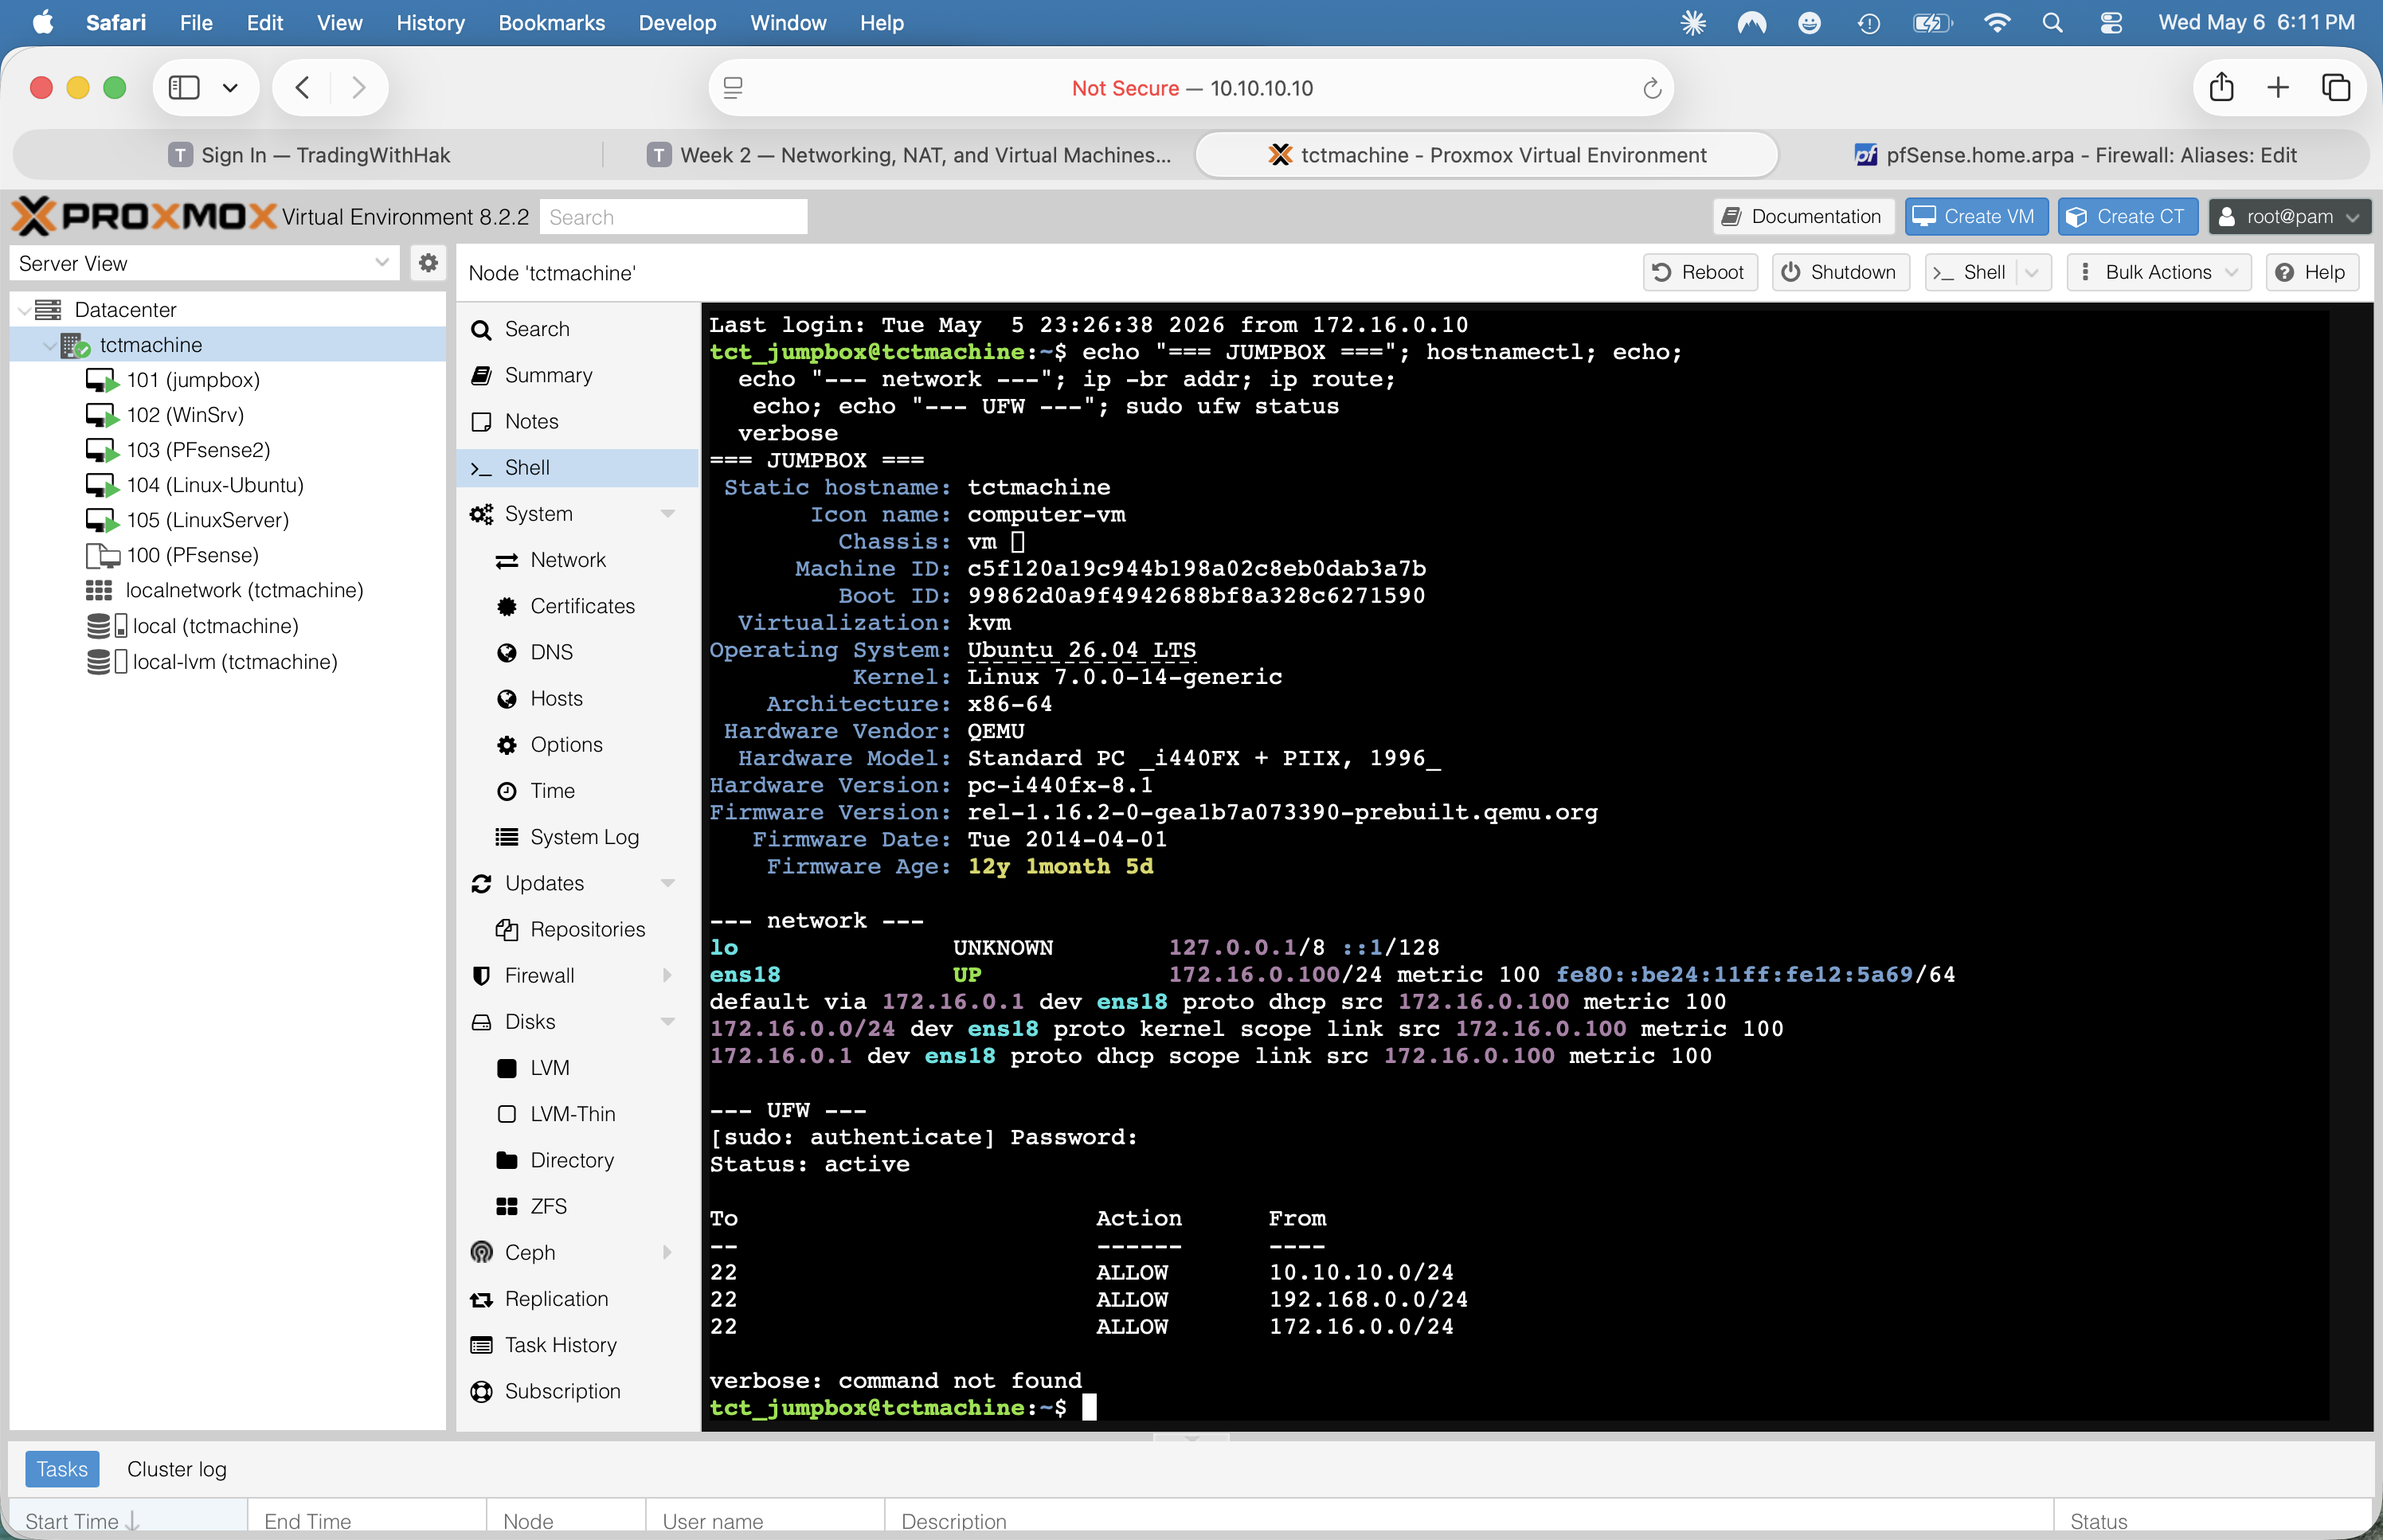
hostnamectl + ip -br addr + ping 1.1.1.1 with 0% loss. Captured 2026-05-06.Phase 3 — pfSense2 (VM 103)
Verified ✓Goal: confirm pfSense2 is the live router/firewall/DHCP/DNS for both internal subnets, document version/IPs/scopes/NAT mode, and flag the security-critical default password.
Step 3.1 — Open the Proxmox console for VM 103
Quick check via the FreeBSD-style menu
Proxmox UI → click VM 103 (PFsense2) in the left tree → top-right tab >_ Console. The noVNC window opens to pfSense's blue text menu. Press Enter once to refresh the header — that prints the welcome banner with all three interface IPs without typing a single command.
What you should see at the top:
*** Welcome to pfSense 2.8.1-RELEASE (amd64) on pfSense ***

  WAN (wan)  -> vtnet0  -> v4: 10.10.110.10/16
  DMZ (lan)  -> vtnet1  -> v4: 172.16.0.1/24
  LAN (opt1) -> vtnet2  -> v4: 192.168.0.1/24
Step 3.2 — Open pfSense web UI via SSH tunnel
Tunnel through the Proxmox host
From your Mac Terminal (not the Proxmox web shell), run:
ssh -L 8443:172.16.0.1:443 root@10.10.10.10
That forwards localhost:8443 on your Mac → through the Proxmox host (which has 172.16.0.10 on vmbr1) → to pfSense2's web UI on its DMZ interface. Leave the SSH session open. Then in Safari open:
https://localhost:8443
Accept the self-signed cert warning. Log in as admin with whatever password you set (or pfsense if you haven't changed it — and you should).
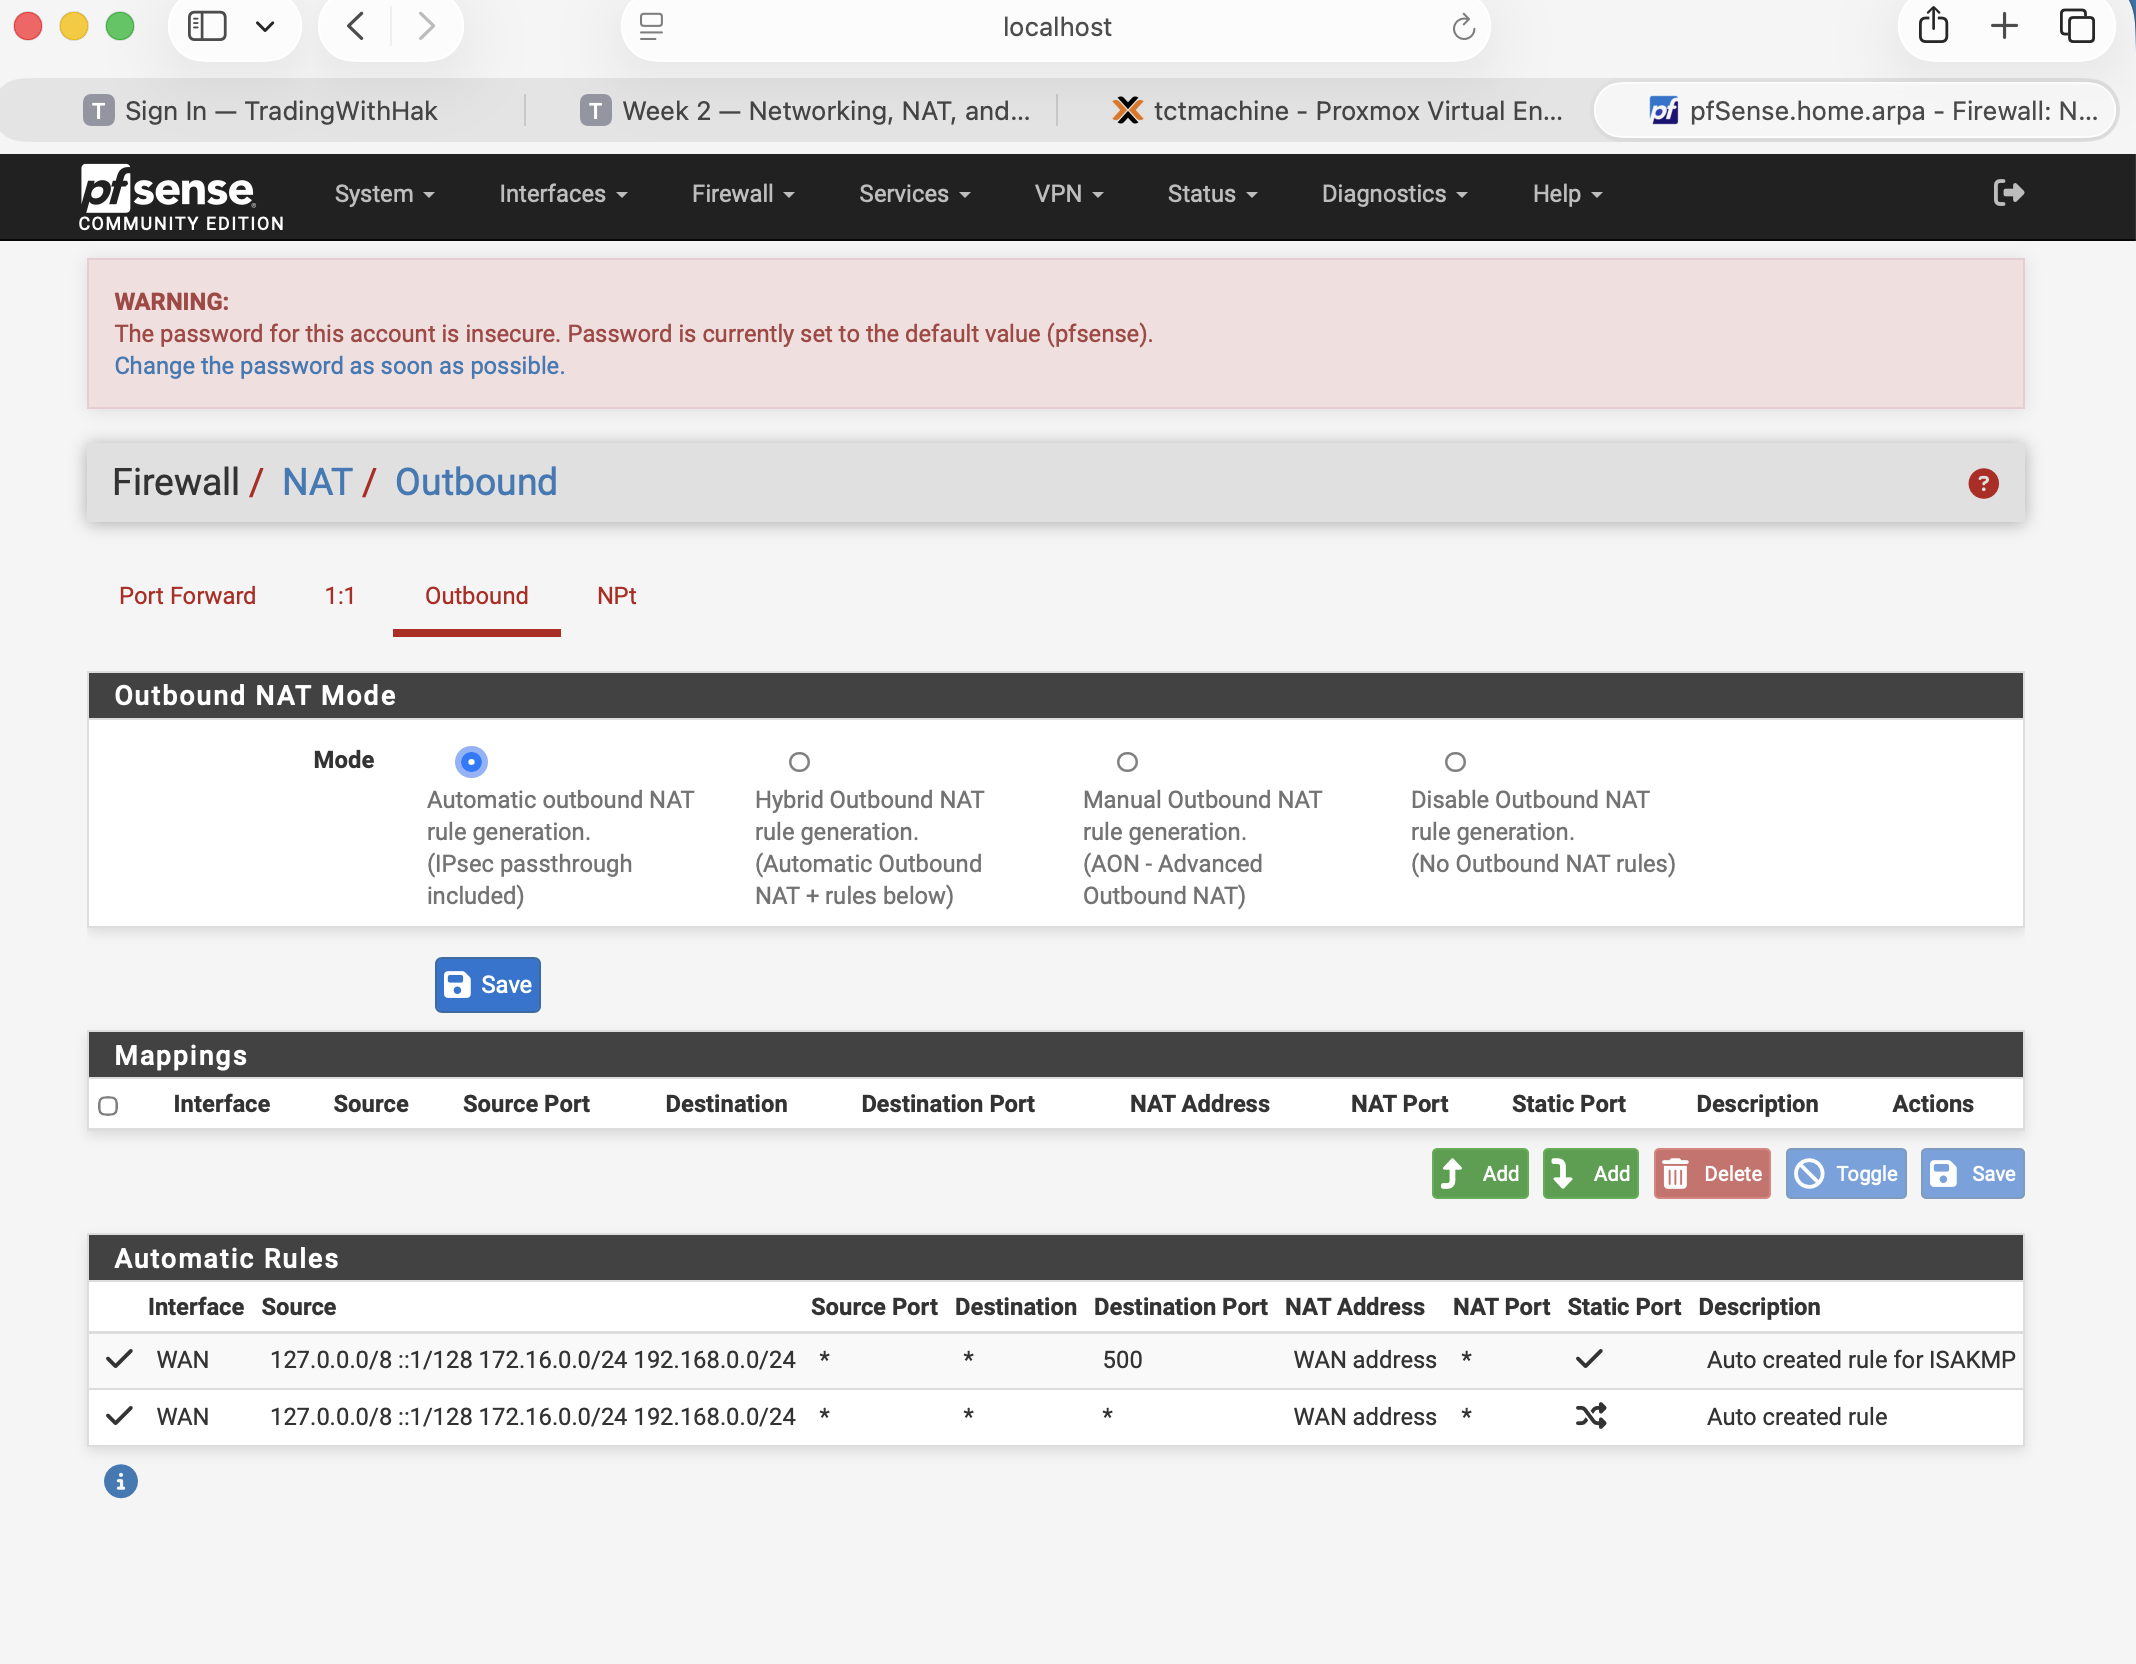
"WARNING: The password for this account is insecure. Password is currently set to the default value (pfsense)."
Fix immediately in System → User Manager → admin → set strong password. Anyone on the school LAN (
10.10.0.0/16) can otherwise log in to https://10.10.110.10 and own your firewall.Step 3.3 — Capture the verification pages
Six screenshots, in this order
- Status → Dashboard — version, uptime, interfaces, DNS servers
- Services → DHCP Server → DMZ tab — General Settings + Primary Address Pool
- Services → DHCP Server → LAN tab — same sections
- Services → DNS Resolver → General Settings — interfaces, DNSSEC, listen ports
- Firewall → NAT → Outbound — confirms automatic NAT mode
- Status → DHCP Leases — current leases (jumpbox + WinSrv)
Verified state — pfSense2
| Field | Value |
|---|---|
| Build | pfSense Community Edition 2.8.1-RELEASE (amd64), built 2025-12-15, FreeBSD 15.0-CURRENT |
| Hostname | pfSense.home.arpa (default — change before AD install) |
| Netgate Device ID | e1878a207e806ad04215 (registered CE install) |
| Resources | 2 vCPU @ 2.49 GHz · 1991 MiB RAM (12% in use) · 1024 MiB swap (0%) |
| WAN | 10.10.110.10/16 on vtnet0 (vmbr0) · uplink to school LAN |
| DMZ (labeled "lan") | 172.16.0.1/24 on vtnet1 (vmbr1) |
| LAN (labeled "opt1") | 192.168.0.1/24 on vtnet2 (vmbr2) |
| DMZ DHCP scope | ISC DHCP · pool 172.16.0.100 – .200 · pushed DNS 172.16.0.1 · allow all clients |
| LAN DHCP scope | ISC DHCP · pool 192.168.0.100 – .200 · pushed DNS 192.168.0.1 · allow all clients |
| DNS Resolver | Unbound · enabled · listens DMZ + LAN (not WAN) · egresses WAN · DNSSEC on · upstream 1.1.1.1 |
| Outbound NAT mode | Automatic — both 172.16/24 + 192.168/24 auto-MASQUERADEd out WAN address |
| Active DHCP leases | 1 active (172.16.0.100 = tctmachine/jumpbox) · 1 stale offline (192.168.0.100 = TCT-WinSrv pre-static — clean up via Status→DHCP Leases→Delete) |
| Admin password | DEFAULT (pfsense) — change immediately |
Findings — pfSense2
🚨 Default admin password
WebGUI displays a red banner on every page. Anyone reachable on 10.10.0.0/16 can log in. Highest-priority fix.
✓ NAT mode = Automatic
Both internal subnets get auto-MASQUERADE. No manual rules needed. Confirmed live by the jumpbox successfully reaching the internet via gateway 172.16.0.1.
✓ DNSSEC validation enabled
Unbound validates DNSSEC and only listens on internal interfaces — nothing exposed to WAN. Solid baseline.
⚠ Default hostname / domain
pfSense.home.arpa — the .arpa TLD is RFC-reserved for reverse-DNS infrastructure and is poor choice for an AD domain. Set to something like pfsense2.capstone.local in System → General Setup before promoting WinSrv.
⚠ Interface label mismatch
pfSense calls 172.16/24 "lan" and 192.168/24 "opt1". Internal handles only — relabel as DMZ / LAN in Interfaces → Assignments for clarity.
ℹ ISC DHCP end-of-life banner
pfSense's leases page warns ISC DHCP is deprecated; future versions will use Kea. Migration path: System → Advanced → Networking → DHCP Backend. Not blocking, document for Week 5.
✓ LAN firewall ruleset is hardened (defense-in-depth)
Discovered during VM 105 verification: the LAN interface has a deliberately tight 9-rule policy, not the default "allow LAN to any". Strong Week 3 evidence as-is. Detail in the table below.
LAN firewall rules — verified 2026-05-05
Order matters in pfSense (top-to-bottom, first match wins). This ruleset implements: ICMP only to gateway · DNS+NTP only to local resolver · no lateral movement to DMZ/RFC1918 · web/DNS/NTP outbound only via curated alias · WinRM/SMB allowed for Windows admin.
| # | Action | Protocol | Source → Destination | Description |
|---|---|---|---|---|
| 1 | PASS | ICMP echoreq | LAN_NET → This Firewall | Ping outbound (gateway only) |
| 2 | PASS | UDP/123 | LAN_NET → This Firewall | NTP to pfSense |
| 3 | PASS | UDP/53 | LAN_NET → This Firewall | DNS to pfSense (Unbound) |
| 4 | BLOCK | any | LAN_NET → This Firewall | Block servers → pfSense management (web GUI, SSH) |
| 5 | BLOCK | any | LAN_NET → DMZ_NET | Block LAN-initiated traffic to DMZ (no return-initiated) |
| 6 | BLOCK | any | LAN_NET → RFC1918 alias | Block lateral movement to other private ranges |
| 7 | PASS | TCP/UDP | LAN_NET → OUTBOUND_WEB alias | Outbound web/DNS/NTP only · alias = ports {80, 443, 53, 123} |
| 8 | PASS | TCP | LAN_NET → port 5985–5986 | WinRM (Windows remote mgmt) |
| 9 | PASS | TCP | LAN_NET → port 445 | SMB (file sharing) — note: rule label says "WinRM", actually MS-DS |
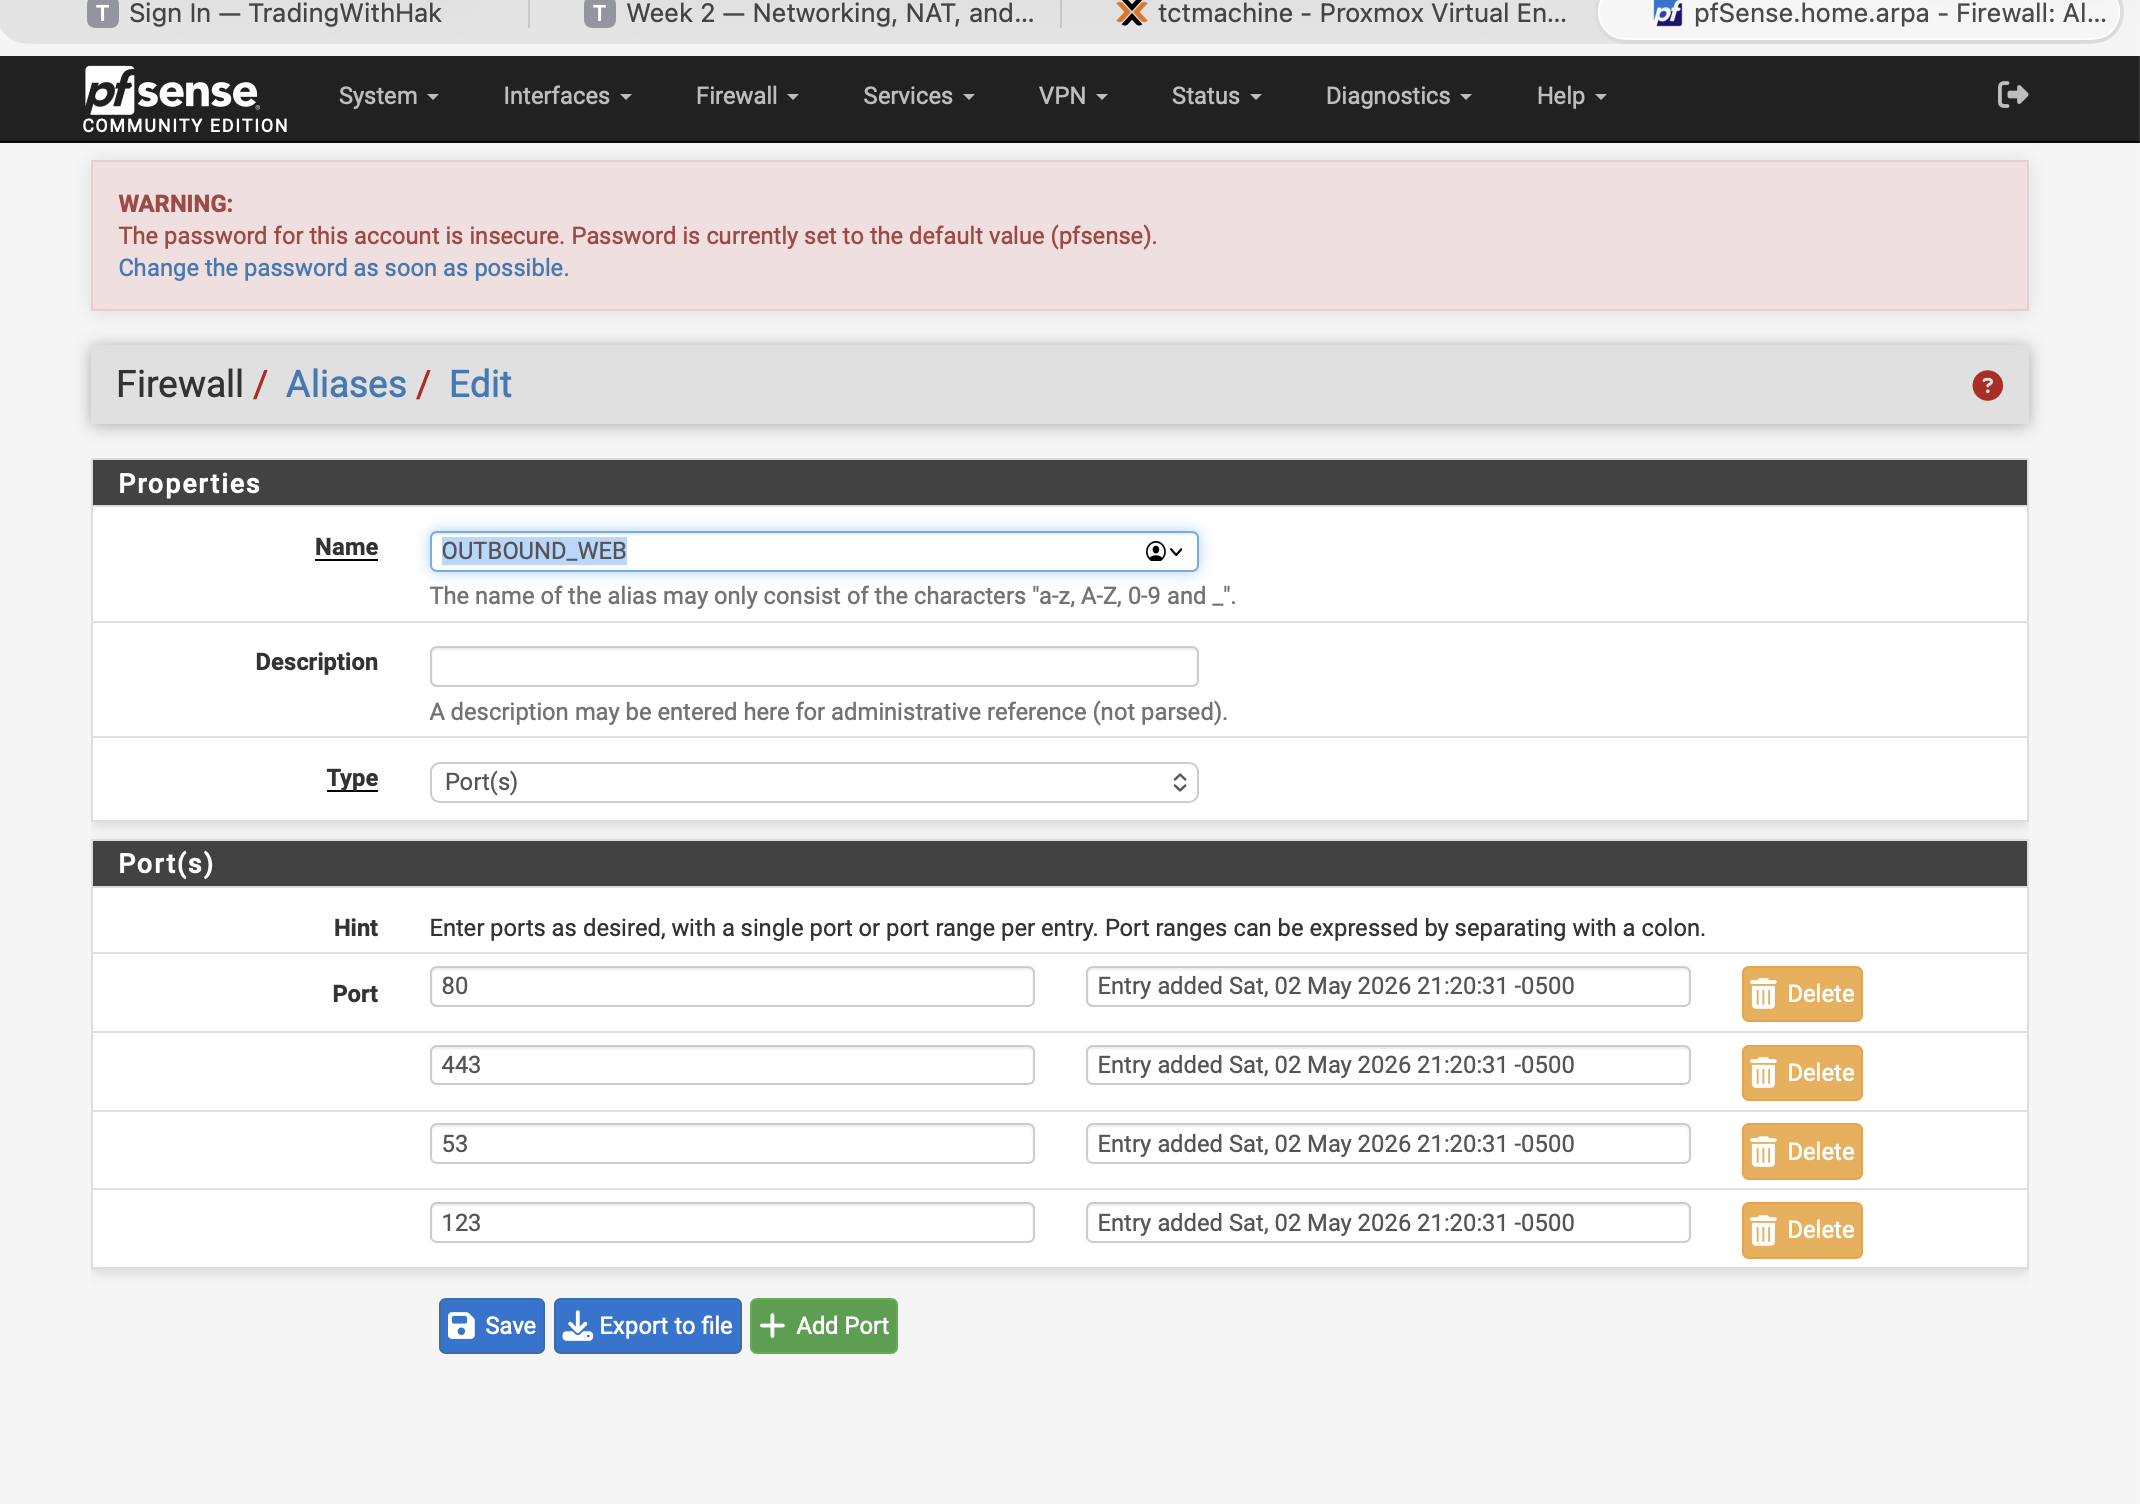
OUTBOUND_WEB alias — verified contents
| Port | Service | Notes |
|---|---|---|
| 80 | HTTP | Plain web (often used for redirect to 443, package mirrors) |
| 443 | HTTPS | TLS-encrypted web (apt mirrors, GitHub, Microsoft Update, etc.) |
| 53 | DNS | For DNS-over-TCP fallback to upstream resolvers (UDP/53 is already covered by rule 3) |
| 123 | NTP | Time sync to pool.ntp.org and similar — though VMs should prefer pfSense's NTP via rule 2 |
Alias entries created Sat, 02 May 2026 21:20:31 -0500.
curl https://anything.com works (rule 7 + 1 covers TLS handshake), apt update works (HTTP/HTTPS to mirrors), Windows Update works (HTTPS to Microsoft + WinRM ports). What doesn't work: ping 1.1.1.1 from LAN (only ICMP to gateway is allowed — by design), SSH outbound to arbitrary internet hosts, arbitrary outbound TCP. This is a feature, not a bug.Screenshots
WAN/DMZ/LAN banner with all three IPs.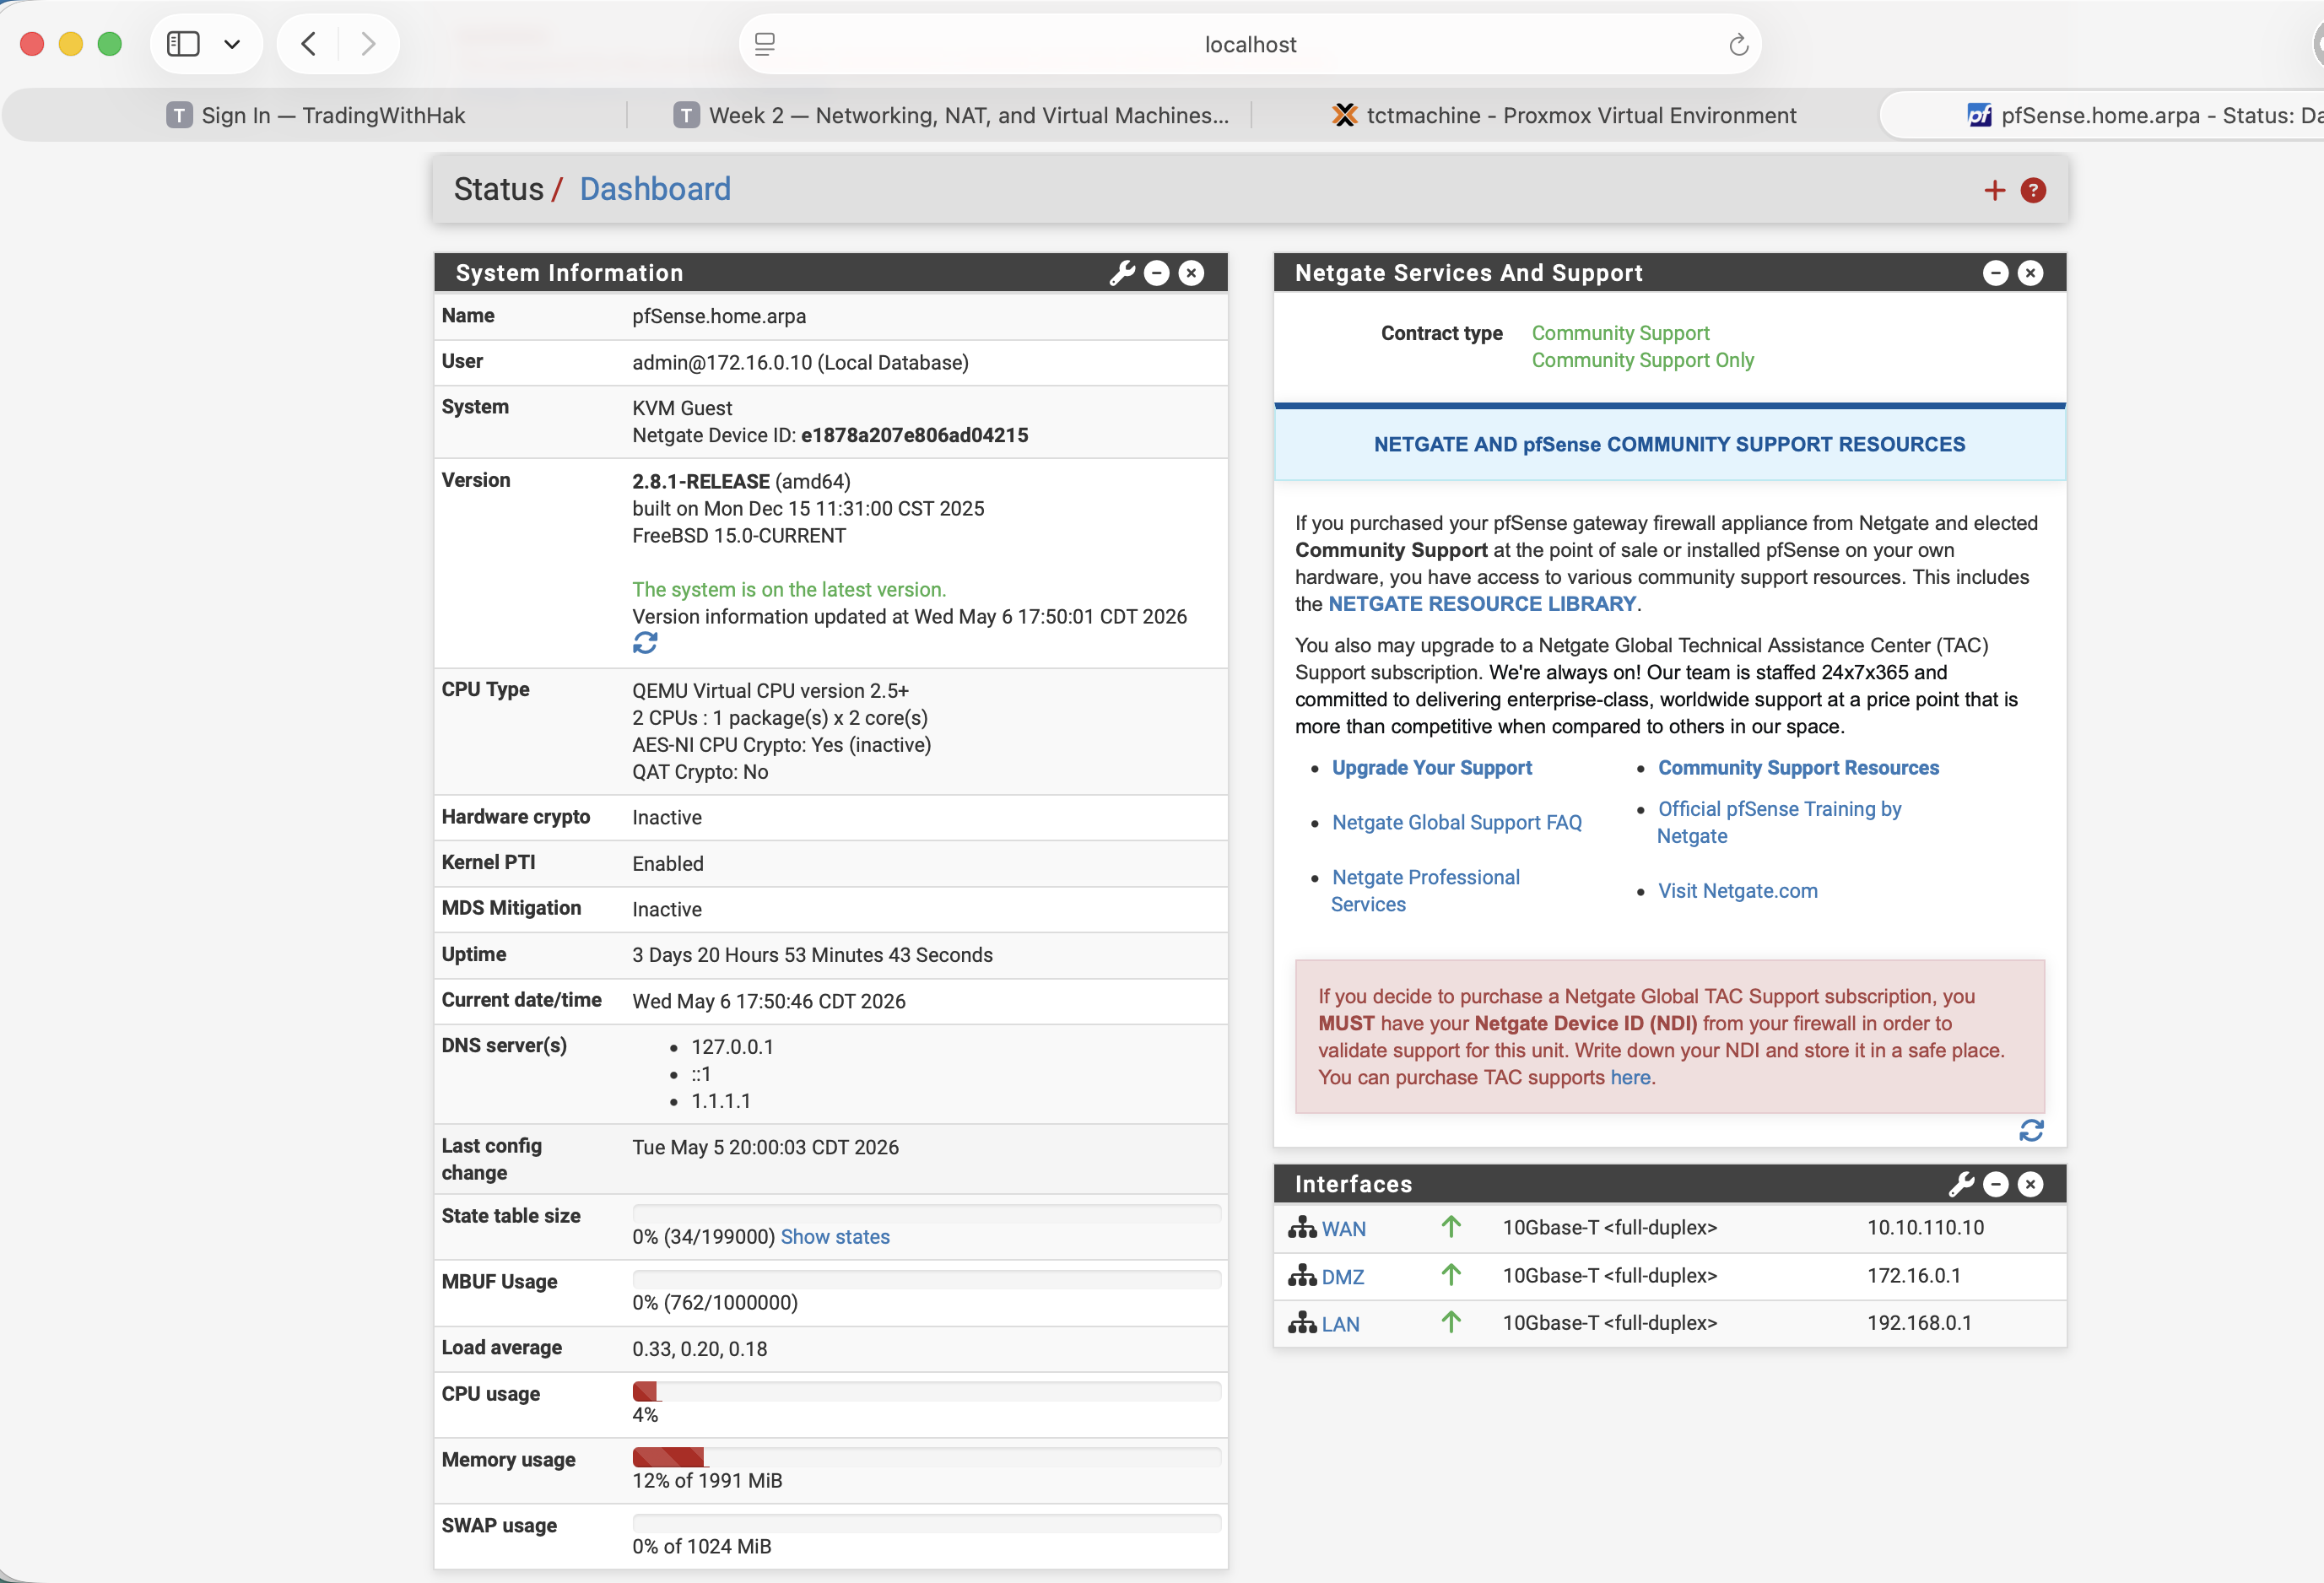
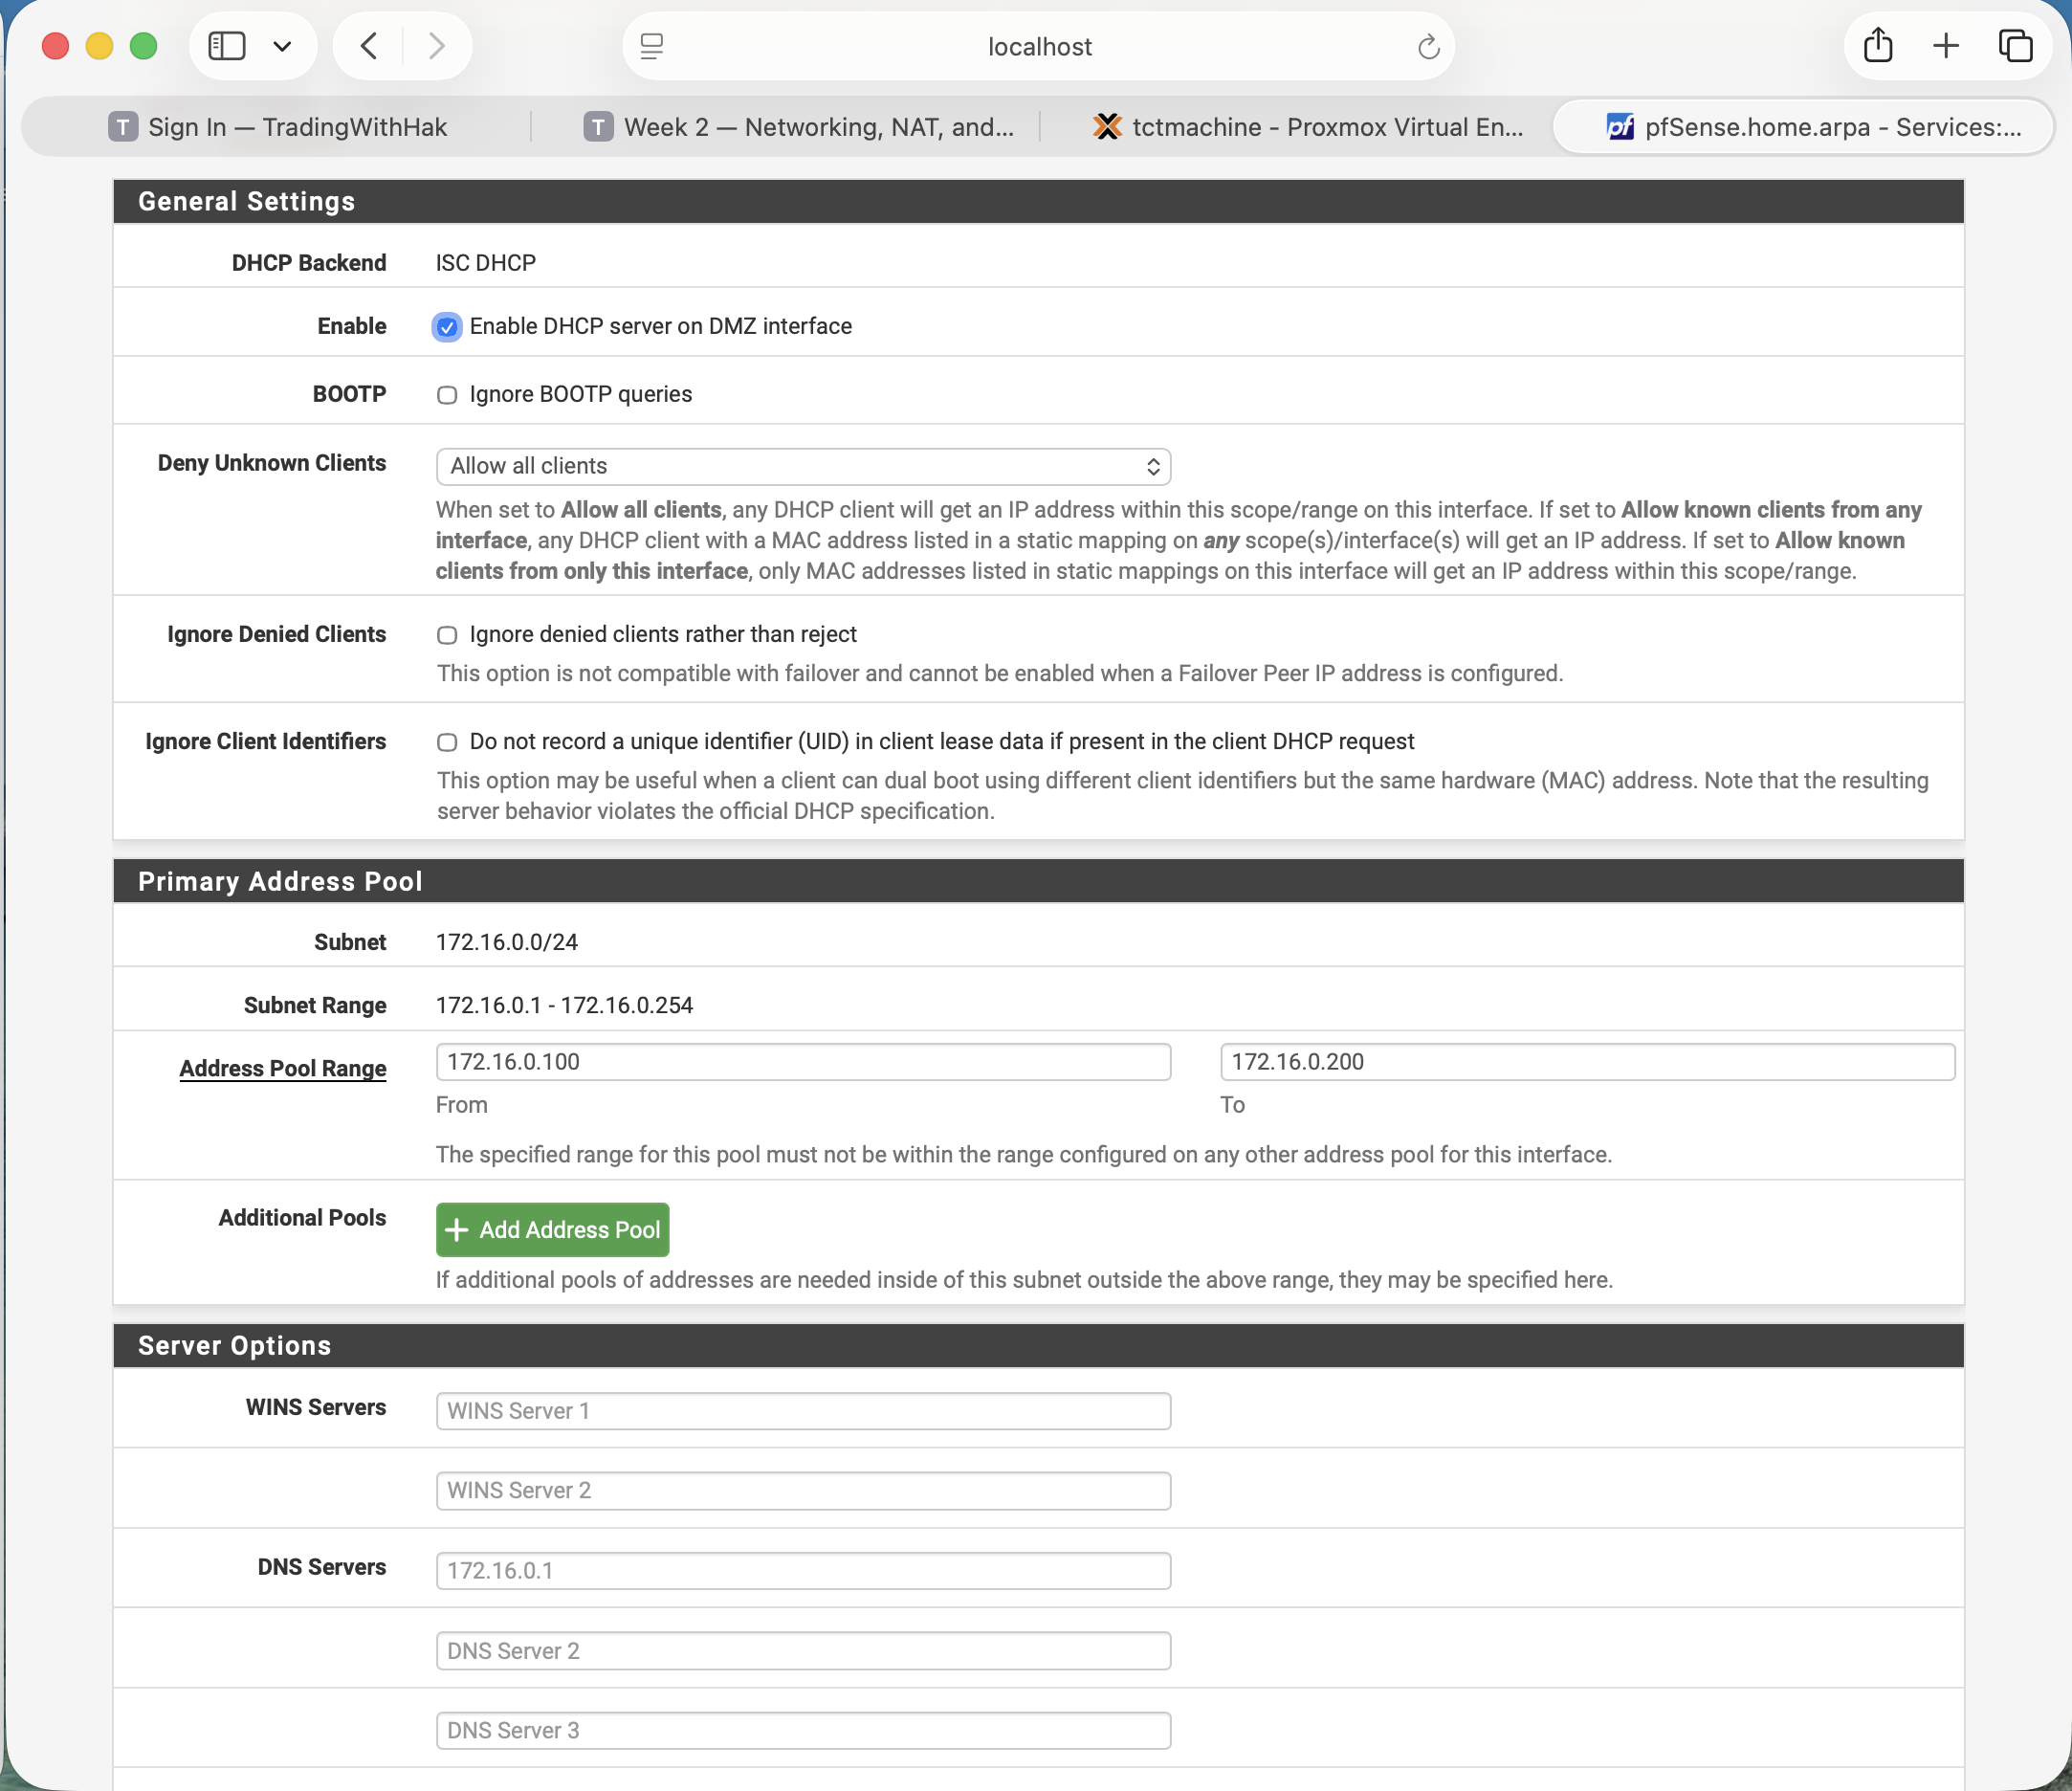
172.16.0.0/24 · pool .100–.200 · DNS 172.16.0.1.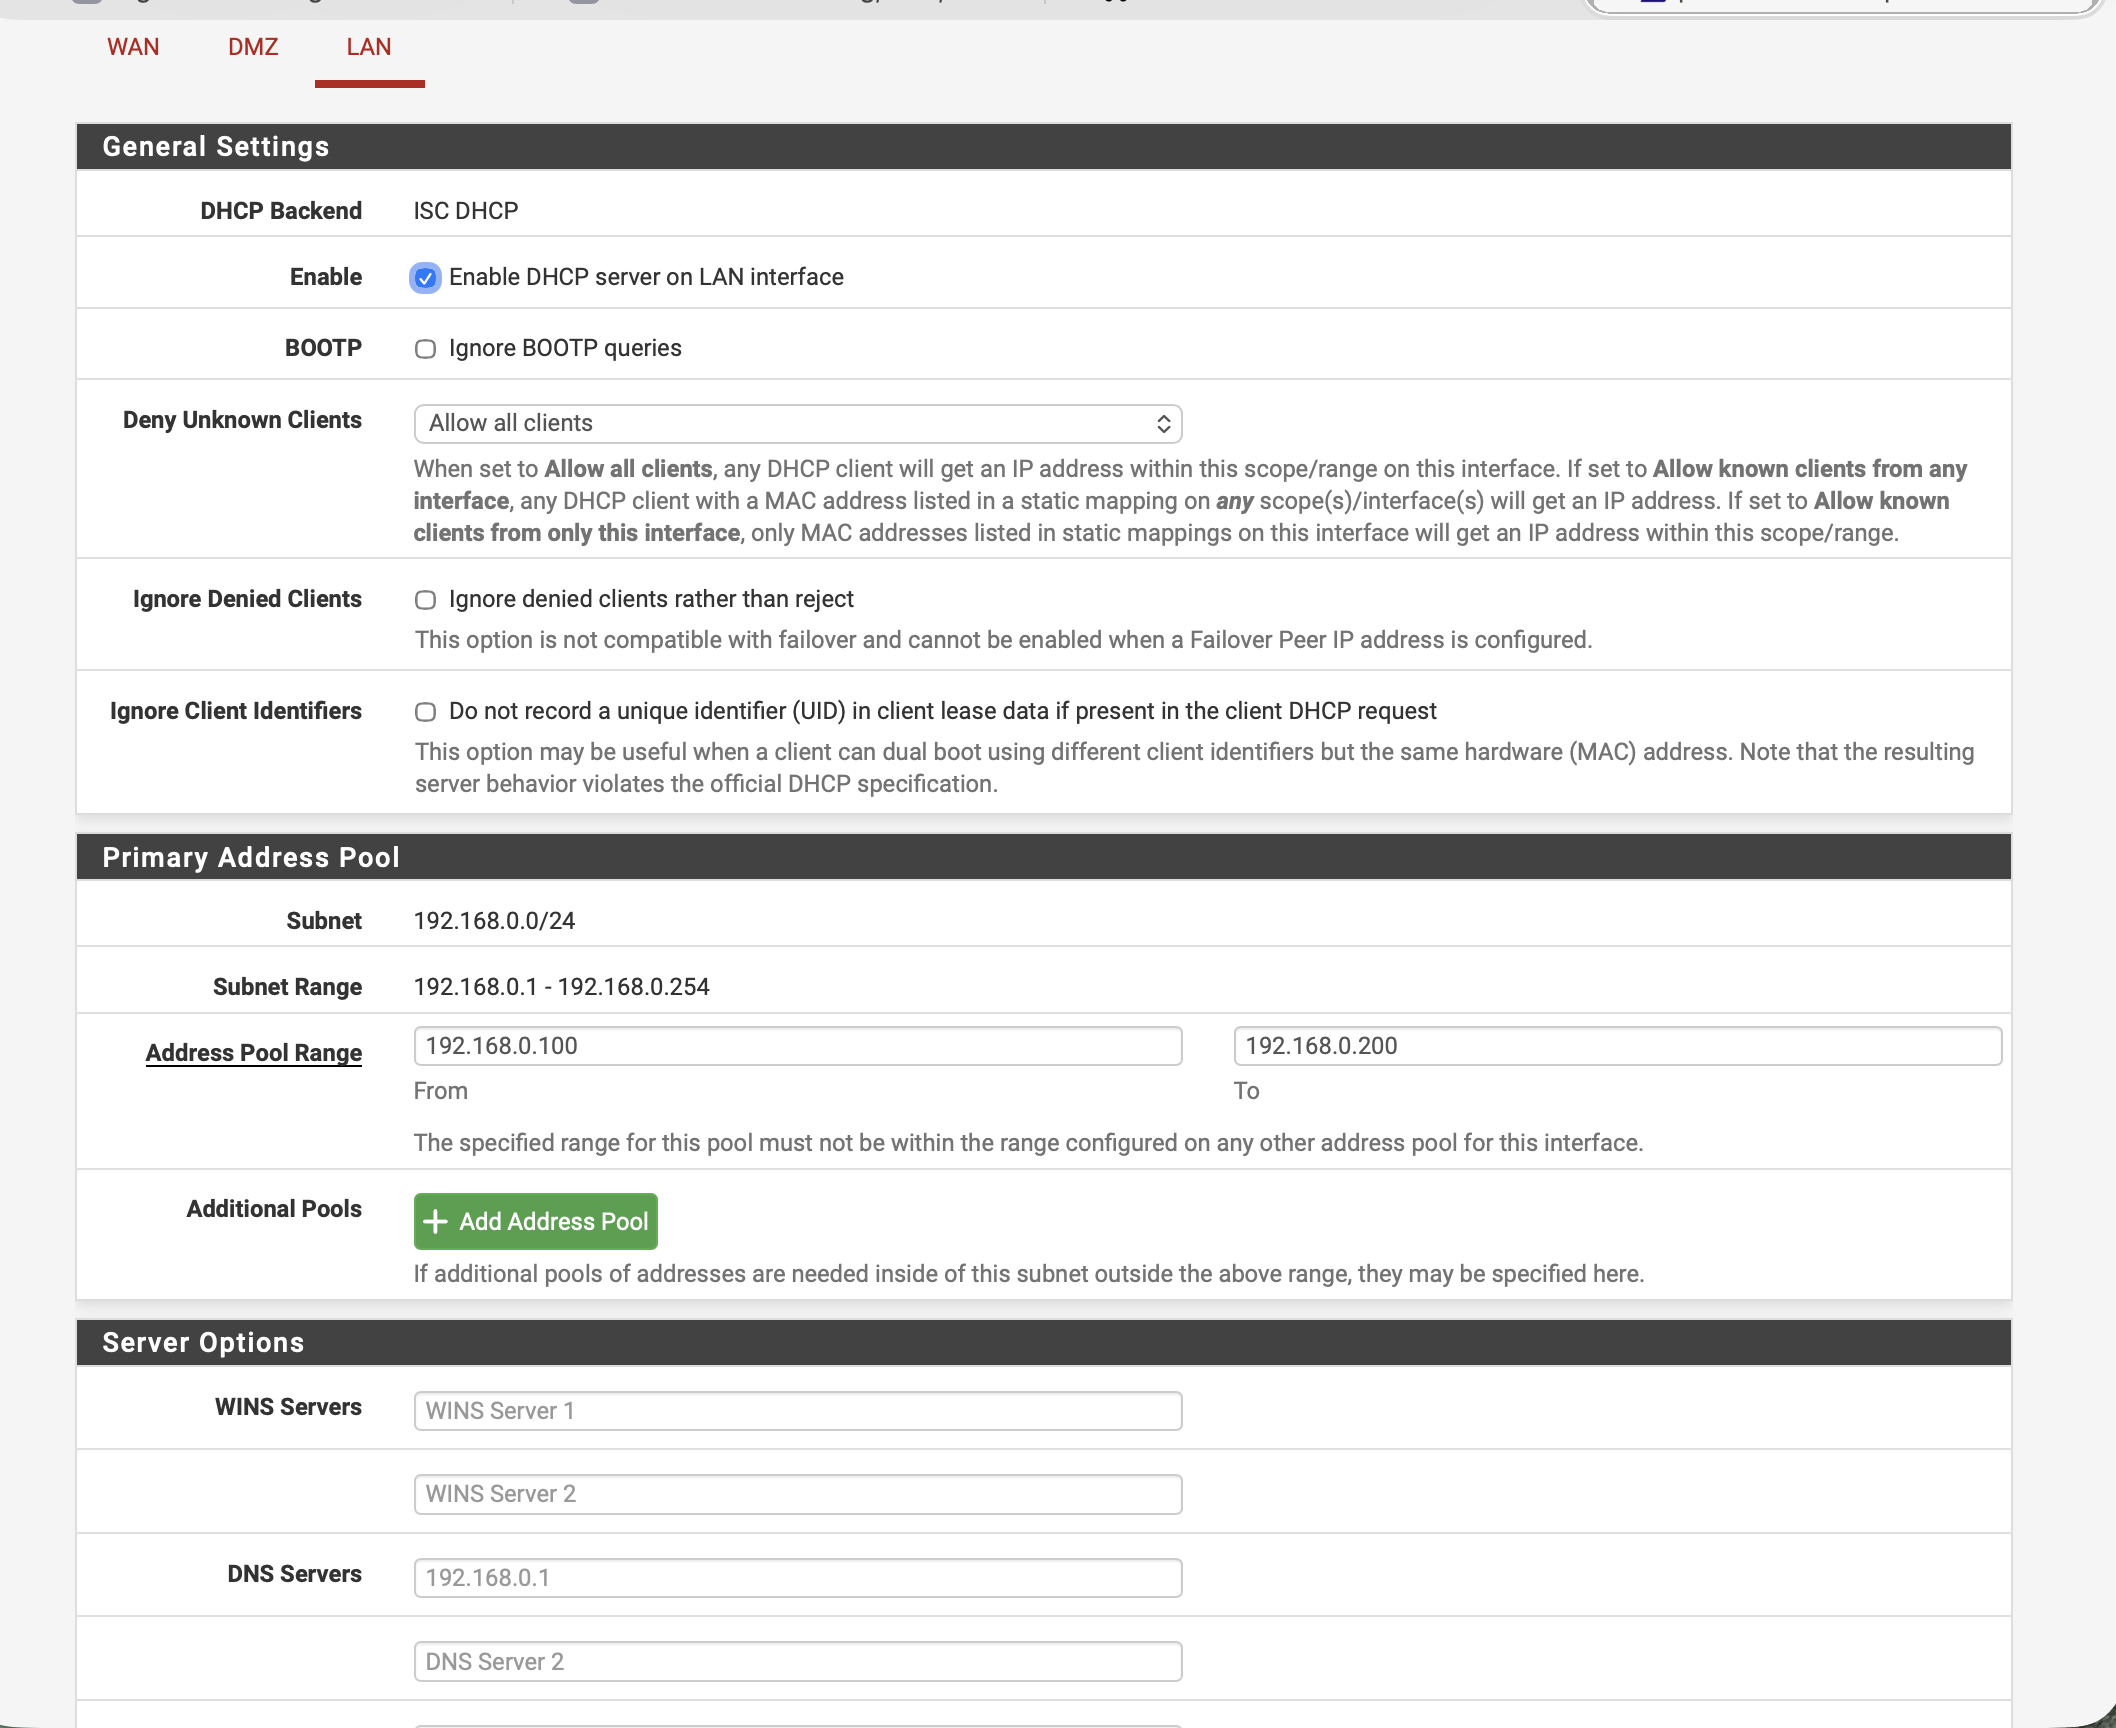
192.168.0.0/24 · pool .100–.200 · DNS 192.168.0.1.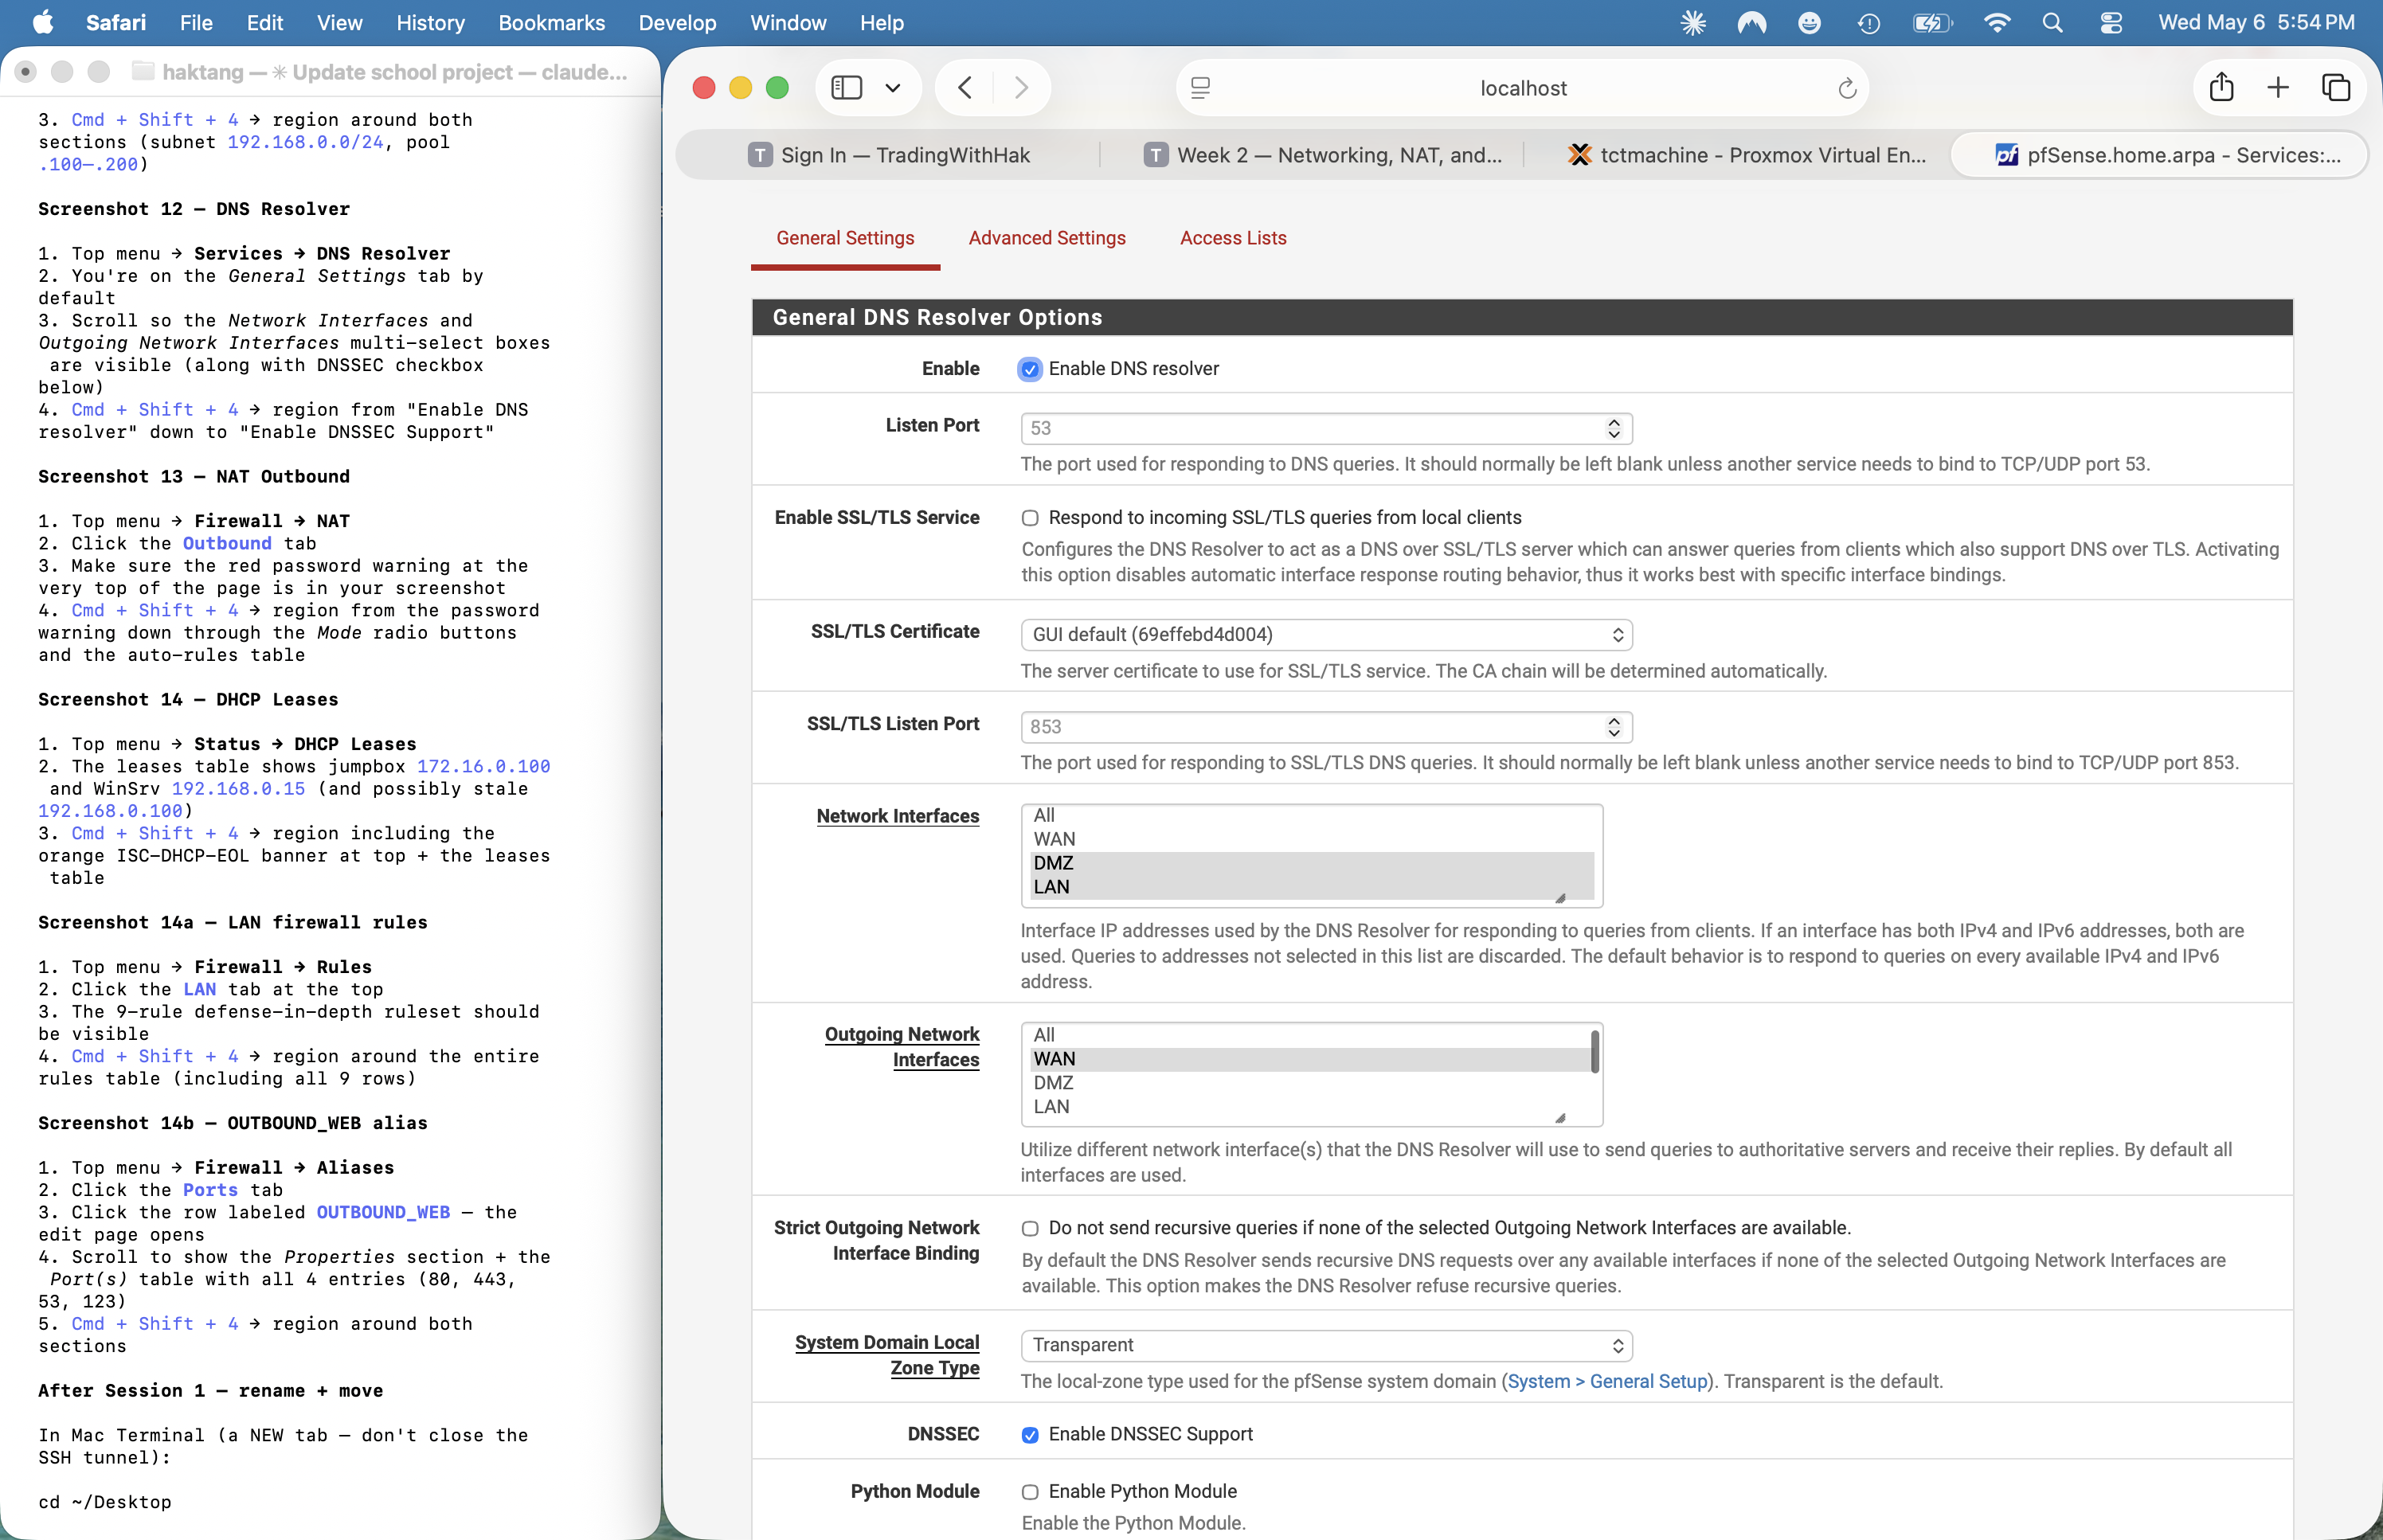
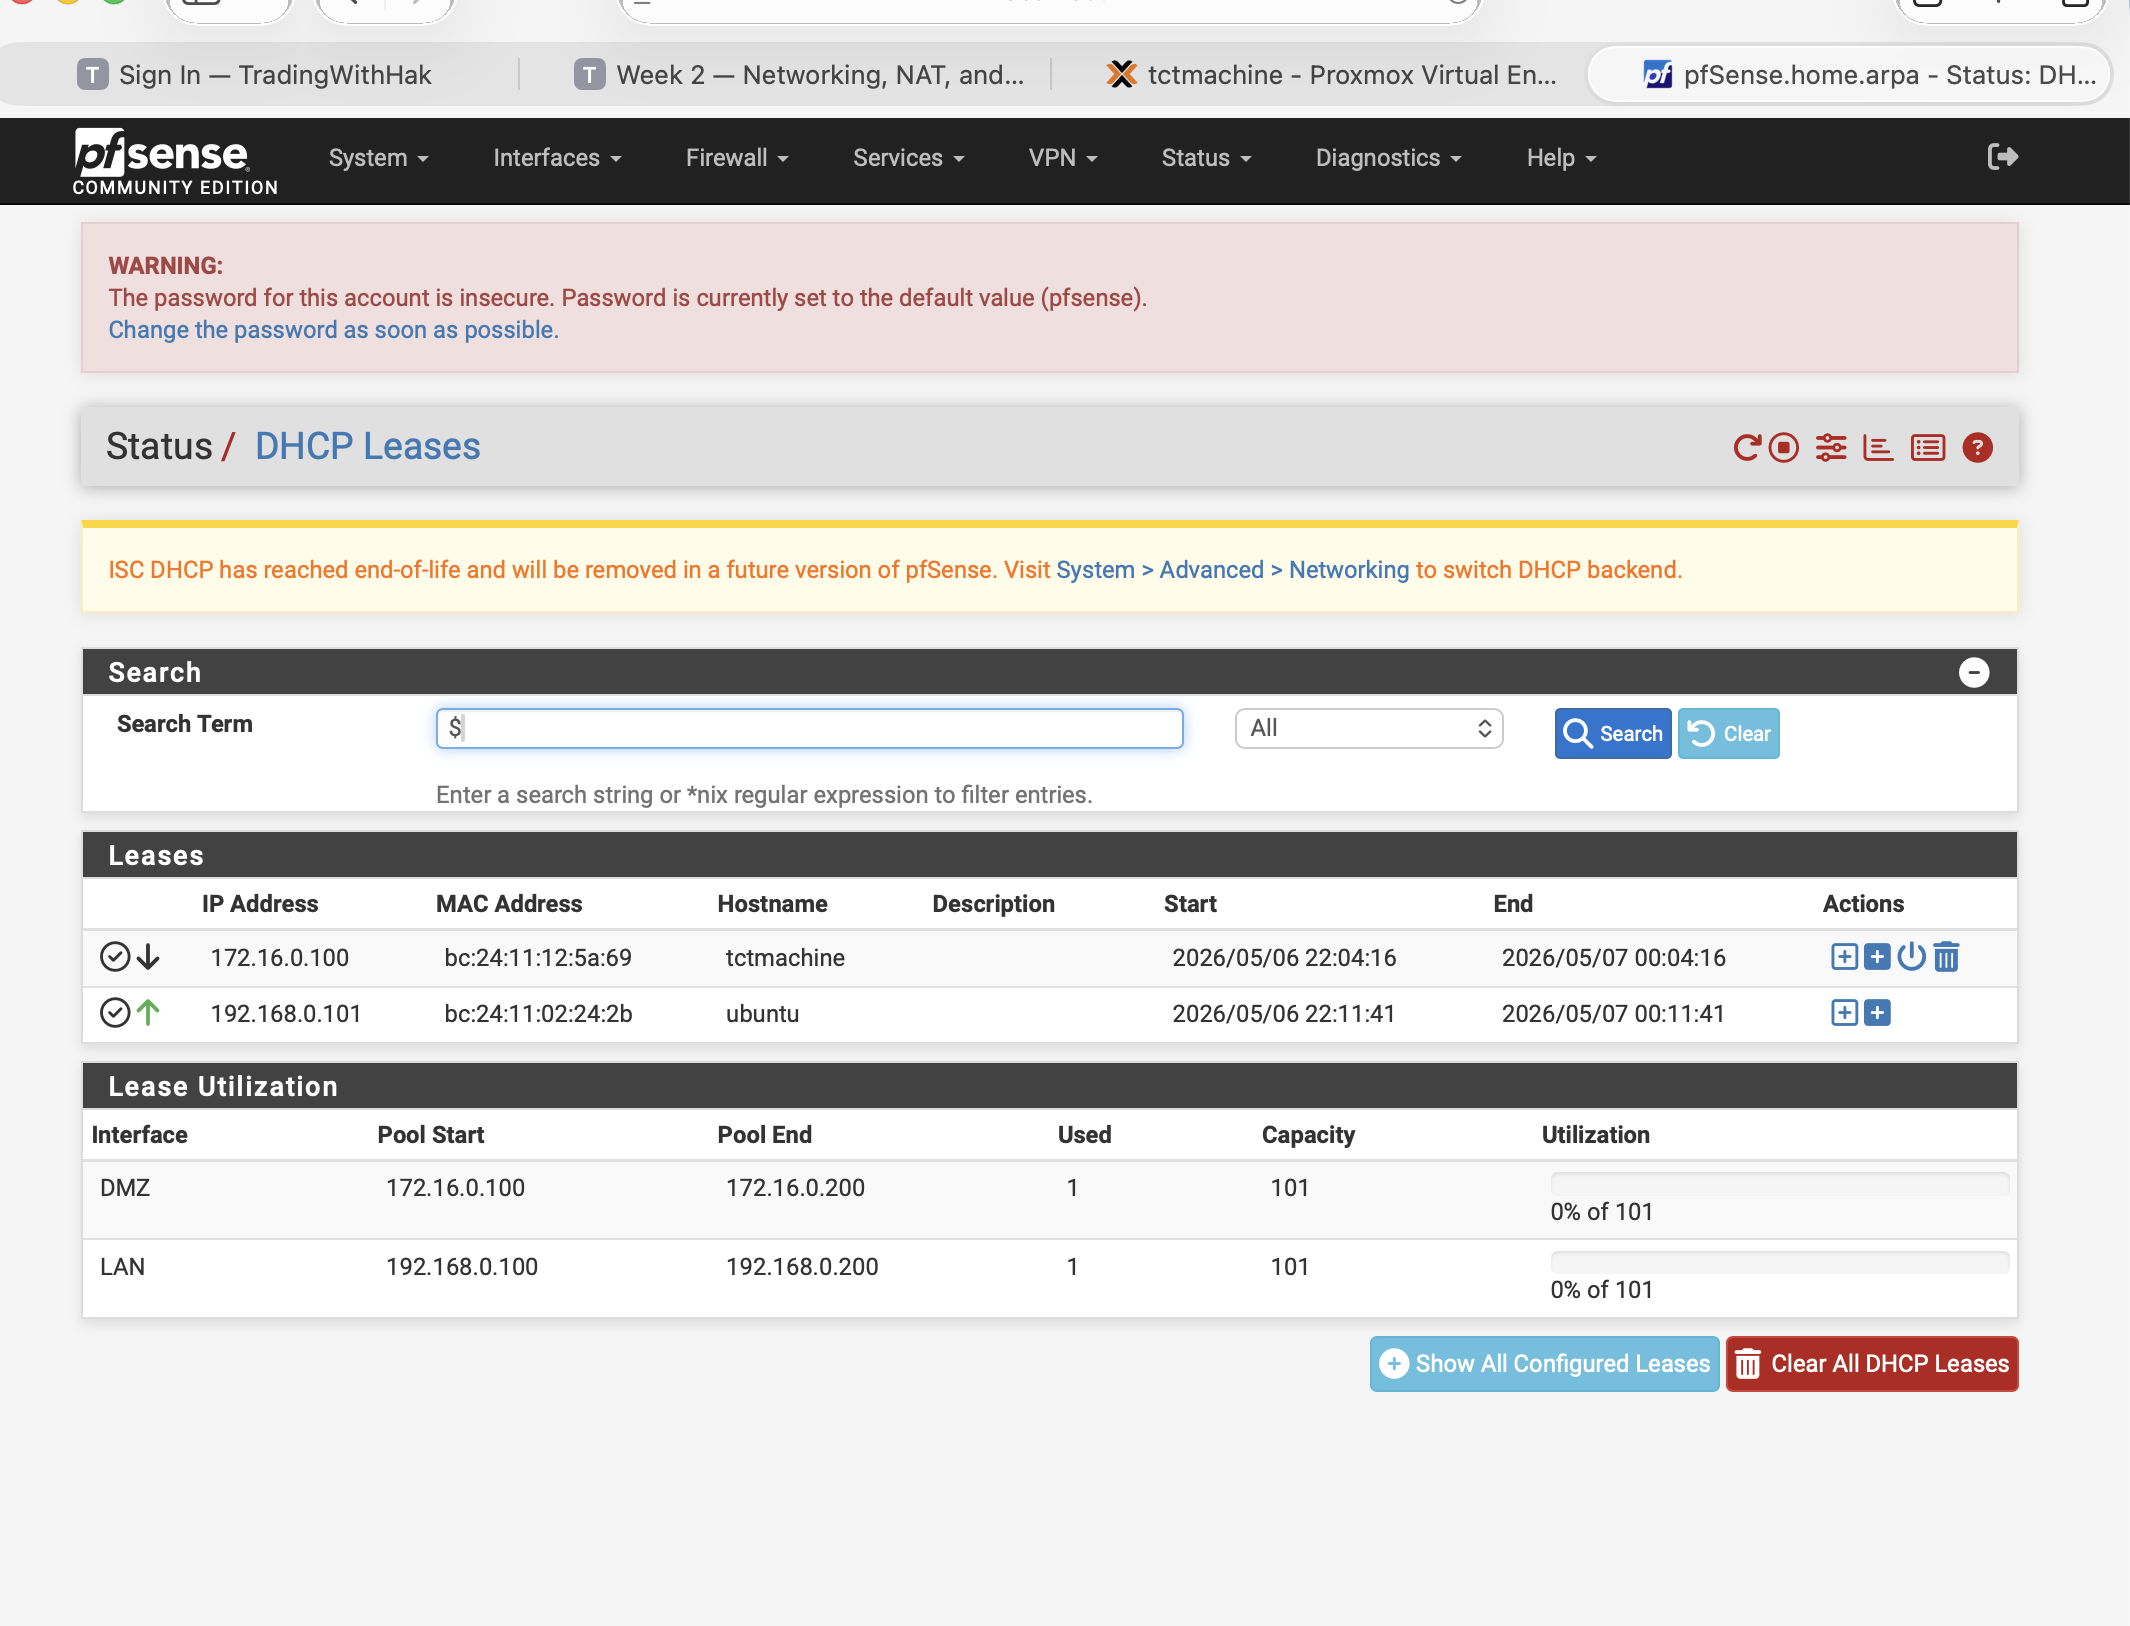
172.16.0.100 and second host at 192.168.0.101. ISC-DHCP EOL banner visible.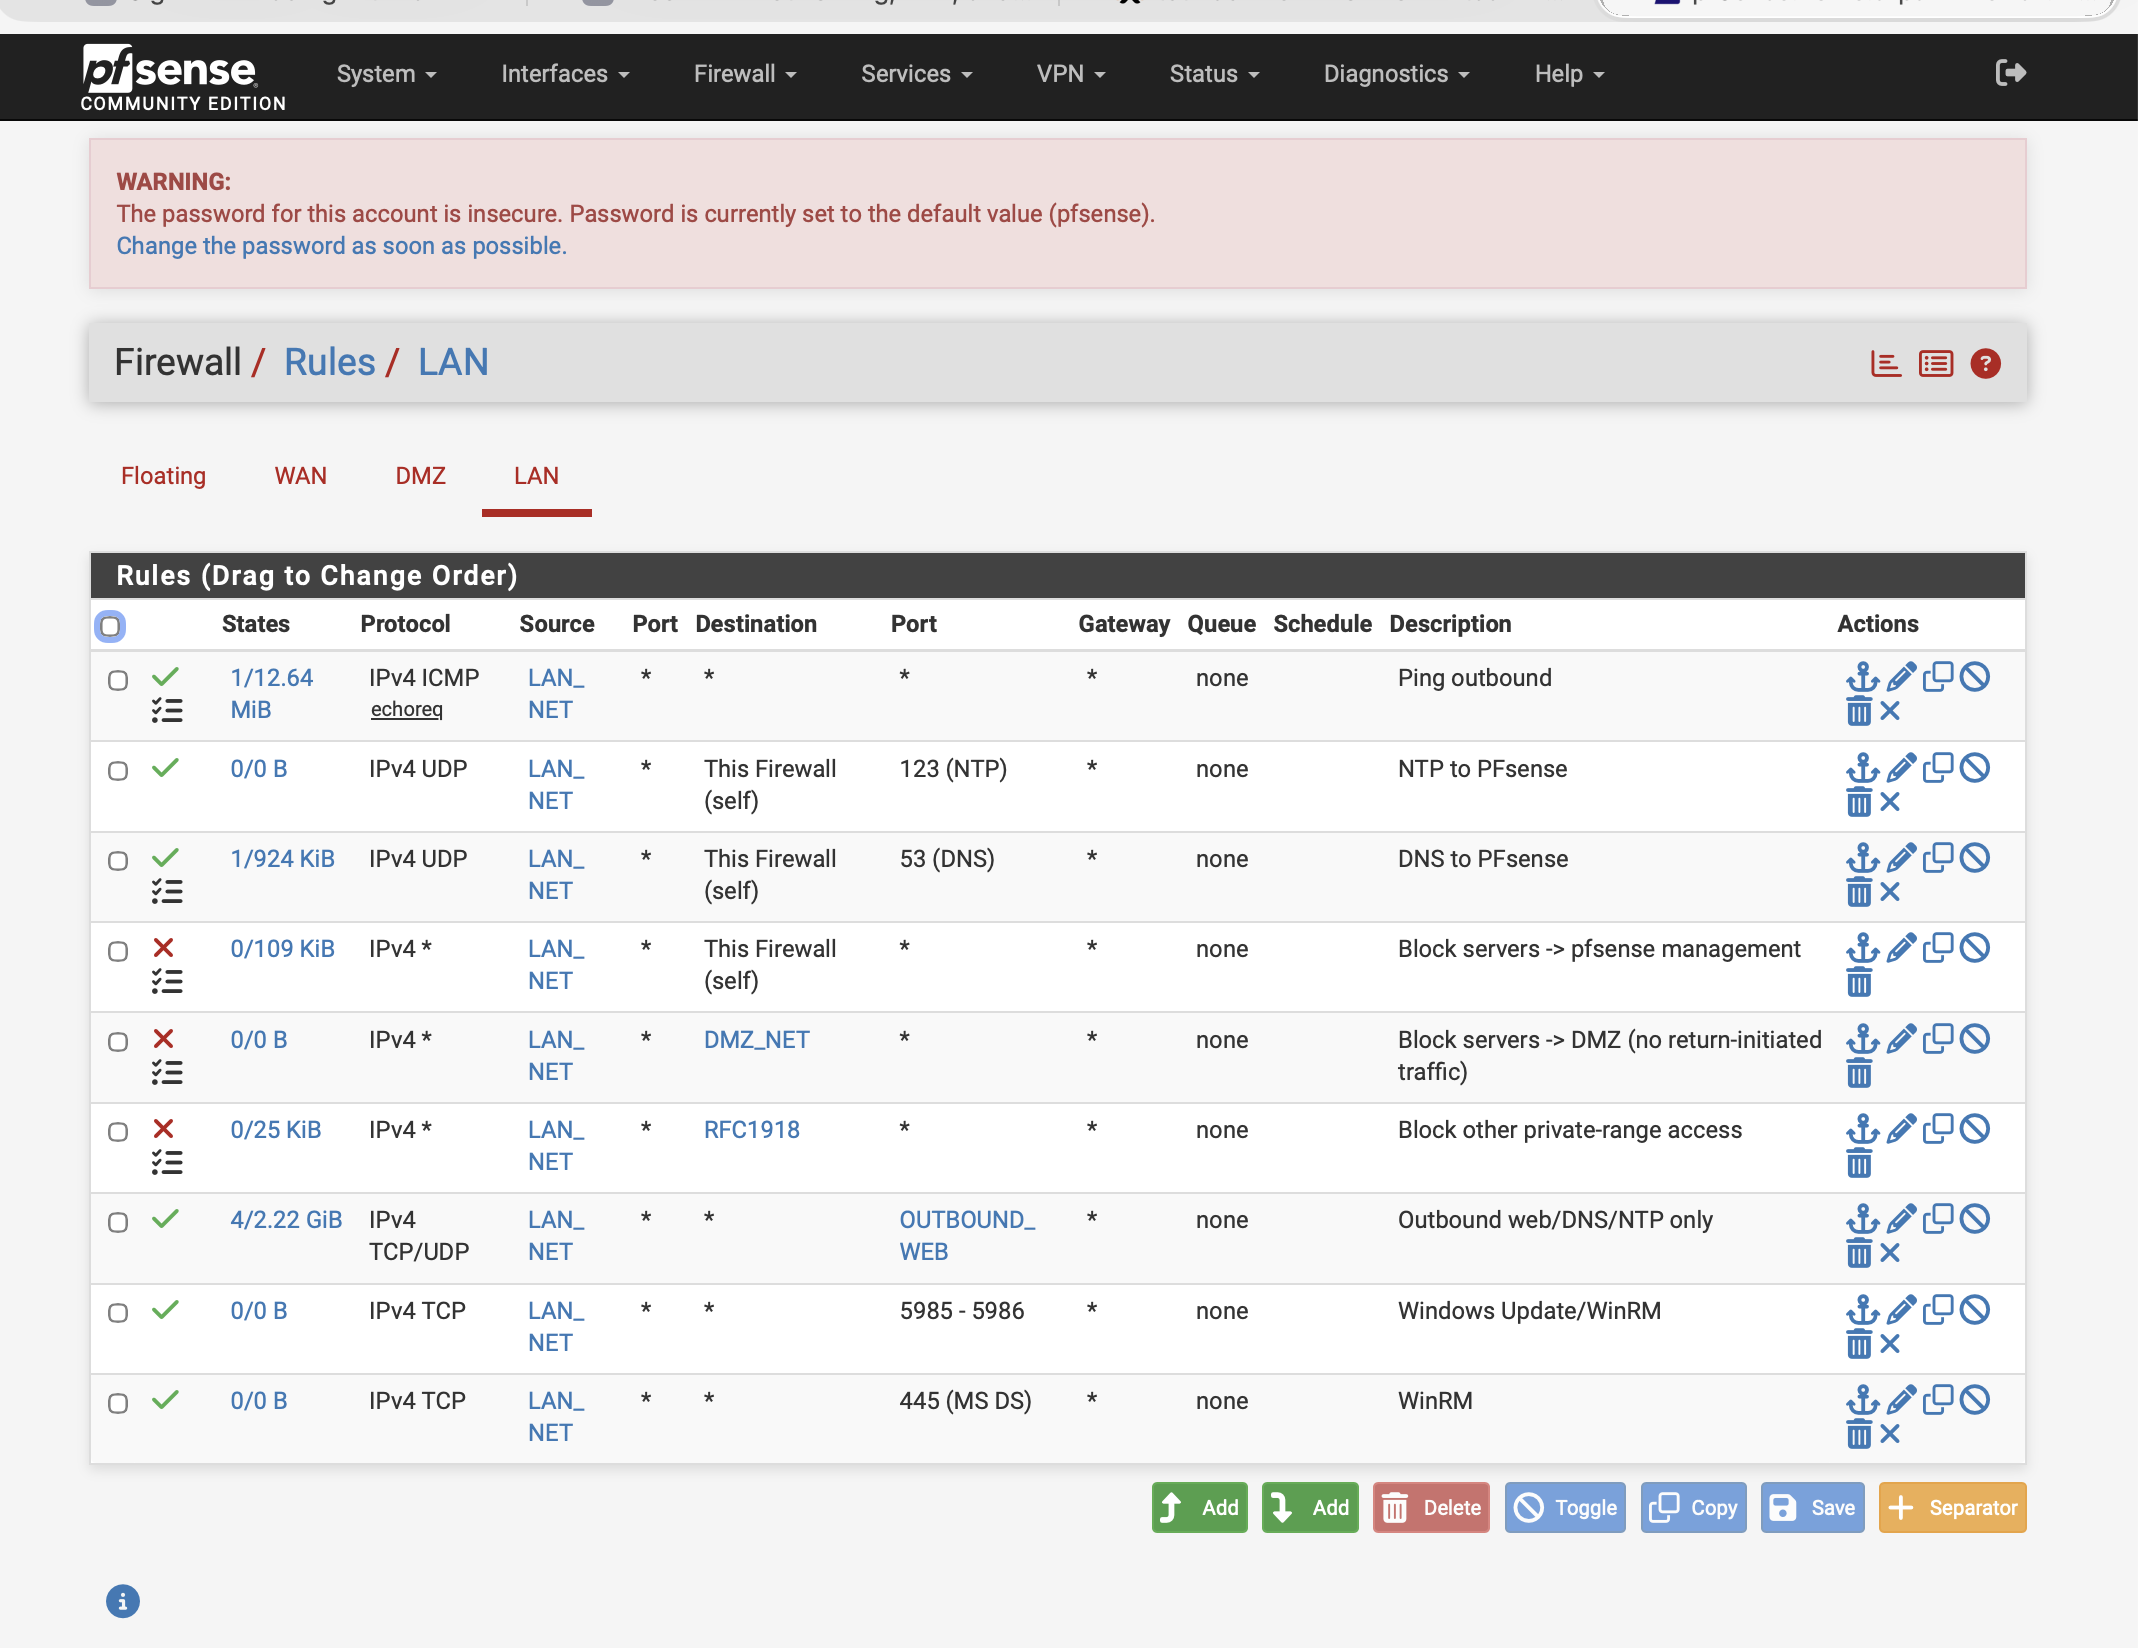
{80, 443, 53, 123}. The destination set rule 7 allows.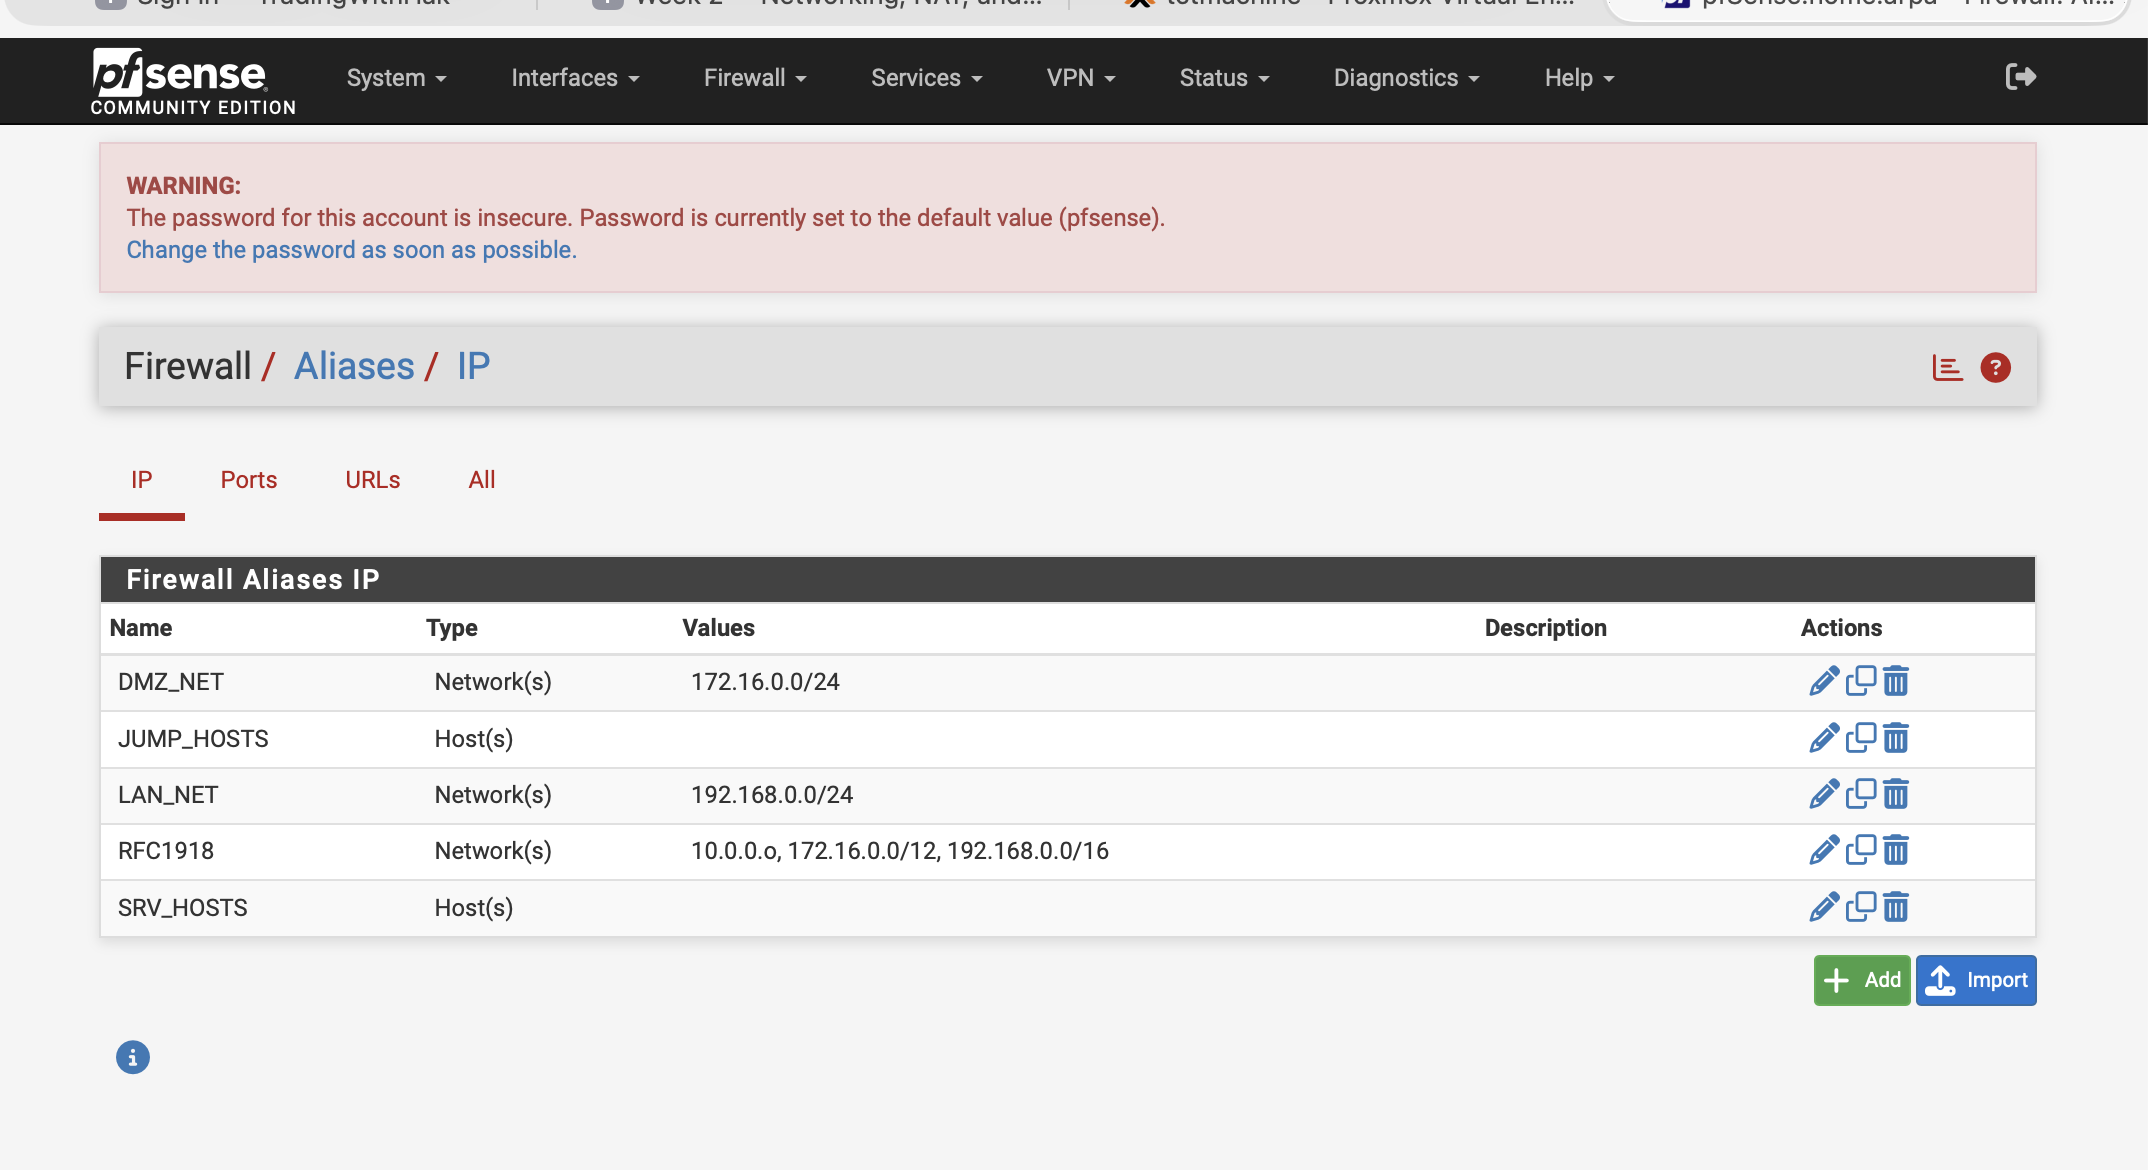
DMZ_NET, LAN_NET, RFC1918, plus host aliases JUMP_HOSTS + SRV_HOSTS. ⚠ RFC1918 alias shows 10.0.0.o — looks like a typo (should be 10.0.0.0/8); verify and fix.Phase 4 — WinSrv (VM 102)
Verified ✓ (fresh OS — no Week 2 services yet)Goal: confirm Windows Server 2025 Eval install, network config, eval license clock, and current installed roles (= baseline only).
Step 4.1 — Open WinSrv console + sign in
Proxmox noVNC console
Click VM 102 (WinSrv) in the Proxmox tree → >_ Console. Click in the console area, press a key, sign in as Administrator. Server Manager opens automatically on first login.
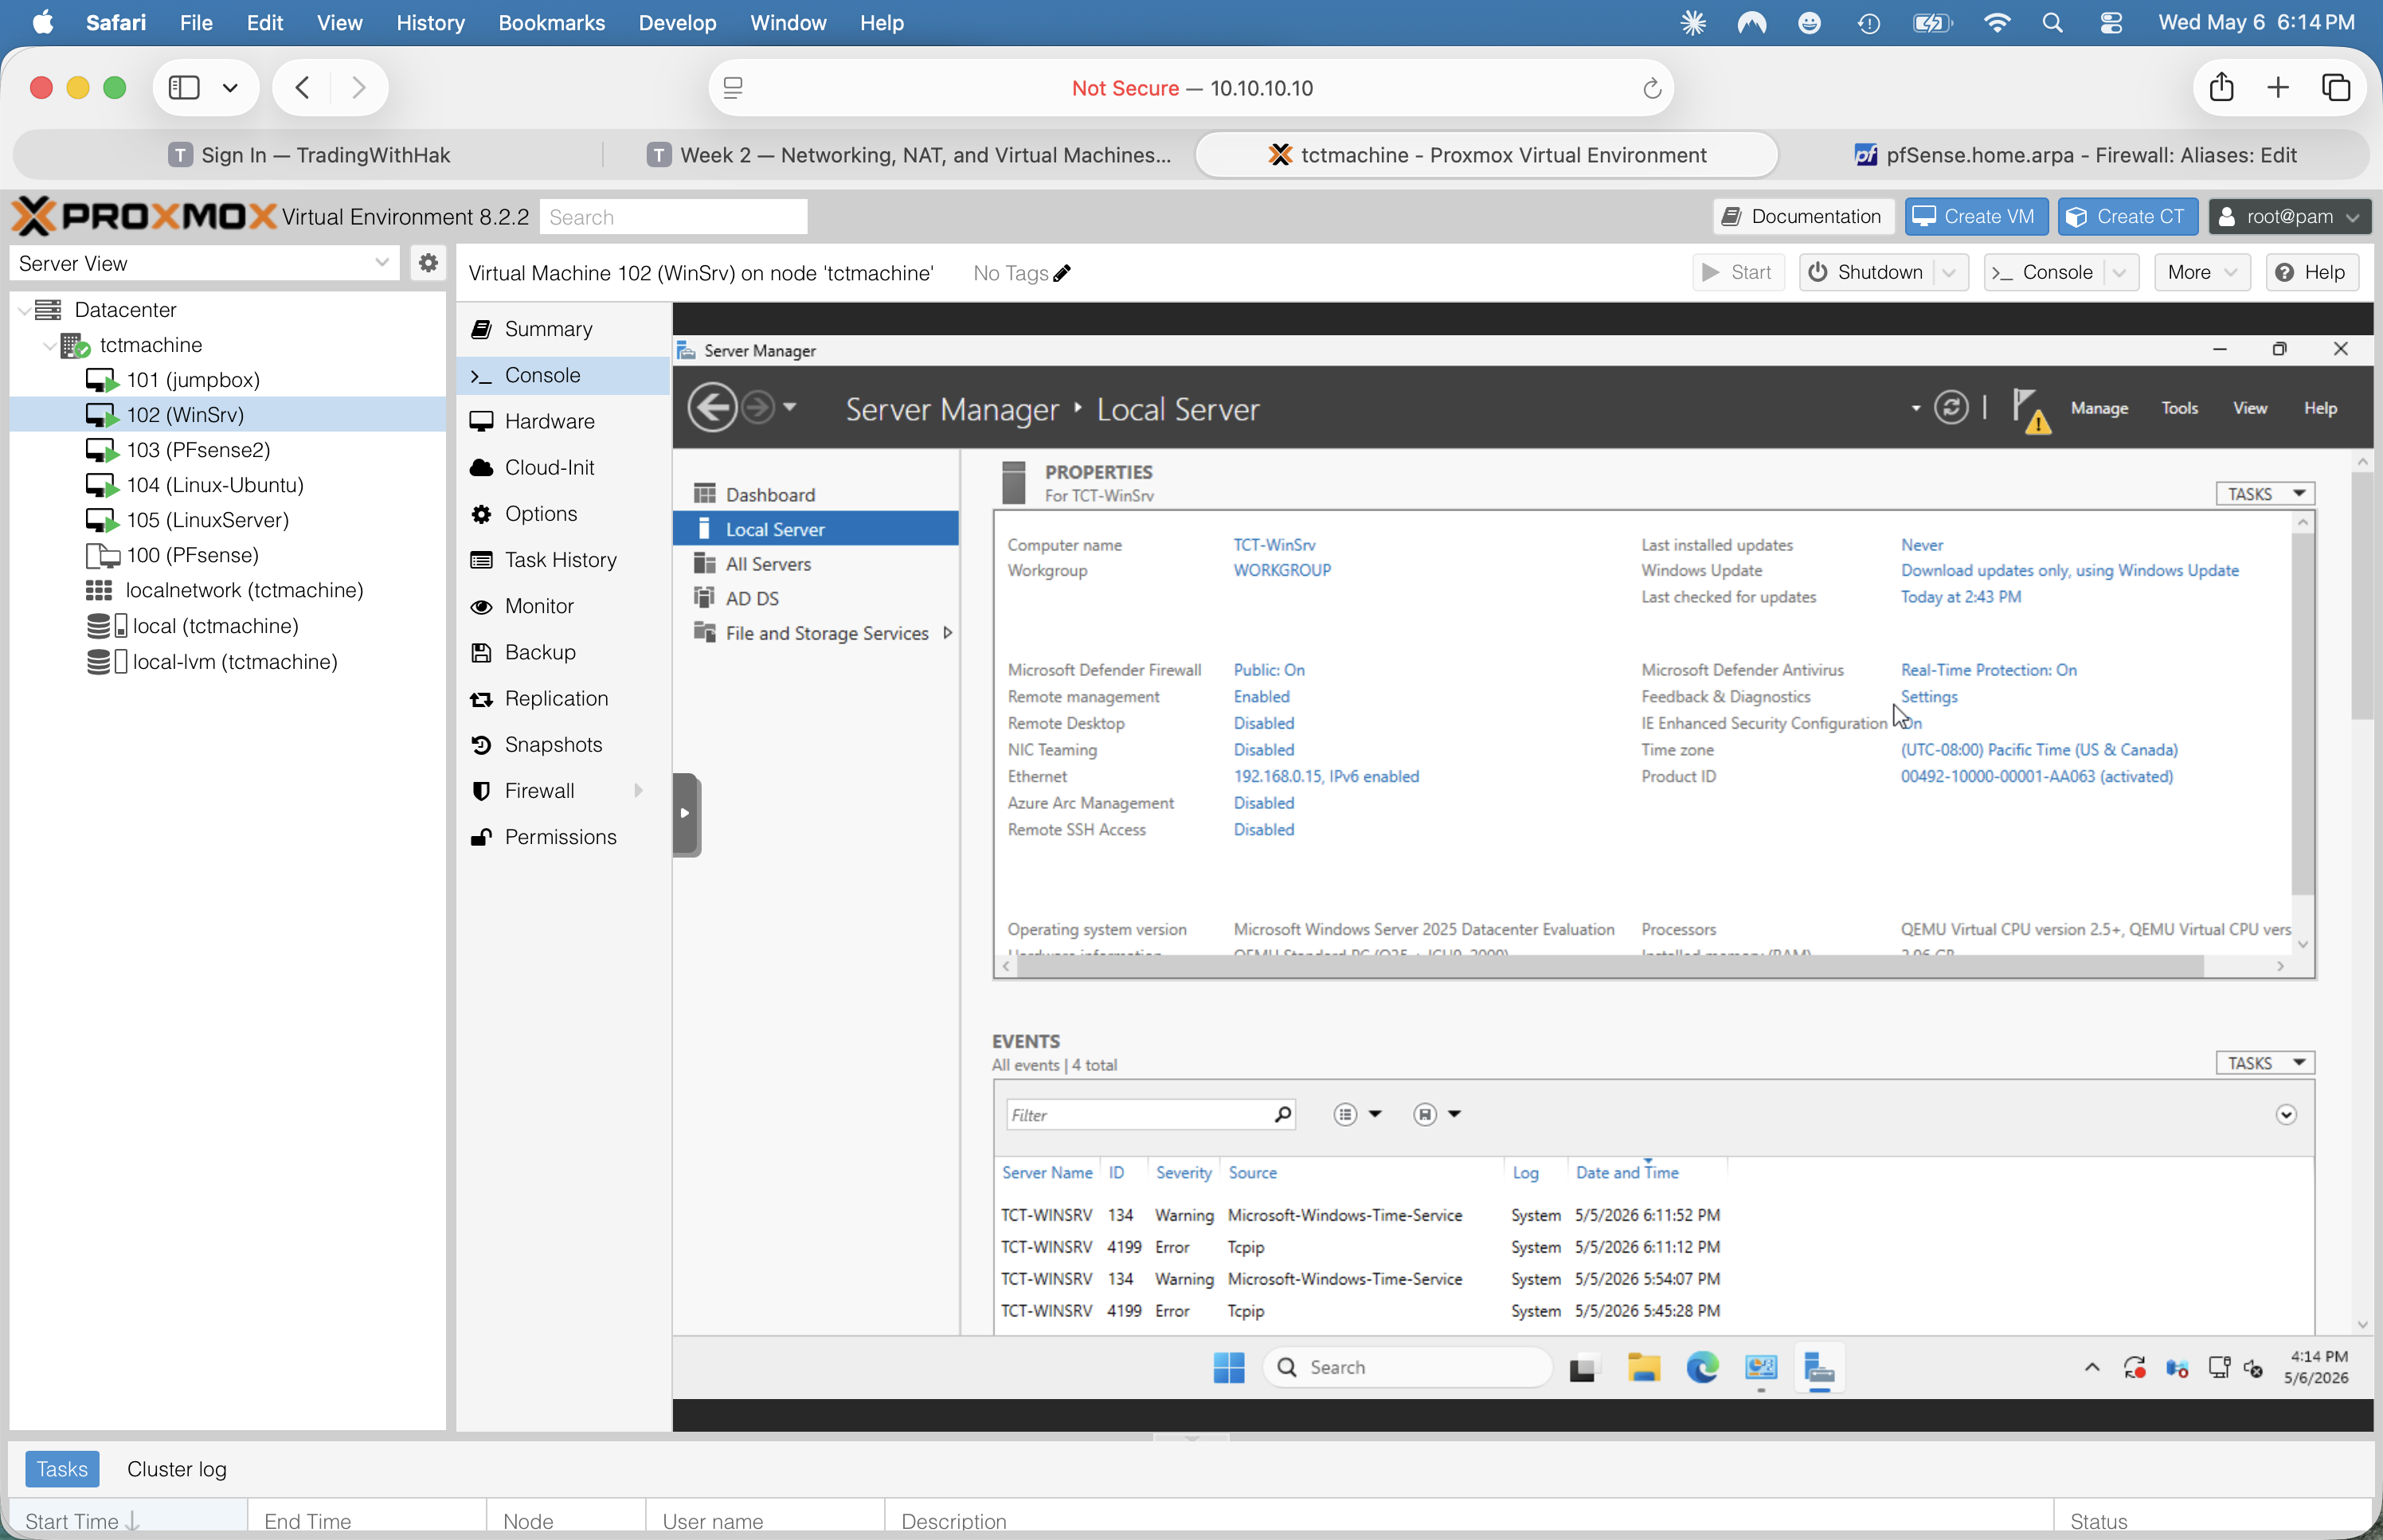
ssh -L 3389:192.168.0.100:3389 root@10.10.10.10 + connect to localhost from Microsoft Remote Desktop).Step 4.2 — Capture Server Manager → Local Server
One-shot view of all server properties
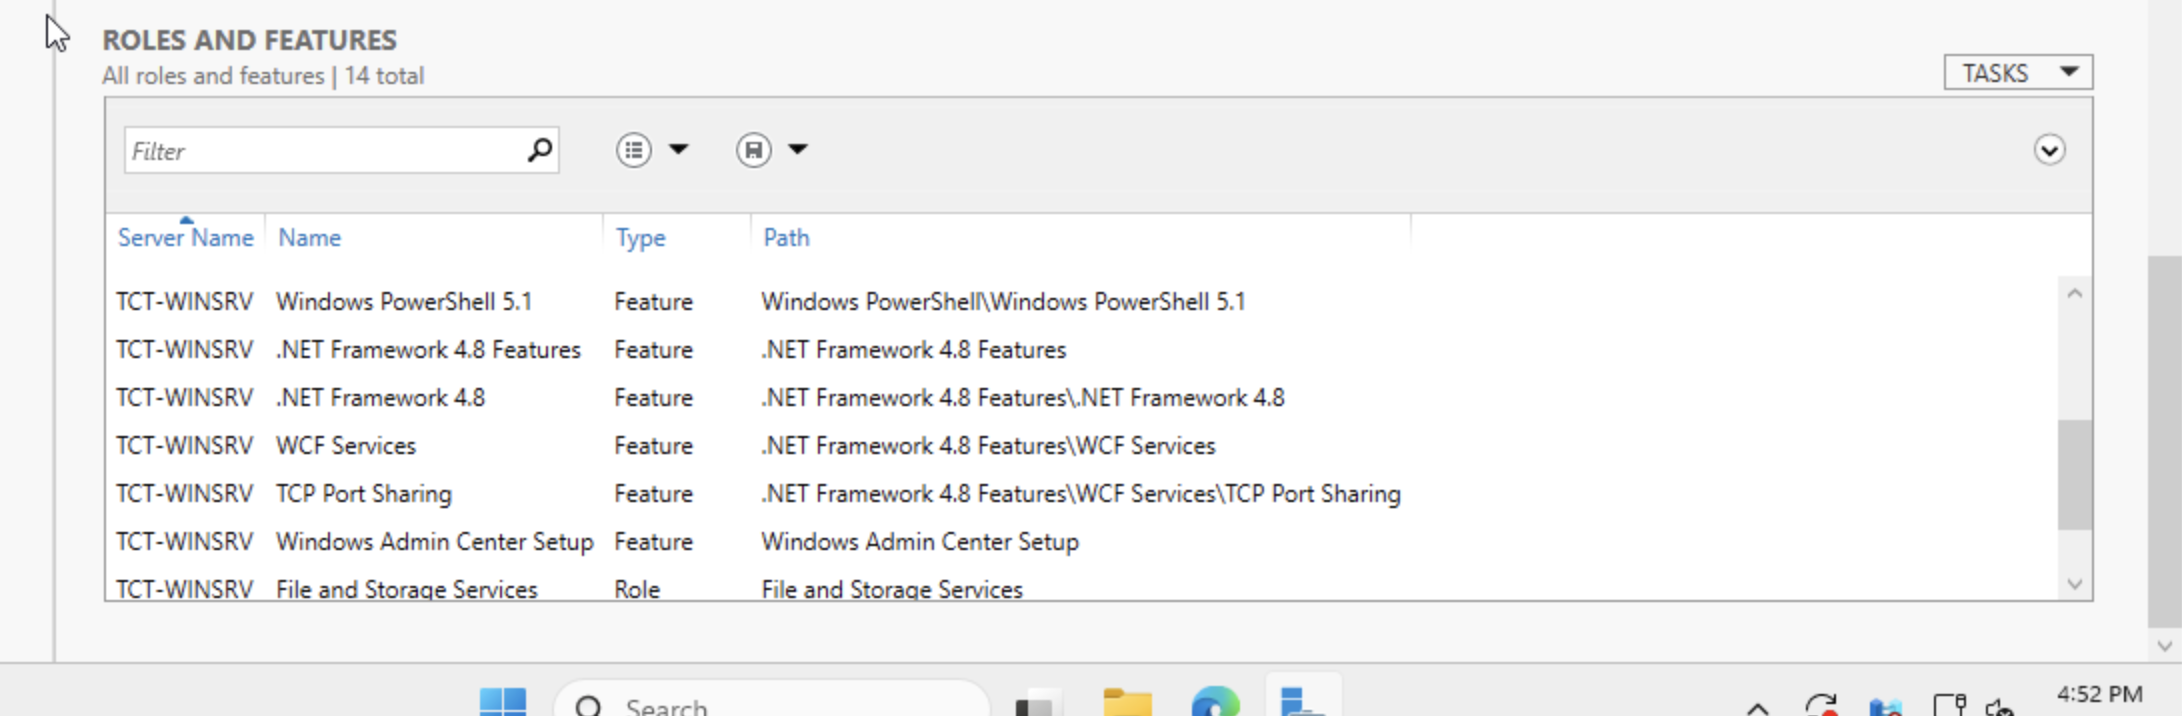
Server Manager → Local Server in the left sidebar. The right pane shows Properties (firewall state, RDP state, time zone, edition, etc.) and at the very bottom the ROLES AND FEATURES panel listing every installed component.
Screenshot the top of Local Server, then scroll down and screenshot the Roles and Features panel.
Step 4.3 — Run ipconfig /all
Authoritative IP/DNS/DHCP info
Press Win key → type cmd → Enter. Then:
ipconfig /all
Screenshot the entire window. Confirms host name, MAC, IPv4, subnet, gateway, DNS servers, DHCP server, lease window — straight from Windows.
Step 4.4 — Capture Settings → System → About
Eval install date and version
Win+I → System → scroll to bottom → About. Records edition, version (24H2), OS build, and most importantly Installed on date. Add 180 days to compute the eval expiration.
Verified state — WinSrv
| Field | Value | Status |
|---|---|---|
| Hostname | TCT-WinSrv | verified |
| Edition | Windows Server 2025 Datacenter Evaluation | eval |
| Version | 24H2 · build 10.0.26100.32230 | current |
| Installed on | 2026-04-27 | eval expires ~2026-10-24 |
| Memory | 4.00 GB allocated, ~3.96 GB usable | verified |
| Processor | QEMU Virtual CPU 2.5+ @ 2.49 GHz · 2 vCPU (2 sockets × 1 core) | verified |
| NIC | Intel(R) PRO/1000 MT (e1000) · MAC BC-24-11-D7-70-2D on vmbr2 with Proxmox firewall enabled | verified |
| IPv4 | 192.168.0.15/24 · static (changed from DHCP .100 on 2026-05-05 evening) — team chose .15 instead of lab-guide's .10 | static · verified |
| Subnet / Gateway / DNS | 255.255.255.0 / 192.168.0.1 / 192.168.0.1 | verified |
| DNS suffix | home.arpa (inherited from pfSense default) | change before AD |
| Time zone | (UTC−08:00) Pacific Time | WRONG · should be Central |
| Microsoft Defender Firewall | Public profile: On | on |
| Microsoft Defender Antivirus | Real-Time Protection: On | on |
| Remote Management | Enabled | on |
| Remote Desktop | Disabled | enable for RDP |
| Roles installed | 1 — File and Storage Services (default) | AD/DNS/DHCP/IIS pending |
| Features installed | 13 — baseline only (PowerShell, .NET 4.8, Defender AV, etc.) | fresh OS baseline |
| Pending Windows Updates | "Attention needed" banner shown | run before AD install |
Findings — WinSrv
✓ Network reachable, DHCP healthy
IP/DNS/Gateway all consistent with pfSense2's lease record. Lease renews automatically.
🔴 Time zone is Pacific, not Central
You're in Austin TX. Kerberos/AD authentication requires accurate time. Fix before AD install: Settings → Time & language → Date & time → Time zone → (UTC−06:00) Central Time.
⚠ DHCP IP must go static for AD-DS
✅ DONE 2026-05-05 evening: WinSrv moved to static 192.168.0.15/24, gateway 192.168.0.1, DNS 192.168.0.1. Team chose .15 over the lab-guide's .10 — both work; .15 is still outside the DHCP pool .100–.200. Original DHCP lease on .100 still showing as offline in pfSense — clean up at Status → DHCP Leases.
⚠ DNS suffix is home.arpa
RFC 8375 reserves this for residential networks; not appropriate for an AD domain. Plan: rename pfSense system domain (System → General Setup) to capstone.local, then promote WinSrv with that domain.
ℹ Eval expires ~2026-10-24
180 days from 2026-04-27. ~172 days remaining as of capture. Capstone ends well before. If you ever need more, run slmgr /rearm (admin) — extends eval by 60 days, up to 5 times.
ℹ Windows Update attention
Pending updates flagged on the Settings home screen. Run them before AD-DS install — DC promotion fails on certain unpatched builds.
ℹ DNS Client warning event 1014
One Warning in the System log (5/4/2026 6:11 PM, source Microsoft-Windows-DNS Client Events). Typically a transient DNS lookup timeout. Re-test after services are installed; ignore if non-recurring.
Screenshots
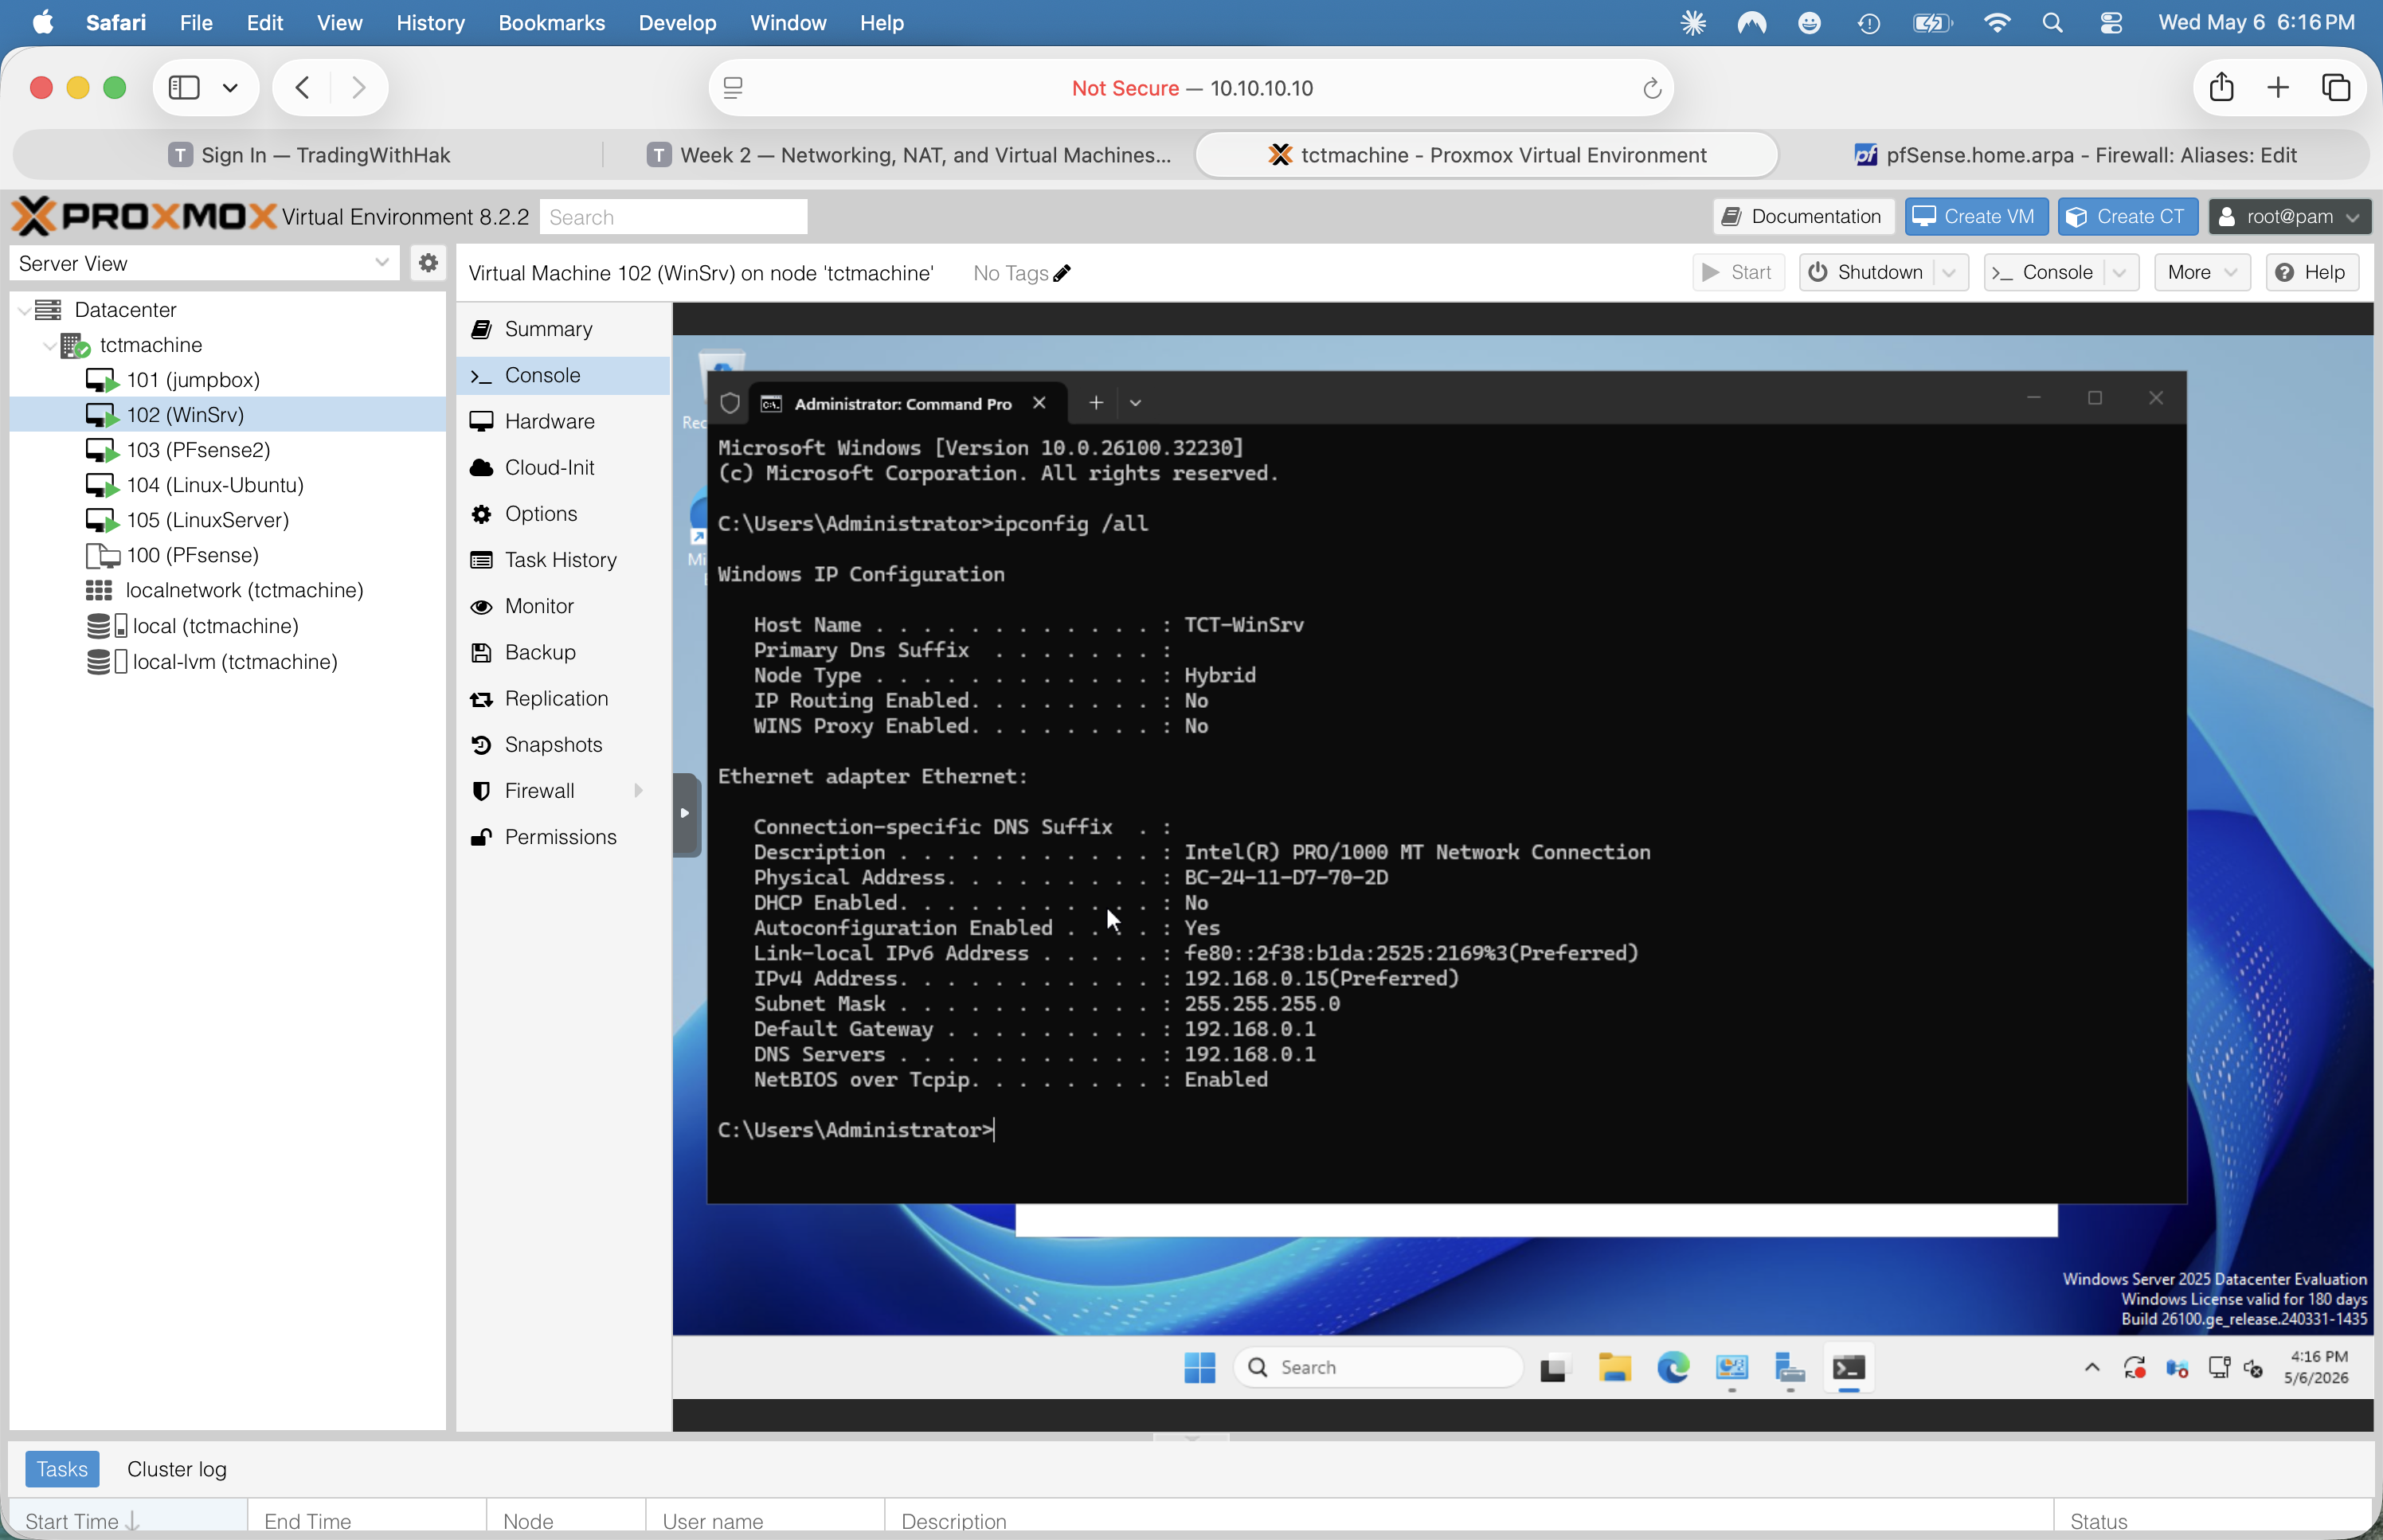
ipconfig /all · static 192.168.0.15(Preferred) · DHCP Enabled: No · gateway + DNS = pfSense.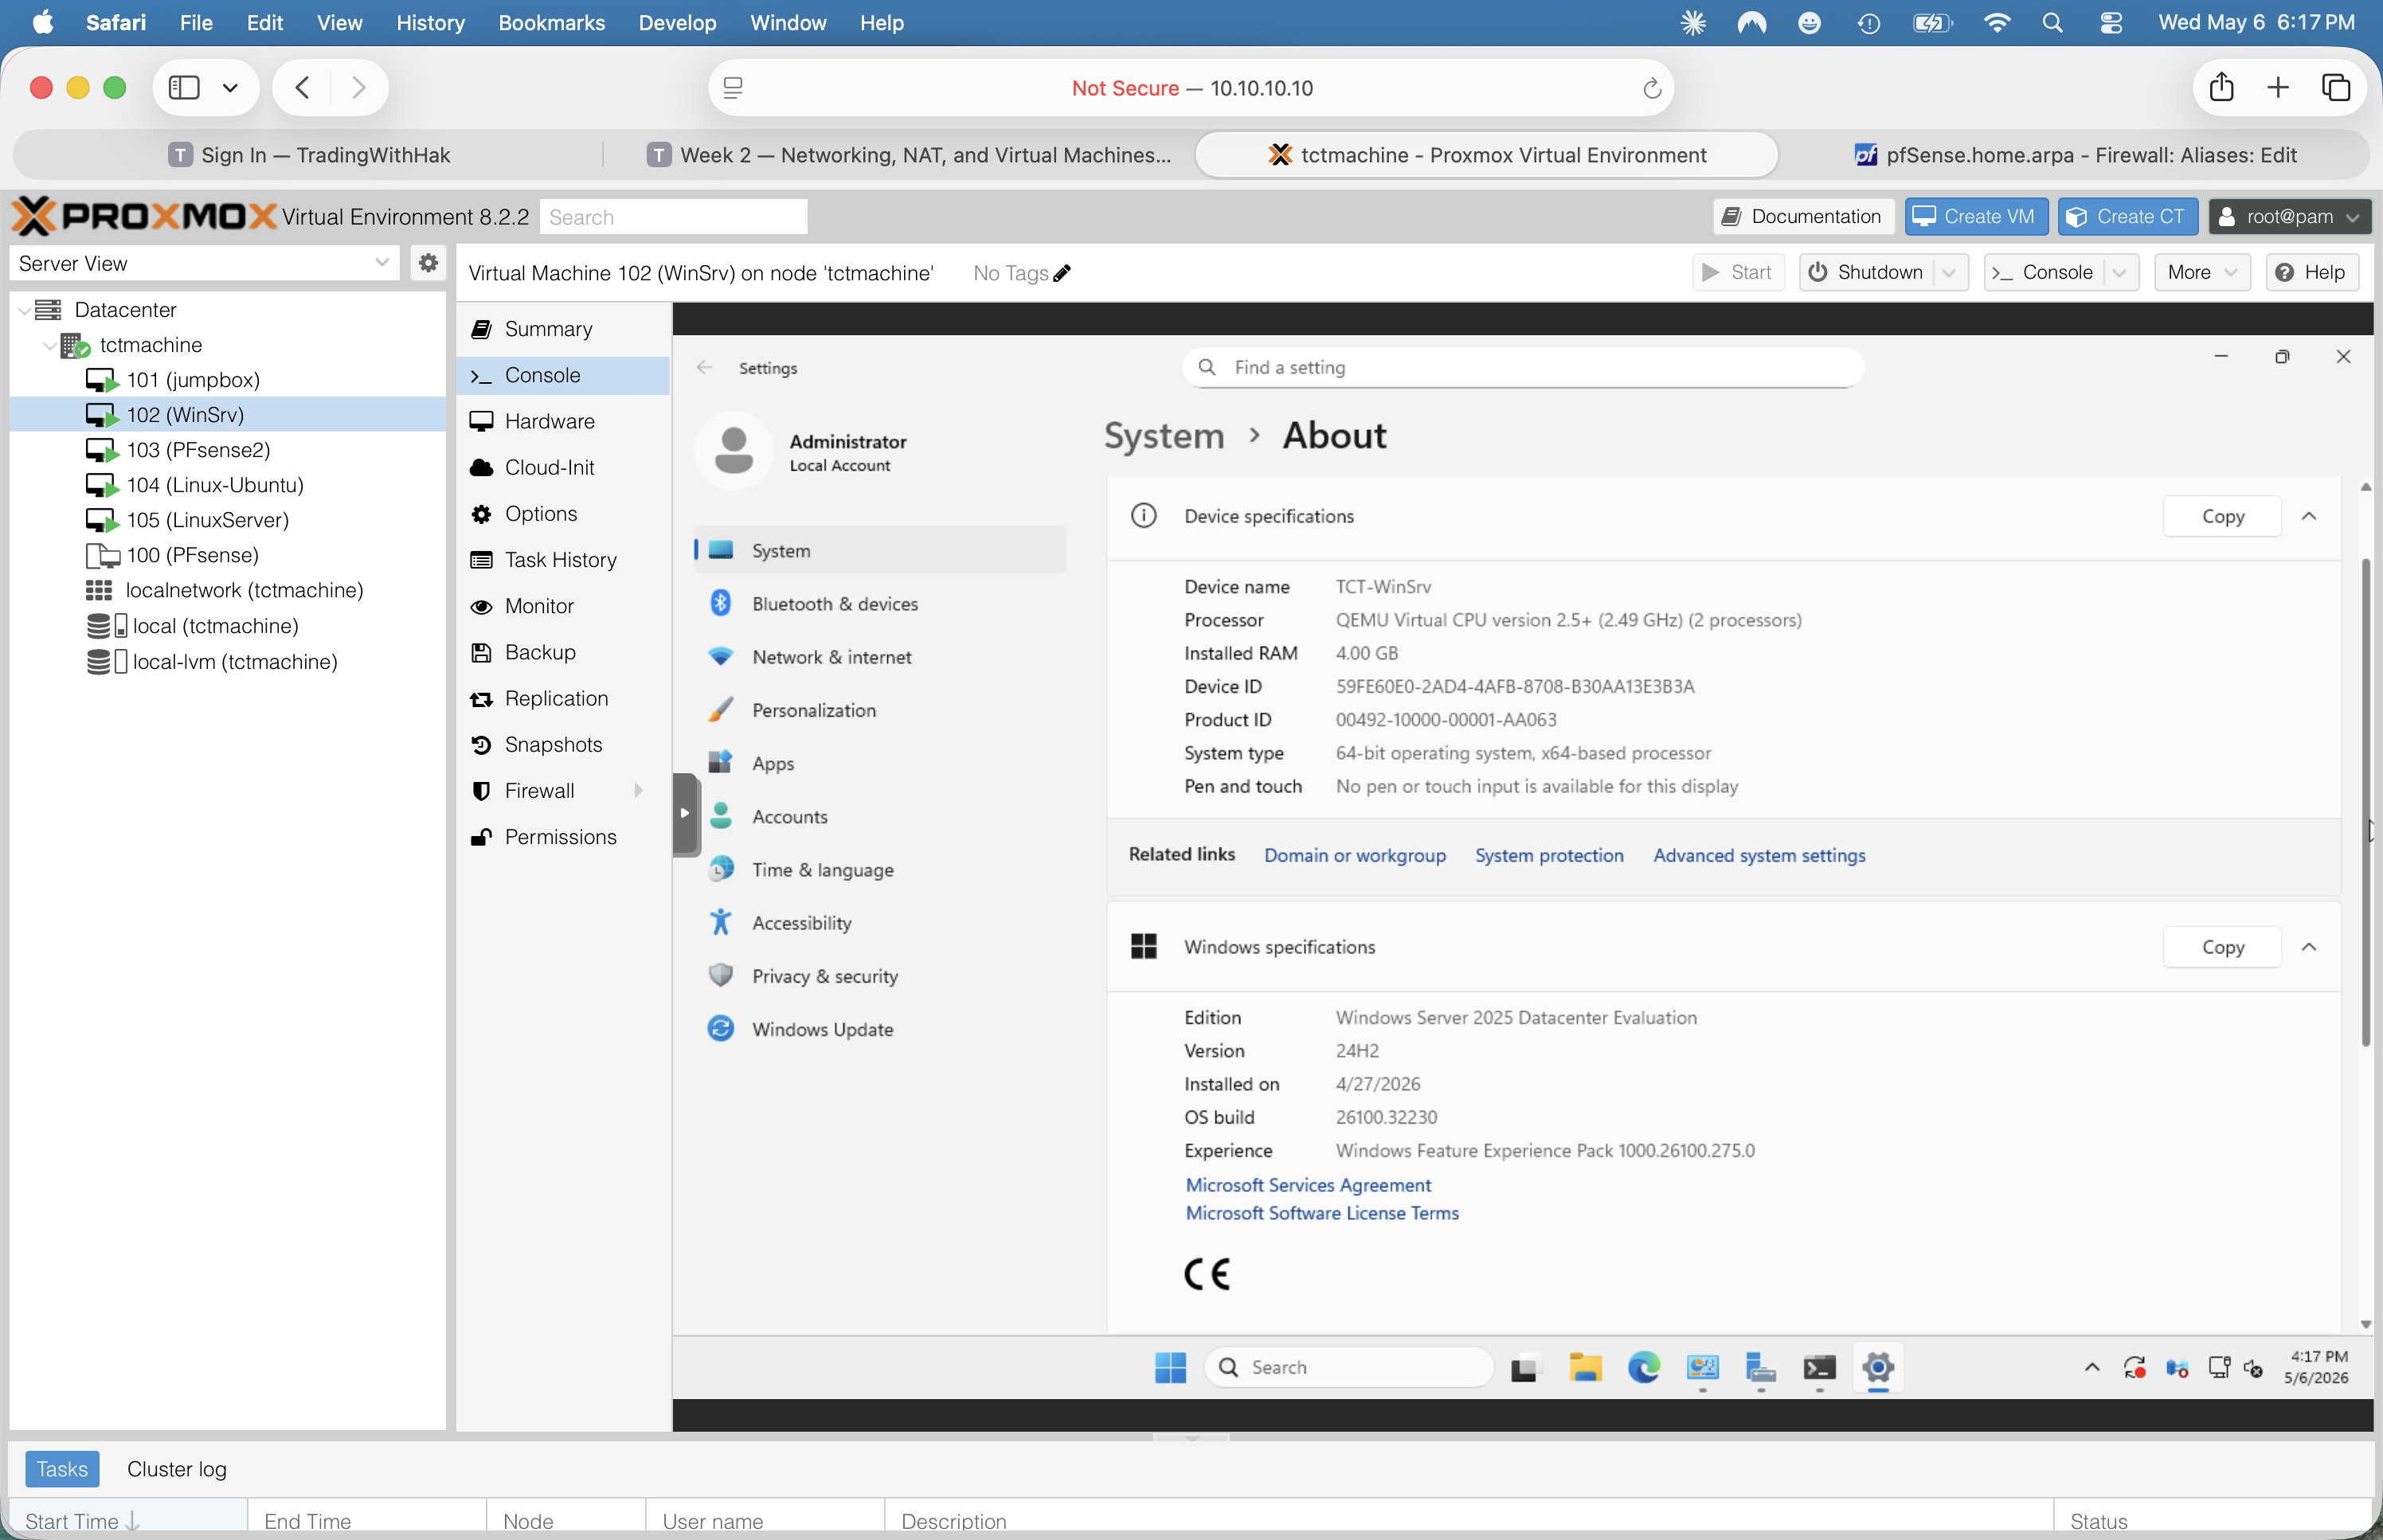

Phase 5 — LinuxServer (VM 105)
Install in progressStatus as of 2026-05-05 evening: VM 105 created and Ubuntu Server install actively running. Sibling VM 104 (Ubuntu 24.04 Desktop) stays in the build as the Linux GUI client workstation — see "Sibling — VM 104" section below for the install plan.
Why a new VM (105) instead of VM 104
ubuntu-24.04.4-desktop-amd64.iso — Desktop edition) and never booted. Rather than swap the ISO and risk inheriting half-configured settings, we created a clean VM 105 with the Server ISO. VM 104 stays in inventory for now as a sandbox / clean-up candidate (see to-do).VM 105 build settings (target spec)
| Setting | Value |
|---|---|
| VMID / Name | 105 / LinuxServer |
| OS | Ubuntu Server (24.04 LTS or 26.04 LTS — confirm post-install) |
| Hardware | 2 vCPU · 2 GB RAM · ~32 GB disk · BIOS (SeaBIOS), Q35 or i440fx |
| NIC | virtio · MAC BC:24:11:68:E3:09 on vmbr2 (LAN side) |
| Static IP | 192.168.0.20/24 (set during installer · outside DHCP pool .100–.200) |
| Gateway | 192.168.0.1 (pfSense2 LAN) |
| DNS | 192.168.0.1 (pfSense2 Unbound) |
| Search domains | (empty — set when AD domain is chosen) |
| Storage | Use entire disk + LVM (default) |
| SSH | OpenSSH server installed during setup ✓ |
| Snaps | None (services installed manually for the lab) |
Step 5.1 — Detach the install ISO before first reboot
Prevent the VM from rebooting back into the installer
While the installer is still running its curtin install phase (or right after, before clicking Reboot Now):
- Proxmox UI → click VM 105 (LinuxServer) → left tab
Hardware - Find the row
CD/DVD Drive (ide2)with the Ubuntu ISO - Double-click → change "ISO image" to Do not use any media → OK
That ensures the next boot goes to scsi0 (the freshly installed disk) instead of looping back into the installer.
Step 5.2 — First-boot login + verification block
Sanity-check the install
After reboot, log in at the console with the username/password set during install. Then paste:
echo "=== LINUXSERVER (VM 105) ==="
hostnamectl
echo
echo "--- network ---"
ip -br addr
ip route
resolvectl status | grep -E "DNS Servers|Current DNS|Link "
echo
echo "--- internet test (proves NAT through pfSense2) ---"
ping -c 2 192.168.0.1
ping -c 2 1.1.1.1
ping -c 2 google.com
echo
echo "--- SSH service ---"
sudo systemctl is-active ssh
sudo systemctl is-enabled ssh
sudo ss -tlnp | grep ssh
echo
echo "--- OS version ---"
lsb_release -a 2>/dev/null
uname -r
Expected: 192.168.0.20/24 on ens18, default route via 192.168.0.1, all three pings succeed, sshd active+enabled+listening on :22.
Step 5.3 — SSH from jumpbox (proves cross-subnet routing)
The realistic admin workflow
From the jumpbox, SSH to the LinuxServer via its LAN IP:
ssh <your-username>@192.168.0.20
This proves pfSense2's firewall is allowing DMZ (172.16.0.0/24) → LAN (192.168.0.0/24) on port 22. If it fails with "Connection timed out", the issue is pfSense's firewall rules — Firewall → Rules → DMZ — by default pfSense allows DMZ-net traffic out, but if you've tightened the rules, you may need an explicit "DMZ → LAN port 22 ALLOW".
Step 5.4 — Snapshot before installing services
Insurance for the rest of Week 2
Before NGINX/MariaDB/syslog/etc., take a Proxmox snapshot so you can roll back cleanly if anything breaks:
- Proxmox UI → VM 105 → left tab
Snapshots→ Take Snapshot - Name:
fresh-install - Description: "Ubuntu Server installed, static IP set, SSH up. No services yet."
- ✓ Include RAM = unchecked (the VM is in a known stable state, no need)
- Click Take Snapshot
Step 5.5 — Service install plan (Week 2 deliverables)
Roles per the lab guide
- System update first —
sudo apt update && sudo apt upgrade -y - NGINX —
sudo apt install -y nginx· place a customindex.htmlin/var/www/html/· test from WinSrv:curl http://192.168.0.20 - MariaDB —
sudo apt install -y mariadb-server· runsudo mysql_secure_installation· create test databasecapstoneDB - NTP — already handled by
systemd-timesyncdon Ubuntu Server; verify withtimedatectl. Optional: installchronyif a stricter NTP daemon is required. - rsyslog forwarder (Week 3 prep) — edit
/etc/rsyslog.confto forward to a central collector when one exists - UFW —
sudo ufw allow 22·sudo ufw allow 80·sudo ufw allow 443·sudo ufw enable(mirrors jumpbox UFW posture)
Verified state — LinuxServer (post-install — to be filled)
| Field | Target value | Status |
|---|---|---|
| VMID / Display name | 105 / LinuxServer | created |
| OS | Ubuntu Server (LTS) — confirm version post-install | installing |
| Hostname (in OS) | To confirm via hostnamectl | pending |
| Interface | ens18 on vmbr2 · MAC BC:24:11:68:E3:09 | verified |
| IPv4 | 192.168.0.20/24 static (set in installer) | verify post-boot |
| Gateway | 192.168.0.1 | verify post-boot |
| DNS | 192.168.0.1 | verify post-boot |
| Internet reachability | ping google.com + ping 1.1.1.1 | verify post-boot |
| SSH service | active + enabled (port 22) | verify post-boot |
| UFW | not yet configured (Step 5.5 #6) | to do |
| Services installed | NGINX · MariaDB · NTP (post-snapshot) | future |
Sibling — VM 104 (Linux-Ubuntu Desktop · client workstation)
VM 104 keeps its Ubuntu Desktop ISO mount and gets installed as a Linux GUI client on the LAN. It's the "user perspective" tester — open Firefox, browse to http://192.168.0.20 (NGINX) and http://192.168.0.15 (IIS once installed) to validate the services from a real desktop session, not just curl. Also good for verifying DNS/DHCP behavior visually.
| Field | Value |
|---|---|
| Status | install pending · ISO mounted, never booted yet |
| NIC | virtio · MAC BC:24:11:02:24:2B on vmbr2 (LAN) |
| ISO mounted | ubuntu-24.04.4-desktop-amd64.iso (LTS · GNOME desktop) |
| Target hostname | linuxdesktop (or your team's preferred name) |
| Target IP | 192.168.0.25/24 static · gateway 192.168.0.1 · DNS 192.168.0.1 |
| Gateway / DNS | 192.168.0.1 (pfSense2 LAN) |
| Role in lab | Linux GUI client · web browser tester · DHCP/DNS validation · packet-capture endpoint |
Install plan for VM 104
Same procedure as VM 105, with the GUI option
- Boot VM 104 (already has the Desktop ISO on
ide2) - Walk through the GNOME-style installer · timezone Central · install third-party drivers if prompted
- Set hostname (suggest
linuxdesktop) · pick admin user · enable login automatically (optional, lab-only) - After install: detach ISO via Hardware tab (same as VM 105 Step 5.1)
- Boot · open Settings → Network → Wired → ⚙ → IPv4 tab → Manual · address
192.168.0.25· netmask255.255.255.0· gateway192.168.0.1· DNS192.168.0.1· Apply - Toggle the switch off+on to apply, then test: open Firefox →
http://192.168.0.20(NGINX welcome page once installed) - Optional: install
openssh-serverfor remote testing —sudo apt install -y openssh-server
Screenshots
ens18 static 192.168.0.20/24, gateway 192.168.0.1, DNS 192.168.0.1 after Save.curtin partition + LVM + extract steps. Confirms install actually ran.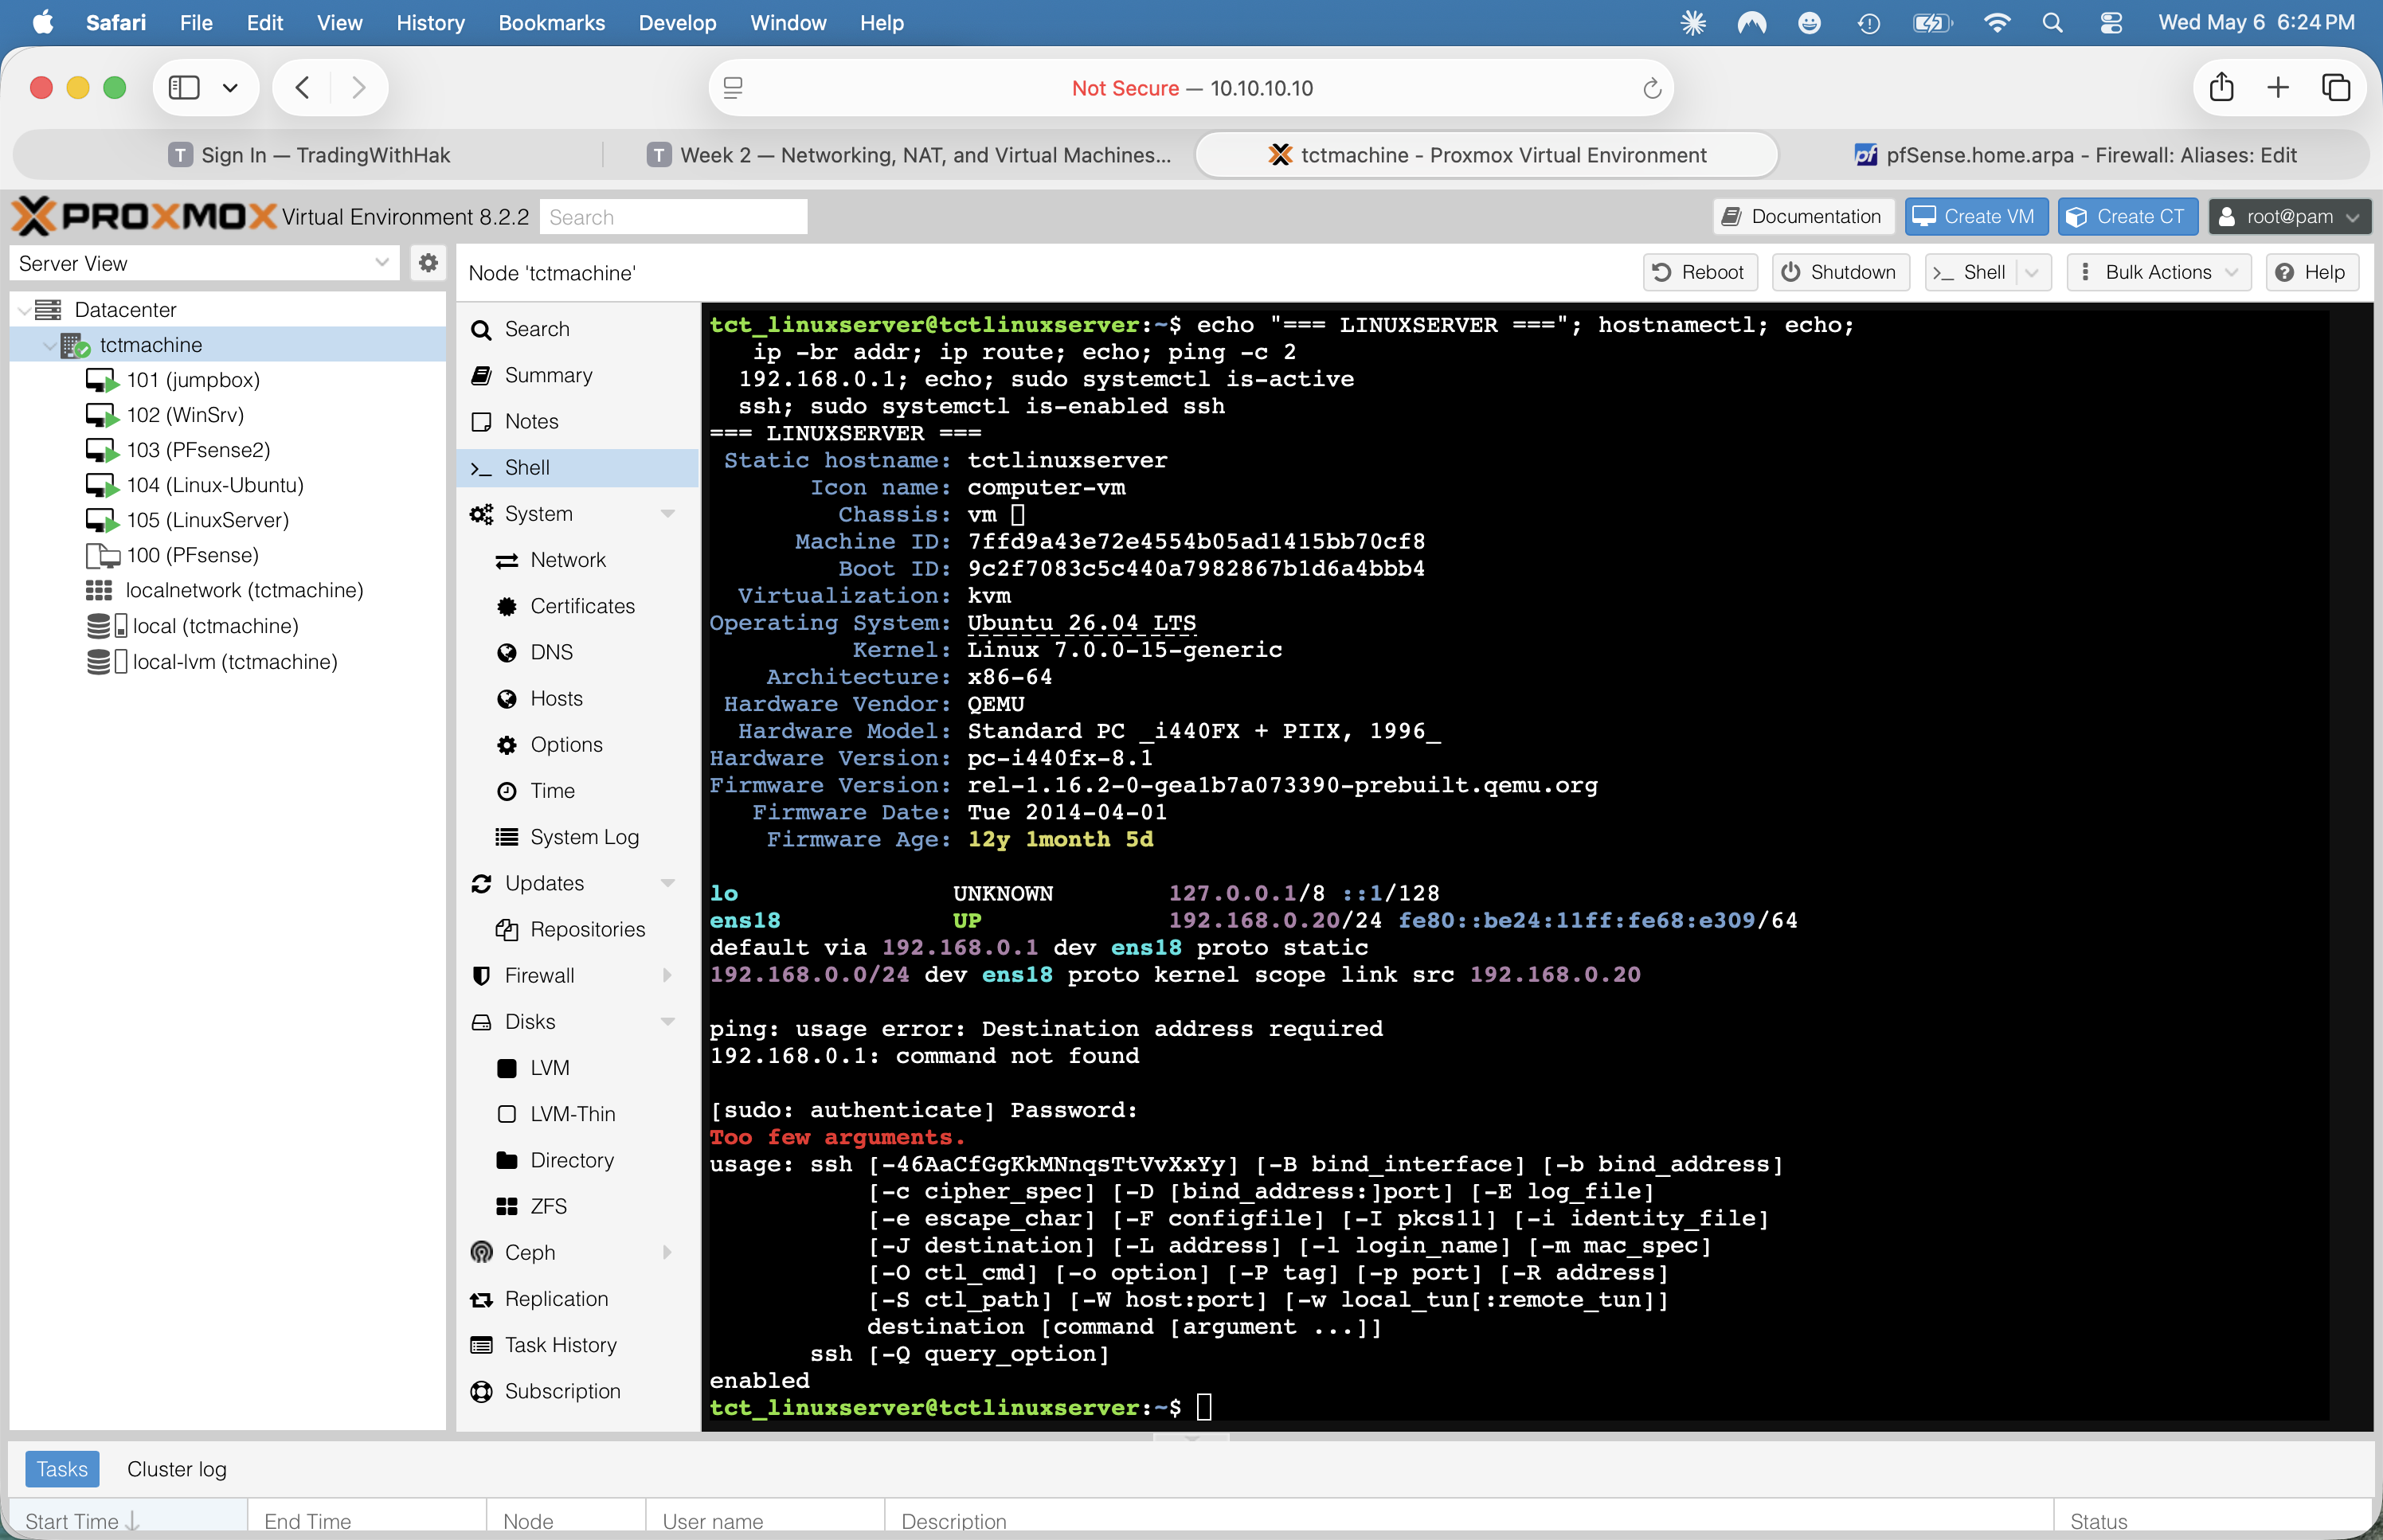
tctlinuxserver, Ubuntu 26.04, static 192.168.0.20, gateway via pfSense, sshd active. Captured 2026-05-06.Verified state — entire build snapshot
One-page reference for status meeting / instructor demo / Week 2 report appendix.
| VMID | Name | State | Role | OS | IP | Bridge | Notes |
|---|---|---|---|---|---|---|---|
| — | tctmachine (host) | running | Hypervisor | PVE 8.2.2 | 10.10.10.10/16 | eno1→vmbr0 | + vmbr1 .10/24, vmbr2 .10/24 |
| 100 | PFsense | template | Clone source | pfSense CE 2.8.1 | n/a | vmbr0/1/2 | template:1 — base disk for VM 103 |
| 101 | jumpbox | running | SSH gateway · DMZ entry | Ubuntu 26.04 LTS | 172.16.0.100 (DHCP) | vmbr1 | UFW on, SSH active, internet OK |
| 102 | WinSrv | running, fresh OS | (future) AD/DNS/DHCP/IIS | Win Srv 2025 Datacenter Eval (24H2) | 192.168.0.15 (static) | vmbr2 | Eval expires ~2026-10-24 · TZ Pacific (fix) |
| 103 | PFsense2 | running | Router · DHCP · DNS · firewall | pfSense CE 2.8.1 | WAN 10.10.110.10 · DMZ 172.16.0.1 · LAN 192.168.0.1 | vmbr0/1/2 | Default admin password 🚨 |
| 104 | Linux-Ubuntu | running · install state TBD | Linux GUI client · web/DHCP/DNS tester | Ubuntu 24.04 LTS Desktop | 192.168.0.25 (static · planned) | vmbr2 | MAC BC:24:11:02:24:2B · booted 2026-05-06 (per Fig 01) |
| 105 | LinuxServer | running, fresh OS | NGINX · MariaDB · NTP · Syslog (Week 2) | Ubuntu Server 26.04 LTS | 192.168.0.20 (static) | vmbr2 | MAC BC:24:11:68:E3:09 · hostname tctlinuxserver |
Topology lock-in
pfSense2 (VM 103) is the canonical router. It does NAT (Automatic mode), DHCP for both internal subnets, and DNS resolution (Unbound + DNSSEC). The Proxmox host's iptables rules are vestigial. If we later switch to host-iptables NAT (per the new instructor guide), we'll need to (a) remove the broken 10.10.110.10/32 MASQUERADE, (b) add 172.16.0.0/24 + 192.168.0.0/24 MASQUERADE rules, (c) point internal VMs at 172.16.0.10 / 192.168.0.10 as their gateway instead of pfSense2's .1 addresses.
Outstanding tasks (the punch list)
Ordered by urgency. Fix top items before any service work.
🚨 Critical — fix tonight
- Change pfSense2 admin password. System → User Manager → admin → set strong password. Default
pfsenseis exposed on10.10.0.0/16.
⚠ High — fix this week
- Finish VM 105 install + verify — detach ISO, let it reboot, run Step 5.2 verification block, confirm static
192.168.0.20took effect, take "fresh-install" snapshot. - SSH from jumpbox to VM 105 — proves DMZ → LAN port-22 firewall path works.
- Install Week 2 services on VM 105 — NGINX, MariaDB, NTP, UFW (per Phase 5 Step 5.5).
- Set WinSrv time zone to Central (Settings → Time & language → Time zone → UTC−06:00). Required for AD/Kerberos.
Move WinSrv to static IP before installing AD-DS— DONE 2026-05-05: WinSrv now at192.168.0.15/24static.- Run pending Windows Updates on WinSrv. AD-DS promotion fails on certain unpatched builds.
- Choose AD domain name (e.g.,
capstone.local) and update pfSense's system domain (System → General Setup) before promoting WinSrv. Don't reusehome.arpa. - Rename jumpbox hostname from
tctmachinetojumpbox(sudo hostnamectl set-hostname jumpbox) to avoid confusion with Proxmox host. - Harden jumpbox SSH per Lab Guide Part 7 step 3: change port, disable root login, disable password auth (after key auth),
AllowUsers tct_jumpbox,MaxAuthTries 3.
ℹ Medium — Week 3 cleanup
- Install Ubuntu Desktop on VM 104 as the LAN client workstation · static
192.168.0.25· use Firefox to validate IIS + NGINX from a GUI session. - Decide topology: keep pfSense2-routed (current) or switch to host-iptables (canonical). Document the decision.
- Delete or document the broken
10.10.110.10/32MASQUERADE on the host. - Rename pfSense interface labels from "lan/opt1" to "DMZ/LAN" in Interfaces → Assignments.
- Rename pfSense hostname from
pfSense.home.arpato something likepfsense2.capstone.local. - Convert jumpbox + WinSrv from DHCP to static (or DHCP static-mappings) for stability.
- Deduplicate
net.ipv4.ip_forward=1in/etc/sysctl.confand/etc/sysctl.d/99-sysctl.conf(each appears twice). - Plan ISC-DHCP → Kea migration in pfSense (Week 5 doc note).
✓ Done
- Hardware discovery + RAID 5 build (Week 1)
- Proxmox VE 8.2.2 install on RAID 5
- vmbr0/1/2 created with correct IP scheme
- 5 VMs created; 3 running stably (jumpbox, WinSrv, pfSense2)
- pfSense2 routing/NAT/DHCP/DNS for both internal subnets
- Jumpbox UFW configured per Part 7 step 4
- Outbound internet from internal subnets verified
Screenshot index
25 screenshots planned for full Week 2 documentation (added 3 for VM 105 build, 2 for the LAN-firewall finding, 1 for IP aliases). 21 captured (Fig 01, 02, 03, 04, 06, 07, 09, 10, 11, 12, 13, 14, 14a, 14b, 14c, 15, 16, 17, 18, 19, 22) · 4 pending. Remaining: Fig 05 (SSH login prompt), Fig 08 (pfSense console main menu), Fig 20–21 (VM 105 installer recaptures, optional), Fig 23–25 (VM 104 once installed).
| Fig | Filename | Description | Status |
|---|---|---|---|
| 01 | 01-host-overview.png | Host shell · pveversion + qm list (all 6 VMs) | captured |
| 02 | 02-host-vm-configs.png | Host shell · qm config 100 (template) + 101 (jumpbox) | captured |
| 03 | 03-host-iptables.png | Host shell · live iptables nat table (MASQUERADE rule) | captured |
| 04 | 04-jumpbox-arp.png | Host shell · ip neigh show dev vmbr1 | captured |
| 05 | 05-jumpbox-ssh-prompt.png | SSH from host → jumpbox prompt | pending |
| 06 | 06-jumpbox-internet-test.png | Jumpbox · ping google.com + 1.1.1.1 | captured |
| 07 | 07-jumpbox-network-and-ufw.png | Jumpbox · hostnamectl + ip + ping success | captured |
| 08 | 08-pfsense-console-menu.png | pfSense2 console main menu (interface IPs) | pending |
| 09 | 09-pfsense-dashboard.png | pfSense2 web UI · Status → Dashboard | captured |
| 10 | 10-pfsense-dhcp-dmz.png | pfSense2 · DHCP Server DMZ tab | captured |
| 11 | 11-pfsense-dhcp-lan.png | pfSense2 · DHCP Server LAN tab | captured |
| 12 | 12-pfsense-dns-resolver.png | pfSense2 · DNS Resolver General Settings | captured |
| 13 | 13-pfsense-nat-outbound.png | pfSense2 · Firewall → NAT → Outbound (+ password warning) | captured |
| 14 | 14-pfsense-dhcp-leases.png | pfSense2 · Status → DHCP Leases (active leases) | captured |
| 14a | 14a-pfsense-rules-lan.png | pfSense2 · Firewall → Rules → LAN (9-rule hardened set) | captured |
| 14b | 14b-pfsense-alias-outbound-web.png | pfSense2 · OUTBOUND_WEB alias = {80, 443, 53, 123} | captured |
| 14c | 14c-pfsense-aliases-ip.png | pfSense2 · IP aliases (DMZ_NET, LAN_NET, RFC1918, host aliases) | captured |
| 15 | 15-winsrv-server-manager.png | WinSrv · Server Manager Local Server | captured |
| 16 | 16-winsrv-ipconfig.png | WinSrv · ipconfig /all output (static .15 verified) | captured |
| 17 | 17-winsrv-about.png | WinSrv · Settings → System → About | captured |
| 18 | 18-winsrv-roles-pt1.png | WinSrv · Roles and Features (1/2) | captured |
| 19 | 19-winsrv-roles-pt2.png | WinSrv · Roles and Features (2/2) | captured |
| 20 | 20-linuxserver-installer-network.png | VM 105 installer · static network configured | pending |
| 21 | 21-linuxserver-installing.png | VM 105 installer · curtin install in progress | pending |
| 22 | 22-linuxserver-firstboot-verify.png | VM 105 first-boot network + service verification | captured |
Cmd+Shift+4 to capture a region, the file is staged in /var/folders/.../TemporaryItems/ first, then dropped on the Desktop. If you drag the floating thumbnail directly into Claude before it lands on Desktop, the file is never saved — that's why most of our originals are gone. To make sure files persist: let the thumbnail settle, then drag from the Desktop file (or use Cmd+Shift+5 → Options → "Save to: Desktop").